【Code】关于 GCN,我有三种写法
本篇文章主要基于 DGL 框架用三种不同的方式来实现图卷积神经网络。手机看可能不太方便,可以点击阅读原文,移步到知乎上看(但是我忘了加 = =)。
1. DGL
DGL(Deep Graph Library)框架是由纽约大学和 AWS 工程师共同开发的开源框架,旨在为大家提供一个在图上进行深度学习的工具,帮助大家更高效的实现算法。
用现有的一些框架比如 TensorFlow、Pytorch、MXNet 等实现图神经网络模型都不太方便,同样现有框架实现图神经网络模型的速度不够快。
DGL 框架设计理念主要在于将图神经网络看作是消息传递的过程,每一个节点会发出它自己的消息,也会接收来自其它节点的消息。然后在得到所有信息之后做聚合,计算出节点新的表示。原有的深度学习框架都是进行张量运算,但是图很多时候并不能直接表示成一个完整的张量,需要手动补零,这其实很麻烦,不高效。
DGL 是基于现有框架,帮助用户更容易实现图神经网络模型。DGL 现在主要是以消息传递的接口作为核心,同时提供图采样以及批量处理图的接口。
关于 DGL 就不再进行过多介绍,感兴趣的同学可以去官网(http://dgl.ai/)了解。
2. Prepare
import torch
import time
import math
import dgl
import numpy as np
import torch.nn as nn
from dgl.data import citation_graph as citegrh
from dgl import DGLGraph
import dgl.function as fn
import networkx as nx
import torch.nn.functional as F

from dgl.nn import GraphConv
# from dgl.nn.pytorch import GraphConv
# from dgl.nn.pytorch.conv import GraphConv
这里有三种导入方法,建议用第一种,因为 DGL 的开发同学设计了一个机制,会自动 detect 用了什么 beckend,从而适配对应的 backend 的 api。
print(torch.__version__)
print(dgl.__version__)
print(nx.__version__)
1.4.0
0.4.3
2.3
3. GCN
3.1 First version
DGL 的第一种写法是利用 DGL 预定义的图卷积模块 GraphConv 来实现的。
GCN 的数学公式如下:
其中, 为节点的邻居集合, 表示节点度的平方根的乘积,用于归一化数据, 为激活函数
GraphConv 模型参数初始化参考 tkipf 大佬的原始实现,其中 使用 Glorot uniform 统一初始化,并将偏差初始化为零。
简单介绍下 Glorot 均匀分布(uniform)
Glorot 均匀分布,也叫 Xavier 均匀分布,该方法源于 2010 年的一篇论文《Understanding the difficulty of training deep feedforward neural networks》。其核心思想在于:为了使得网络中信息更好的流动,每一层输出的方差应该尽量相等。基于这个目标,权重 W 的方差需要满足 ,我们知道均匀分布的方差为: 。所以我们可以初始化 W 为 Xavier 均匀分布: (具体证明见论文)
class GCN(nn.Module):
    def __init__(self,
                 g,
                 in_feats,
                 n_hidden,
                 n_classes,
                 n_layers,
                 activation,
                 dropout):
        super(GCN, self).__init__()
        self.g = g
        self.layers = nn.ModuleList()
        # input layer
        self.layers.append(GraphConv(in_feats, n_hidden, activation=activation))
        # output layer
        for i in range(n_layers - 1):
            self.layers.append(GraphConv(n_hidden, n_hidden, activation=activation))
        # output layer
        self.layers.append(GraphConv(n_hidden, n_classes))
        self.dropout = nn.Dropout(p=dropout)

    def forward(self, features):
        h = features
        for i, layers in enumerate(self.layers):
            if i!=0:
                h = self.dropout(h)
            h = layers(self.g, h)
        return h
3.2 Second version
3.2.1 ndata
DGL 的第二种写法:使用用户自定义的 Message 和 Reduce 函数
ndata 是 DGL 的一个特殊的语法,可以用于赋值(获得)某些节点的特征:
x = tourch.randn(10, 3)
g.ndata['x'] = x
如果指定某些节点的特征,可以进行切片操作:
g.ndata['x'][0] = th.zeros(1, 3)
g.ndata['x'][[0, 1, 2]] = th.zeros(3, 3)
g.ndata['x'][th.tensor([0, 1, 2])] = th.randn((3, 3))
当然也可以获得边的特征:
g.edata['w'] = th.randn(9, 2)

# Access edge set with IDs in integer, list, or integer tensor
g.edata['w'][1] = th.randn(1, 2)
g.edata['w'][[0, 1, 2]] = th.zeros(3, 2)
g.edata['w'][th.tensor([0, 1, 2])] = th.zeros(3, 2)

# You can get the edge ids by giving endpoints, which are useful for accessing the features.
g.edata['w'][g.edge_id(1, 0)] = th.ones(1, 2)                   # edge 1 -> 0
g.edata['w'][g.edge_ids([1, 2, 3], [0, 0, 0])] = th.ones(3, 2)  # edges [1, 2, 3] -> 0
# Use edge broadcasting whenever applicable.
g.edata['w'][g.edge_ids([1, 2, 3], 0)] = th.ones(3, 2)          # edges [1, 2, 3] -> 0
3.2.2 UDFs
在 DGL 中,通过用户自定义的函数(User-defined functions,UDFs)来实现消息传递和节点特征变换。
可以利用 Edge UDFs 来定义一个消息(Message)函数,其功能在于基于边传递消息。具体实现如下:
def gcn_msg(edge):
    msg = edge.src['h'] * edge.src['norm']
    return {'m': msg}
Edge UDFs 需要传入一个 edge 参数,其中 edge 有三个属性:src、dst、data,分别对应源节点特征、目标节点特征和边特征。
我们的 Message 函数,是从源节点向目标节点传递,所以只考虑源节点的特征。
节点中的 'norm' 用于归一化,具体计算方式后面会说。
对于每个节点来说,可能过会收到很多个源节点传过来的消息,所以可以将这些消息存储在邮箱中(mailbox)。
我们那再来定义一个聚合(Reduce)函数。
消息传递完后,每个节点都要处理下他们的“信箱”(mailbox),Reduce 函数的作用就是用来处理节点“信箱”的消息的。
Reduce 函数是一个 Node UDFs。
Node UDFs 接收一个 node 的参数,并且 node 有两个属性 data 和 mailbox,分别为节点的特征和用来接收信息的“信箱”。
def gcn_reduce(node):
    # 需要注意:消息存放在 mailbox 的第二个维上,第一维是消息的数量
    accum = torch.sum(node.mailbox['m'], dim=1) * node.data['norm']
    return {'h': accum}
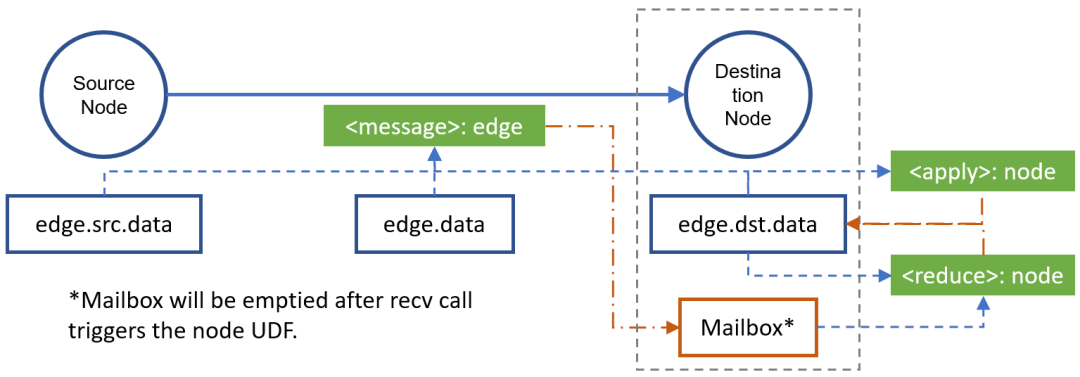
Messge UDF 作用于边上,而 Reduce UDF 作用于节点上。两者的关系如下:
从左到右开始看,源节点通过 message 函数传递节点特征,并传递到目标节点的 Mailbox 中,在触发 Node UDF 时(这里为 Reduce 函数),Mailbox 将被清空。
上图中我们还可以看到作用于节点的有两个函数:Apply 函数和 Reduce 函数。
Reduce 函数我们上面介绍过了,那这个 Apply 函数是什么呢?
Apply 函数为节点更新的函数,可以用于「初始化参数」和「对节点特征的进行非线形变换」。
初始化参数:我们刚刚指出,参数分布服从 Glorot 均匀分布,所以要给节点加偏置的话,我们也需要将其初始化为并使其服从 Glorot 均匀分布,如下面代码中的 reset_parameters 函数
非线形变换:GCN 中每一层进行传递后,节点可能需要进行非线形变换,如下面代码中 forward 函数
class NodeApplyModule(nn.Module):
    def __init__(self, out_feats, activation=None, bias=True):
        super(NodeApplyModule, self).__init__()
        if bias:
            self.bias = nn.Parameter(torch.Tensor(out_feats))
        else:
            self.bias = None
        self.activation = activation
        self.reset_parameters()

    def reset_parameters(self):
        if self.bias is not None:
            stdv = 1. / math.sqrt(self.bias.size(0))
            self.bias.data.uniform_(-stdv, stdv)

    def forward(self, nodes):
        h = nodes.data['h']
        if self.bias is not None:
            h = h + self.bias
        if self.activation:
            h = self.activation(h)
        return {'h': h}
有了 Message 函数、Reduce 函数和节点的更新函数后,我们需要将其连贯起来:
g.update_all(message_func='default',
             reduce_func='default',
             apply_node_func='default')
这个函数可以用于发送信息并更新所有节点,是 send() 和 recv() 函数的一个简单组合
3.2.3 GCNLayer
有了这些后,我们便可以定义 GCNLayer 了:
class GCNLayer(nn.Module):
    def __init__(self,
                 g,
                 in_feats,
                 out_feats,
                 activation,
                 dropout,
                 bias=True):
        super(GCNLayer, self).__init__()
        self.g = g
        self.weight = nn.Parameter(torch.Tensor(in_feats, out_feats))
        if dropout:
            self.dropout = nn.Dropout(p=dropout)
        else:
            self.dropout = 0.
        self.node_update = NodeApplyModule(out_feats, activation, bias)
        self.reset_parameters()

    def reset_parameters(self):
        stdv = 1. / math.sqrt(self.weight.size(1))
        self.weight.data.uniform_(-stdv, stdv)

    def forward(self, h):
        if self.dropout:
            h = self.dropout(h)
        self.g.ndata['h'] = torch.mm(h, self.weight)
        self.g.update_all(gcn_msg, gcn_reduce, self.node_update)
        h = self.g.ndata.pop('h')
        return h
然后我们把 GCNLayer 拼接在一起组成 GCN 网络
class GCN(nn.Module):
    def __init__(self,
                 g,
                 in_feats,
                 n_hidden,
                 n_classes,
                 n_layers,
                 activation,
                 dropout):
        super(GCN, self).__init__()
        self.layers = nn.ModuleList()
        # input layer
        self.layers.append(GCNLayer(g, in_feats, n_hidden, activation, dropout))
        # hidden layers
        for i in range(n_layers - 1):
            self.layers.append(GCNLayer(g, n_hidden, n_hidden, activation, dropout))
        # output layer
        self.layers.append(GCNLayer(g, n_hidden, n_classes, None, dropout))

    def forward(self, features):
        h = features
        for layer in self.layers:
            h = layer(h)
        return h
3.3 Third version
DGL 的第三种写法:使用 DGL 的内置(builtin)函数
由于 Messge 和 Reduce 函数使用的比较频繁,所以 DGL 了内置函数以方便使用,我们把刚刚的 Message 和 Reduce 函数改变为内置函数有:
-
dgl.function.copy_src(src, out):Message 函数其实就是把源节点的特征拷贝到目标节点,所以可以换用内置的 copy_src 函数。
-
dgl.function.sum(msg, out):Reduce 函数其实就是聚合节点 Mailbox 中的消息,所以可以换用内置的 sum 函数。
class GCNLayer(nn.Module):
    def __init__(self,
                 g,
                 in_feats,
                 out_feats,
                 activation,
                 dropout,
                 bias=True):
        super(GCNLayer, self).__init__()
        self.g = g
        self.weight = nn.Parameter(torch.Tensor(in_feats, out_feats))
        if bias:
            self.bias = nn.Parameter(torch.Tensor(out_feats))
        else:
            self.bias = None
        self.activation = activation
        if dropout:
            self.dropout = nn.Dropout(p=dropout)
        else:
            self.dropout = 0.
        self.reset_parameters()

    def reset_parameters(self):
        stdv = 1. / math.sqrt(self.weight.size(1))
        self.weight.data.uniform_(-stdv, stdv)
        if self.bias is not None:
            self.bias.data.uniform_(-stdv, stdv)

    def forward(self, h):
        if self.dropout:
            h = self.dropout(h)
        h = torch.mm(h, self.weight)
        # normalization by square root of src degree
        h = h * self.g.ndata['norm']
        self.g.ndata['h'] = h
        self.g.update_all(fn.copy_src(src='h', out='m'),
                          fn.sum(msg='m', out='h'))
        h = self.g.ndata.pop('h')
        # normalization by square root of dst degree
        h = h * self.g.ndata['norm']
        # bias
        if self.bias is not None:
            h = h + self.bias
        if self.activation:
            h = self.activation(h)
        return h
-
这里的做了两次的标准化,对应 GCN 公式中的 ; -
这里把 Node 的 Apply 函数的功能合并到 GCNLayer 中了。
class GCN(nn.Module):
    def __init__(self,
                 g,
                 in_feats,
                 n_hidden,
                 n_classes,
                 n_layers,
                 activation,
                 dropout):
        super(GCN, self).__init__()
        self.layers = nn.ModuleList()
        # input layer
        self.layers.append(GCNLayer(g, in_feats, n_hidden, activation, 0.))
        # hidden layers
        for i in range(n_layers - 1):
            self.layers.append(GCNLayer(g, n_hidden, n_hidden, activation, dropout))
        # output layer
        self.layers.append(GCNLayer(g, n_hidden, n_classes, None, dropout))

    def forward(self, features):
        h = features
        for layer in self.layers:
            h = layer(h)
        return h
4.Train
dropout=0.5
gpu=-1
lr=0.01
n_epochs=200
n_hidden=16  # 隐藏层节点的数量
n_layers=2  # 输入层 + 输出层的数量
weight_decay=5e-4  # 权重衰减
self_loop=True  # 自循环
# cora 数据集

data = citegrh.load_cora()
features = torch.FloatTensor(data.features)
labels = torch.LongTensor(data.labels)
train_mask = torch.BoolTensor(data.train_mask)
val_mask = torch.BoolTensor(data.val_mask)
test_mask = torch.BoolTensor(data.test_mask)

in_feats = features.shape[1]
n_classes = data.num_labels
n_edges = data.graph.number_of_edges()
# 构建 DGLGraph
g = data.graph

if self_loop:
    g.remove_edges_from(nx.selfloop_edges(g))
    g.add_edges_from(zip(g.nodes(), g.nodes()))
g = DGLGraph(g)
这里大家可能会有些疑惑:为什么要先移除自环?然后再加上自环。
这个主要是为了防止原本数据集中有一部分的自环,如果不去掉直接加上自环的话,会导致一些节点有两个自环,而有些只有一个。
# 加载 GPU
if gpu < 0:
    cuda = False
else:
    cuda = True
    torch.cuda.set_device(gpu)
    features = features.cuda()
    labels = labels.cuda()
    train_mask = train_mask.cuda()
    val_mask = val_mask.cuda()
    test_mask = test_mask.cuda()
# 归一化,依据入度进行计算
degs = g.in_degrees().float()
norm = torch.pow(degs, -0.5)
norm[torch.isinf(norm)] = 0
if cuda:
    norm = norm.cuda()
g.ndata['norm'] = norm.unsqueeze(1)
# 创建一个 GCN 的模型,可以选择上面的任意一个进行初始化
model = GCN(g,
            in_feats,
            n_hidden,
            n_classes,
            n_layers,
            F.relu,
            dropout)

if cuda:
    model.cuda()
# 采用交叉熵损失函数和 Adam 优化器
loss_fcn = torch.nn.CrossEntropyLoss()

optimizer = torch.optim.Adam(model.parameters(),
                             lr=lr,
                             weight_decay=weight_decay)
# 定义一个评估函数
def evaluate(model, features, labels, mask):
    model.eval()
    with torch.no_grad():
        logits = model(features)
        logits = logits[mask]
        labels = labels[mask]
        _, indices = torch.max(logits, dim=1)
        correct = torch.sum(indices == labels)
        return correct.item() * 1.0 / len(labels)
# 训练,并评估
dur = []
for epoch in range(n_epochs):
    model.train()
    t0 = time.time()
    # forward
    logits = model(features)
    loss = loss_fcn(logits[train_mask], labels[train_mask])

    optimizer.zero_grad()
    loss.backward()
    optimizer.step()

    dur.append(time.time() - t0)

    if epoch % 10 == 0:
        acc = evaluate(model, features, labels, val_mask)
        print("Epoch {:05d} | Time(s) {:.4f} | Loss {:.4f} | Accuracy {:.4f} | "
              "ETputs(KTEPS) {:.2f}". format(epoch, np.mean(dur), loss.item(),
                                             acc, n_edges / np.mean(dur) / 1000))

print()
acc = evaluate(model, features, labels, test_mask)
print("Test accuracy {:.2%}".format(acc))
Epoch 00000 | Time(s) 0.0178 | Loss 1.9446 | Accuracy 0.2100 | ETputs(KTEPS) 594.54
Epoch 00010 | Time(s) 0.0153 | Loss 1.7609 | Accuracy 0.3533 | ETputs(KTEPS) 689.33
Epoch 00020 | Time(s) 0.0150 | Loss 1.5518 | Accuracy 0.5633 | ETputs(KTEPS) 703.47
Epoch 00030 | Time(s) 0.0146 | Loss 1.2769 | Accuracy 0.5867 | ETputs(KTEPS) 721.28
Epoch 00040 | Time(s) 0.0143 | Loss 1.0785 | Accuracy 0.6567 | ETputs(KTEPS) 740.36
Epoch 00050 | Time(s) 0.0140 | Loss 0.8881 | Accuracy 0.7067 | ETputs(KTEPS) 754.21
Epoch 00060 | Time(s) 0.0138 | Loss 0.6994 | Accuracy 0.7533 | ETputs(KTEPS) 763.21
Epoch 00070 | Time(s) 0.0137 | Loss 0.6249 | Accuracy 0.7800 | ETputs(KTEPS) 770.54
Epoch 00080 | Time(s) 0.0137 | Loss 0.5048 | Accuracy 0.7800 | ETputs(KTEPS) 772.31
Epoch 00090 | Time(s) 0.0136 | Loss 0.4457 | Accuracy 0.7867 | ETputs(KTEPS) 778.78
Epoch 00100 | Time(s) 0.0135 | Loss 0.4167 | Accuracy 0.7800 | ETputs(KTEPS) 782.25
Epoch 00110 | Time(s) 0.0134 | Loss 0.3389 | Accuracy 0.8000 | ETputs(KTEPS) 786.52
Epoch 00120 | Time(s) 0.0134 | Loss 0.3777 | Accuracy 0.8100 | ETputs(KTEPS) 789.85
Epoch 00130 | Time(s) 0.0133 | Loss 0.3307 | Accuracy 0.8133 | ETputs(KTEPS) 792.00
Epoch 00140 | Time(s) 0.0133 | Loss 0.2542 | Accuracy 0.7933 | ETputs(KTEPS) 794.13
Epoch 00150 | Time(s) 0.0133 | Loss 0.2937 | Accuracy 0.8000 | ETputs(KTEPS) 795.73
Epoch 00160 | Time(s) 0.0132 | Loss 0.2944 | Accuracy 0.8333 | ETputs(KTEPS) 797.04
Epoch 00170 | Time(s) 0.0132 | Loss 0.2161 | Accuracy 0.8167 | ETputs(KTEPS) 799.74
Epoch 00180 | Time(s) 0.0132 | Loss 0.1972 | Accuracy 0.8200 | ETputs(KTEPS) 801.31
Epoch 00190 | Time(s) 0.0131 | Loss 0.2339 | Accuracy 0.8167 | ETputs(KTEPS) 802.92

Test accuracy 80.40%
5.Conclusion
以上便是本教程的全部,当然还有其他实现的方法,比如说,直接利用矩阵相乘来进行迭代。
6.Reference
-
DGL Github -
DGL 官方文档 -
《深度学习——Xavier初始化方法》 -
《DGL 作者答疑!关于 DGL 你想知道的都在这里-周金晶》
推荐阅读
文本自动摘要任务的“不完全”心得总结番外篇——submodular函数优化
斯坦福大学NLP组Python深度学习自然语言处理工具Stanza试用
太赞了!Springer面向公众开放电子书籍,附65本数学、编程、机器学习、深度学习、数据挖掘、数据科学等书籍链接及打包下载
数学之美中盛赞的 Michael Collins 教授,他的NLP课程要不要收藏?
模型压缩实践系列之——bert-of-theseus,一个非常亲民的bert压缩方法
关于AINLP
AINLP 是一个有趣有AI的自然语言处理社区,专注于 AI、NLP、机器学习、深度学习、推荐算法等相关技术的分享,主题包括文本摘要、智能问答、聊天机器人、机器翻译、自动生成、知识图谱、预训练模型、推荐系统、计算广告、招聘信息、求职经验分享等,欢迎关注!加技术交流群请添加AINLPer(id:ainlper),备注工作/研究方向+加群目的。
阅读至此了,点个在看吧👇


