YOLOv5在最新OpenVINO 2021R02版本的部署与代码演示详解

新智元推荐
新智元推荐
来源:OpenCV学堂
作者:gloomyfish
【新智元导读】本文从原始的三个输出层解析实现了boxes, classes, nms等关键C++代码输出,实现了纯OpenVINO+OpenCV版本的YOLOv5s模型推理的代码演示。下面是详细的系统环境与各个部分解释,以及代码实现与演示图像。
系统版本信息与依赖
Window 10 64bit Pytorch1.7+CUDA10.0 Python3.8.5 VS2015 OpenVINO_2021.2.185
YOLOv5下载与测试运行
YOLOv5是第二个非官方的YOLO对象检测版本,也是第一个Pytorch实现的YOLO对象检测版本。Github地址如下:
https://github.com/ultralytics/yolov5
需要克隆到本地
git clone https://github.com/ultralytics/yolov5.git
然后运行
pip install -r requirements.txt
安装所有依赖。
最后运行一段视频或者图像完成测试
python detect.py --source D:\images\video\SungEun.avi --weights yolov5s.pt --conf 0.25

视频测试结果如下:

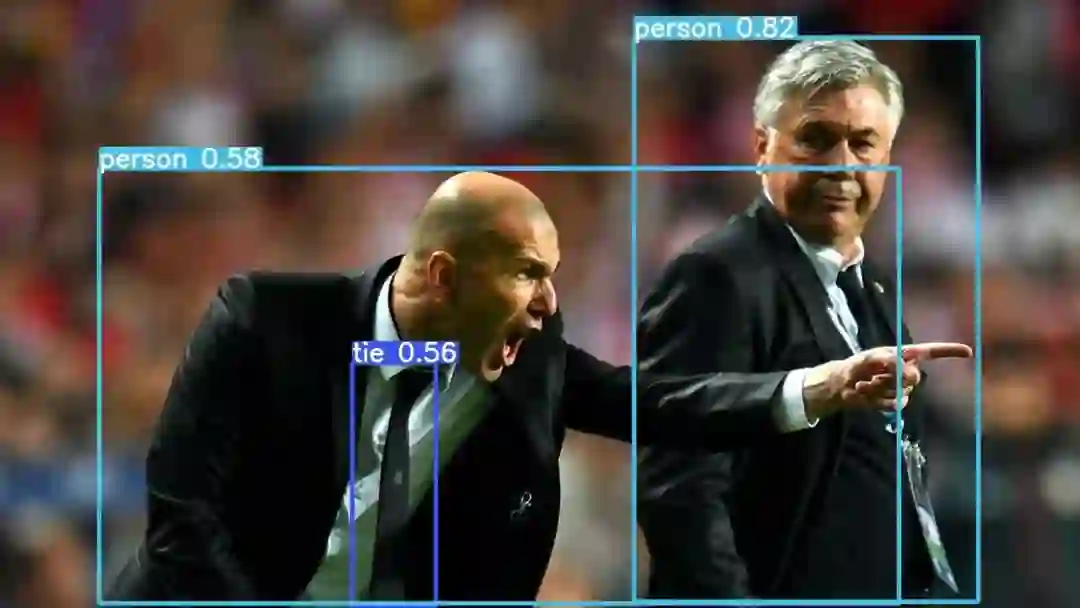
图像测试结果如下:
模型转换
模型转换主要是把原始的YOLOv5的pytorch模型文件转换为通用的开放模型格式ONNX与OpenVIN特有的文件格式IR(*.xml与*.bin)。
OpenVINO从2020R02以后版本开始支持直接读取ONNX格式文件,所以我们既可以通过脚本直接导出onnx格式文件,直接给OpenVINO调用,也可以对得到ONNX文件通过OpenVINO的模型转换脚本做进一步转换生成IR中间格式(*.bin文件与*.xml文件)。
导出ONNX格式文件的脚本
Pytorch的YOLOv5项目本身已经提供了转换脚本,命令行运行方式如下:
# export at 640x640 with batch size 1python models/export.py --weights yolov5s.pt --img 640 --batch 1

然后生成的yolov5s.onnx文件就在同一目录下面。
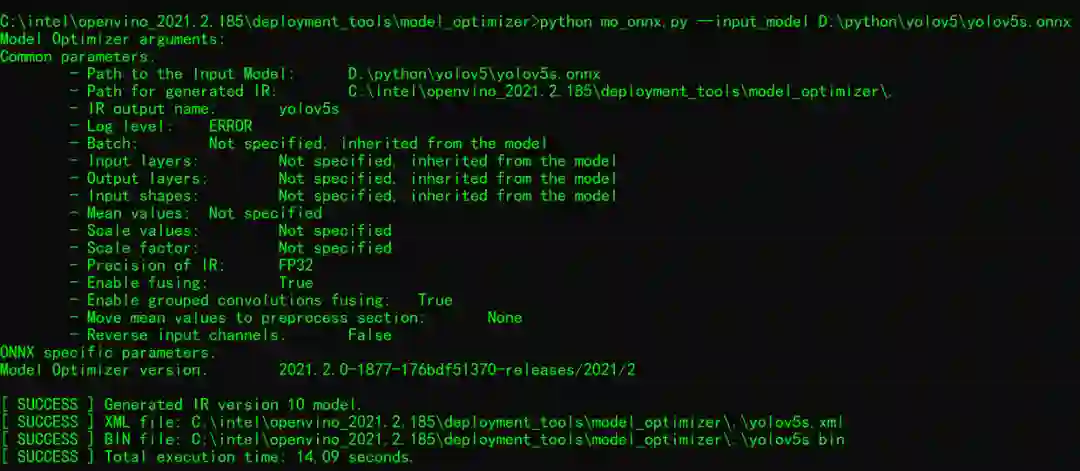
ONNX转为为IR中间格式
把ONNX转换为IR中间格式,运行结果如下:
OpenVINO SDK+YOLOv5s代码演示
上面我们已经成功转换为YOLOv5s模型IR,现在就可以基于最新的SDK来说完成调用解析与调用。
第一步:
初始Core对象,读取模型(加载ONNX格式或者IR格式均可以,亲测有效)
// 创建IE插件, 查询支持硬件设备
Core ie;
vector<string> availableDevices = ie.GetAvailableDevices();
for (int i = 0; i < availableDevices.size(); i++) {
    printf("supported device name : %s \n", availableDevices[i].c_str());
}

//  加载检测模型
auto network = ie.ReadNetwork("D:/python/yolov5/yolov5s.xml", "D:/python/yolov5/yolov5s.bin");
// auto network = ie.ReadNetwork("D:/python/yolov5/yolov5s.onnx");
第二步:
设置输入与输出格式,YOLOv5s输入的图像被归一化到0~1之间,而且是RGB通道顺序,输入与输出格式设置数据为浮点数,这部分的代码如下:
// 设置输入格式
for (auto &item : input_info) {
    auto input_data = item.second;
    input_data->setPrecision(Precision::FP32);
    input_data->setLayout(Layout::NCHW);
    input_data->getPreProcess().setResizeAlgorithm(RESIZE_BILINEAR);
    input_data->getPreProcess().setColorFormat(ColorFormat::RGB);
}

// 设置输出格式
for (auto &item : output_info) {
    auto output_data = item.second;
    output_data->setPrecision(Precision::FP32);
}
auto executable_network = ie.LoadNetwork(network, "CPU");
第三步:
设置输入图像数据并实现推理预测
int64 start = getTickCount();
/** Iterating over all input blobs **/
for (auto & item : input_info) {
    auto input_name = item.first;

    /** Getting input blob **/
    auto input = infer_request.GetBlob(input_name);
    size_t num_channels = input->getTensorDesc().getDims()[1];
    size_t h = input->getTensorDesc().getDims()[2];
    size_t w = input->getTensorDesc().getDims()[3];
    size_t image_size = h*w;
    Mat blob_image;
    resize(src, blob_image, Size(w, h));
    cvtColor(blob_image, blob_image, COLOR_BGR2RGB);

    // NCHW
    float* data = static_cast<float*>(input->buffer());
    for (size_t row = 0; row < h; row++) {
        for (size_t col = 0; col < w; col++) {
            for (size_t ch = 0; ch < num_channels; ch++) {
                data[image_size*ch + row*w + col] = float(blob_image.at<Vec3b>(row, col)[ch])/255.0;
            }
        }
    }
}

// 执行预测
infer_request.Infer();
上面的代码跟SSD对象检测的OpenVINO调用基本上没有太大区别。主要的区别是在对推理完成结果的解析部分。
第四步:
解析输出结果,实现显示输出。要完成这个部分,首先需要看一下YOLOv5项目中的yolo.py中对推理部分的组装。
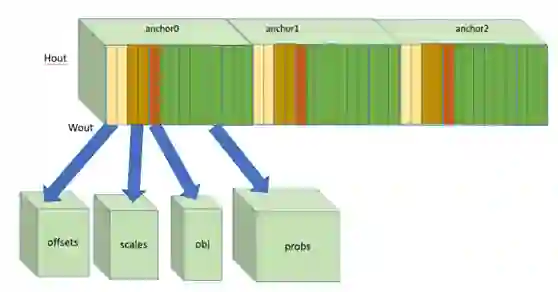
首先输出层,从YOLOv3开始到YOLOv5,输出层都是3层,分别对应的降采样的倍数是32、16、8。
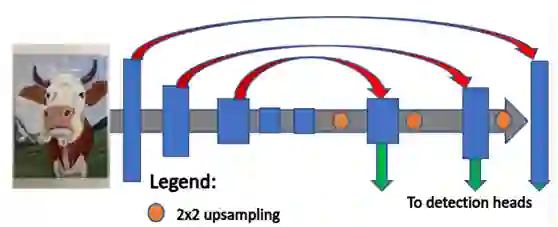
以输入640x640大小的图像为例,得到三个输出层大小应该分别是20、40、80。每个层上对应三个尺度的anchor,表示如下:
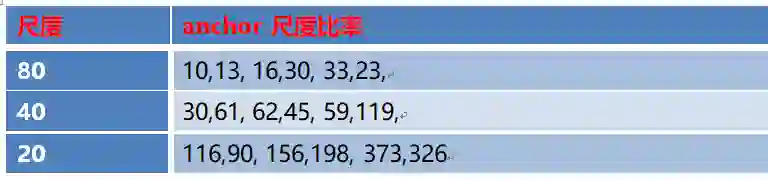
模型的预测是在20x20、40x40、80x80每个输出层的每个特征点上预测三个框,每个框预测分类!
每个框的维度大小为 cx,cy,w,h,conf + number of class, 图示如下:
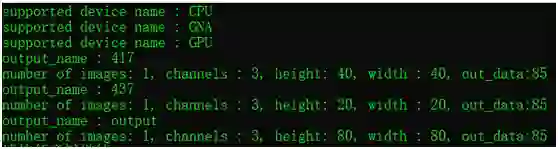
以YOLOv5项目的预训练模型是基于COCO的80个对象类别为例,在检测阶段最终三个输出层是:
1x3x20x20x851x3x40x40x851x3x80x80x85
电脑上实际加载模型之后的三个输出层实现运行结果:
然后循环每个输出层,解析每个特征点对应的3个框与相关数据。
由于在导出的时候ONNX格式文件时模型的推理得到的三个输出层原始结果,所以还需要对每个数据先完成sigmoid归一化,然后再计算相关值,这部分的代码实现我参考了项目中的yolo.py中的Detection部分,得到初始每个对象的检测框之后,采用OpenVINO中自带非最大抑制函数,完成非最大抑制,就得到了最终的预测框,然后绘制显示。
所以最终的解析输出层部分的代码如下:
for (int i = 0; i < side_square; ++i) {
    for (int c = 0; c < out_c; c++) {
        int row = i / side_h;
        int col = i % side_h;
        int object_index = c*side_data_square + row*side_data_w + col*side_data;

        // 阈值过滤
        float conf = sigmoid_function(output_blob[object_index + 4]);
        if (conf < 0.25) {
            continue;
        }

        // 解析cx, cy, width, height
        float x = (sigmoid_function(output_blob[object_index]) * 2 - 0.5 + col)*stride;
        float y = (sigmoid_function(output_blob[object_index + 1]) * 2 - 0.5 + row)*stride;
        float w = pow(sigmoid_function(output_blob[object_index + 2]) * 2, 2)*anchors[anchor_index + c * 2];
        float h = pow(sigmoid_function(output_blob[object_index + 3]) * 2, 2)*anchors[anchor_index + c * 2 + 1];
        float max_prob = -1;
        int class_index = -1;

        // 解析类别
        for (int d = 5; d < 85; d++) {
            float prob = sigmoid_function(output_blob[object_index + d]);
            if (prob > max_prob) {
                max_prob = prob;
                class_index = d - 5;
            }
        }

        // 转换为top-left, bottom-right坐标
        int x1 = saturate_cast<int>((x - w / 2) * scale_x);  // top left x
        int y1 = saturate_cast<int>((y - h / 2) * scale_y);  // top left y
        int x2 = saturate_cast<int>((x + w / 2) * scale_x);  // bottom right x
        int y2 = saturate_cast<int>((y + h / 2) * scale_y); // bottom right y

        // 解析输出
        classIds.push_back(class_index);
        confidences.push_back((float)conf);
        boxes.push_back(Rect(x1, y1, x2 - x1, y2 - y1));
        // rectangle(src, Rect(x1, y1, x2 - x1, y2 - y1), Scalar(255, 0, 255), 2, 8, 0);
    }
}
非最大抑制的代码如下:
vector<int> indices;
NMSBoxes(boxes, confidences, 0.25, 0.5, indices);
for (size_t i = 0; i < indices.size(); ++i)
{
    int idx = indices[i];
    Rect box = boxes[idx];
    rectangle(src, box, Scalar(140, 199, 0), 4, 8, 0);
}
float fps = getTickFrequency() / (getTickCount() - start);
float time = (getTickCount() - start) / getTickFrequency();
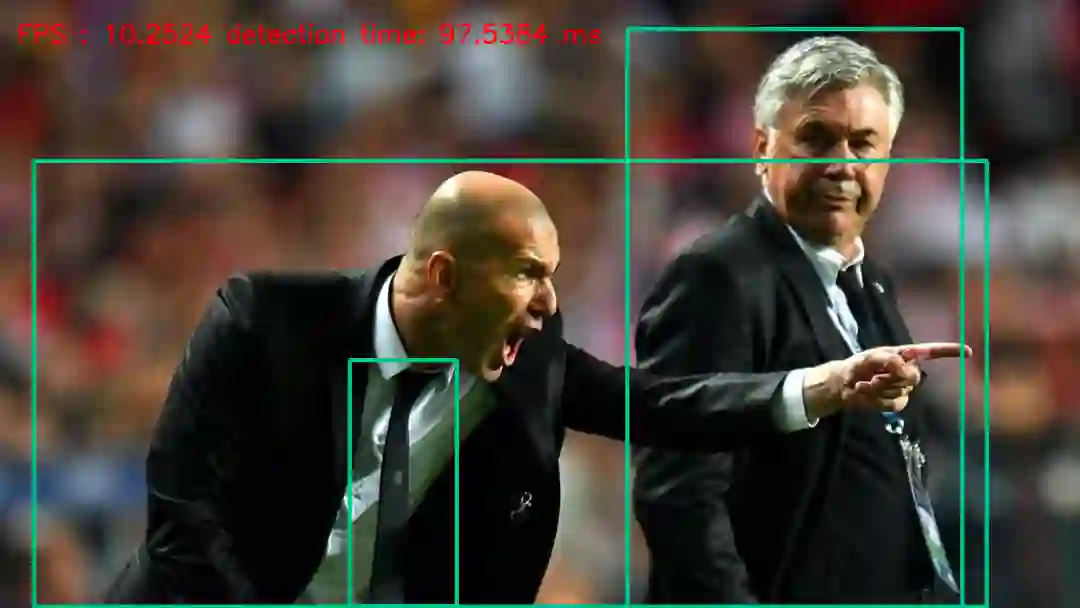
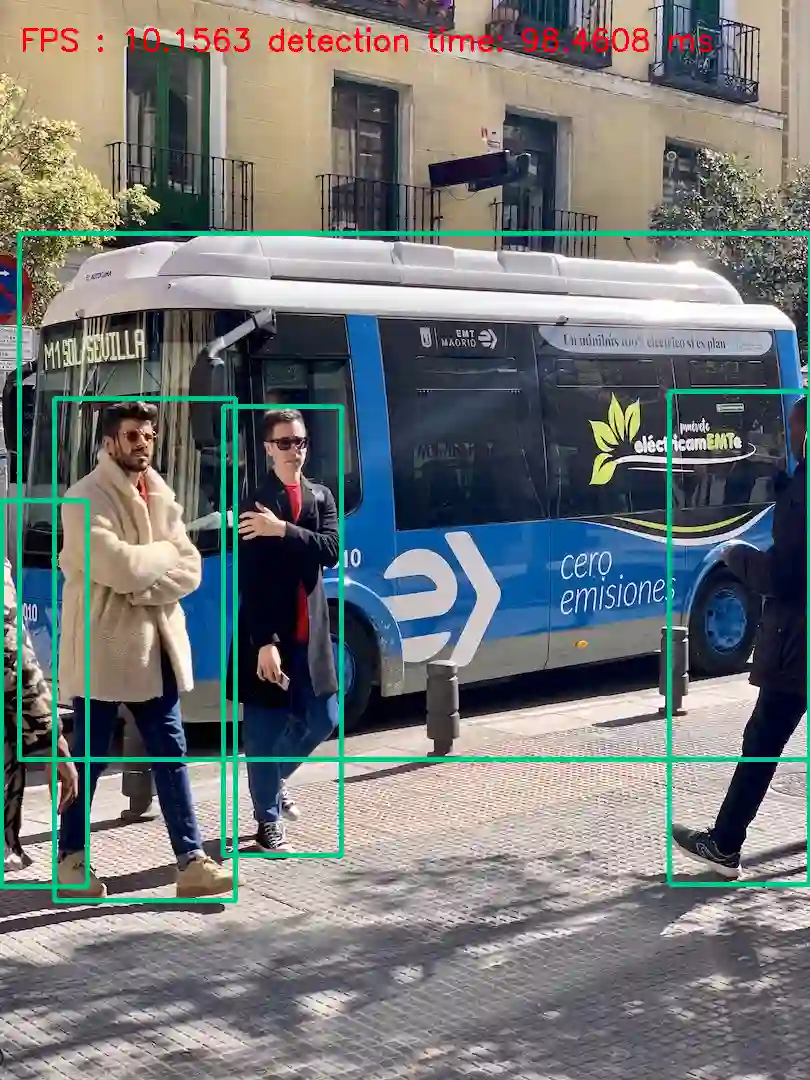
官方的两张测试图像,测试结果如下:
推荐阅读:
15岁上浙大、22岁获世界冠军,90后「天才黑客」为何被开除、错失上亿股票?