我佛了!用 KNN 实现验证码识别,又 Get 到一招
作者 | 李秋键
编辑 | Carol
题图 | 视觉中国
出品| CSDN(ID:CSDNnews)


实验前的准备


训练模型的搭建
1、获取切割字符轮廓:
    #定义函数get_rect_box,目的在于获得切割图片字符位置和宽度


def get_rect_box(contours):


      print(


      "获取字符轮廓。。。")


    #定义ws和valid_contours数组,用来存放图片宽度和训练数据集中的图片。如果分割错误的话需要重新分割


    ws = []


    valid_contours = []


      for contour


      in contours:


        #画矩形用来框住单个字符,x,y,w,h四个参数分别是该框子的x,y坐标和长宽。因


        x, y, w, h = cv2.boundingRect(contour)


      if w <


      7:


            continue


        valid_contours.append(contour)


        ws.append(w)


#w_min是二值化白色区域最小宽度,目的用来分割。


    w_min =


      min(ws)


# w_max是最大宽度


    w_max =


      max(ws)


    result = []


    #如果切割出有


      4个字符。说明没啥问题


      if


      len(valid_contours) ==


      4:


      for contour


      in valid_contours:


            x, y, w, h = cv2.boundingRect(contour)


            box = np.int0(


      [[x,y], [x+w,y], [x+w,y+h], [x,y+h]])


            result.append(box)


    # 如果切割出有


      3个字符。参照文章,中间分割


    elif


      len(valid_contours) ==


      3:


      for contour


      in valid_contours:


            x, y, w, h = cv2.boundingRect(contour)


      if w == w_max:


                box_left = np.int0(


      [[x,y], [x+w/2,y], [x+w/2,y+h], [x,y+h]])


                box_right = np.int0(


      [[x+w/2,y], [x+w,y], [x+w,y+h], [x+w/2,y+h]])


                result.append(box_left)


                result.append(box_right)


      else:


                box = np.int0(


      [[x,y], [x+w,y], [x+w,y+h], [x,y+h]])


                result.append(box)


    # 如果切割出有


      3个字符。参照文章,将包含了


      3个字符的轮廓在水平方向上三等分


    elif


      len(valid_contours) ==


      2:


      for contour


      in valid_contours:


            x, y, w, h = cv2.boundingRect(contour)


      if w == w_max


      and w_max >= w_min *


      2:


                box_left = np.int0(


      [[x,y], [x+w/3,y], [x+w/3,y+h], [x,y+h]])


                box_mid = np.int0(


      [[x+w/3,y], [x+w*2/3,y], [x+w*2/3,y+h], [x+w/3,y+h]])


                box_right = np.int0(


      [[x+w*2/3,y], [x+w,y], [x+w,y+h], [x+w*2/3,y+h]])


                result.append(box_left)


                result.append(box_mid)


                result.append(box_right)


            elif w_max < w_min *


      2:


                box_left = np.int0(


      [[x,y], [x+w/2,y], [x+w/2,y+h], [x,y+h]])


                box_right = np.int0(


      [[x+w/2,y], [x+w,y], [x+w,y+h], [x+w/2,y+h]])


                result.append(box_left)


                result.append(box_right)


      else:


                box = np.int0(


      [[x,y], [x+w,y], [x+w,y+h], [x,y+h]])


                result.append(box)


    # 如果切割出有


      3个字符。参照文章,对轮廓在水平方向上做


      4等分


    elif


      len(valid_contours) ==


      1:


        contour = valid_contours[


      0]


        x, y, w, h = cv2.boundingRect(contour)


        box0 = np.int0(


      [[x,y], [x+w/4,y], [x+w/4,y+h], [x,y+h]])


        box1 = np.int0(


      [[x+w/4,y], [x+w*2/4,y], [x+w*2/4,y+h], [x+w/4,y+h]])


        box2 = np.int0(


      [[x+w*2/4,y], [x+w*3/4,y], [x+w*3/4,y+h], [x+w*2/4,y+h]])


        box3 = np.int0(


      [[x+w*3/4,y], [x+w,y], [x+w,y+h], [x+w*3/4,y+h]])


        result.extend([box0, box1, box2, box3])


    elif


      len(valid_contours) >


      4:


      for contour


      in valid_contours:


            x, y, w, h = cv2.boundingRect(contour)


            box = np.int0(


      [[x,y], [x+w,y], [x+w,y+h], [x,y+h]])


            result.append(box)


    result = sorted(result, key=lambda x: x[


      0][


      0])


      return result
      def process_im(im):


    rows, cols, ch = im.shape


      #转为灰度图


    im_gray = cv2.cvtColor(im, cv2.COLOR_BGR2GRAY)


      #二值化,就是黑白图。字符变成白色的,背景为黑色


    ret, im_inv = cv2.threshold(im_gray,


      127,


      255,cv2.THRESH_BINARY_INV)


      #应用高斯模糊对图片进行降噪。高斯模糊的本质是用高斯核和图像做卷积。就是去除一些斑斑点点的。因为二值化难免不够完美,去燥使得二值化结果更好


    kernel =


      1/


      16*np.array([[


      1,


      2,


      1], [


      2,


      4,


      2], [


      1,


      2,


      1]])


    im_blur = cv2.filter2D(im_inv,


      -1,kernel)


      #再进行一次二值化。


    ret, im_res = cv2.threshold(im_blur,


      127,


      255,cv2.THRESH_BINARY)


      return im_res
3、切割字符:
      #借助第一个函数获得待切割位置和长宽后就可以切割了


def split_code(filepath):


    #获取图片名


    filename = filepath.split("/")[-1]


    #图片名即为标签


    filename_ts = filename.split(".")[0]


    im = cv2.imread(filepath)


    im


      _res = process_im(im)


    im2, contours, hierarchy = cv2.findContours(im


      _res, cv2.RETR_EXTERNAL, cv2.CHAIN


      _APPROX_SIMPLE)


      #这里就是用的第一个函数,获得待切割位置和长宽


    boxes = get


      _rect_box(contours)


      #如果没有区分出四个字符,就不切割这个图片


    if len(boxes) != 4:


        print(filepath)


      # 如果区分出了四个字符,说明切割正确,就可以切割这个图片。将切割后的图片保存在char文件夹下


    for box in boxes:


        cv2.drawContours(im, [box], 0, (0,0,255),2)


        roi = im_res[


      box[0][


      1]:box[


      3][


      1], box[


      0][


      0]:box[


      1][


      0]]


        roistd = cv2.resize(roi, (30, 30))


        timestamp = int(time.time() * 1e6)


        filename = "{}.jpg".format(timestamp)


        filepath = os.path.join("char", filename)


        cv2.imwrite(filepath, roistd)


    #cv2.imshow("image", im)


    #cv2.waitKey(0)


    #cv2.destroyAllWindows()


      # split all captacha codes in training set


      #调用上面的split_code进行切割即可。


def split_all():


    files = os.listdir(TRAIN_DIR)


    for filename in files:


        filename_ts = filename.split(".")[0]


        patt = "label/{}


      _*".format(filename_ts)


        saved_chars = glob.glob(patt)


        if len(saved_chars) == 4:


            print("{} done".format(filepath))


            continue


        filepath = os.path.join(TRAIN_DIR, filename)


        split_code(filepath)

    #用来标注单个字符图片,在label文件夹下,很明显可以看到_后面的就是标签。比如图片里是数字


      6,_后面就是


      6


def label_data():


    files =


      os.listdir(


      "char")


      for filename


      in files:


        filename_ts = filename.split(


      ".")[


      0]


        patt =


      "label/{}_*".


      format(filename_ts)


        saved_num =


      len(glob.glob(patt))


      if saved_num ==


      1:


      print(


      "{} done".


      format(patt))


            continue


        filepath =


      os.


      path.join(


      "char", filename)


        im = cv2.imread(filepath)


        cv2.imshow(


      "image", im)


        key = cv2.waitKey(


      0)


      if key ==


      27:


            sys.


      exit()


      if key ==


      13:


            continue


      char = chr(key)


        filename_ts = filename.split(


      ".")[


      0]


        outfile =


      "{}_{}.jpg".


      format(filename_ts,


      char)


        outpath =


      os.


      path.join(


      "label", outfile)


        cv2.imwrite(outpath, im)


#和标注字符图反过来,我们需要让电脑知道这个字符叫啥名字,即让电脑知道_后面的就是他字符的名字


def analyze_label():


      print(


      "识别数据标签中。。。")


    files =


      os.listdir(


      "label")


    label_count = {}


      for filename


      in files:


        label = filename.split(


      ".")[


      0].split(


      "_")[


      1]


        label_count.setdefault(label,


      0)


        label_count[label] +=


      1


      print(label_count)
      #训练模型,用的是k相邻算法


def get_code(im):


    #将读取图片和标签


    print("读取数据集和标签中。。。。")


    [samples, label


      _ids, id_label


      _map] = load_data()


    #k相邻算法


    print("初始化中...")


    model = cv2.ml.KNearest_create()


    #开始训练


    print("训练模型中,请等待!")


    model.train(samples, cv2.ml.ROW


      _SAMPLE, label_ids)


    #处理图片。即二值化和降噪


    im


      _res = process_im(im)


    #提取轮廓


    im2, contours, hierarchy = cv2.findContours(im


      _res, cv2.RETR_EXTERNAL, cv2.CHAIN


      _APPROX_SIMPLE)


    #获取各切割区域位置和长宽


    boxes = get


      _rect_box(contours)


    #判断有没有识别出4个字符,如果没有识别出来,就不往下运行,直接结束了


    if len(boxes) != 4:


        print("cannot get code")


    result = []


    #如果正确分割出了4个字符,下面调用训练好的模型进行识别。


    for box in boxes:


        #获取字符长宽


        roi = im_res[


      box[0][


      1]:box[


      3][


      1], box[


      0][


      0]:box[


      1][


      0]]


        #重新设长宽。


        roistd = cv2.resize(roi, (30, 30))


        #将图片转成像素矩阵


        sample = roistd.reshape((1, 900)).astype(np.float32)


        #调用训练好的模型识别


        ret, results, neighbours, distances = model.findNearest(sample, k = 3)


        #获取对应标签id


        label_id = int(results[0,0])


        #根据id得到识别出的结果


        label = id


      _label_map[label_id]


        #存放识别结果


        result.append(label)


    return result

      if __name__ ==


      "__main__":


    file=os.listdir(


      "test")


    filepath=


      "test/"+file[


      4]


    im = cv2.imread(filepath)


    preds = get_code(im)


    preds=


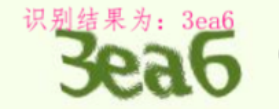
      "识别结果为:"+preds[


      0]+preds[


      1]+preds[


      2]+preds[


      3]


    print(preds)


    canny0 = im


    img_PIL = Image.fromarray(cv2.cvtColor(canny0, cv2.COLOR_BGR2RGB))


    myfont = ImageFont.truetype(


      r'simfang.ttf',


      18)


    draw = ImageDraw.Draw(img_PIL)


    draw.text((


      20,


      5), str(preds), font=myfont, fill=(


      255,


      23,


      140))


    img_OpenCV = cv2.cvtColor(np.asarray(img_PIL), cv2.COLOR_RGB2BGR)


    cv2.imshow(


      "frame", img_OpenCV)


    key = cv2.waitKey(


      0)


    print(filepath)

作者简介:
李秋键,CSDN博客专家,CSDN达人课作者。硕士在读于中国矿业大学,开发有taptap竞赛获奖等等。
更多精彩推荐
☞5 月编程语言排行榜:C 重回第一,今年编程语言名人堂冠军还会是它吗?| 原力计划
![]()
你点的每个“在看”,我都认真当成了喜欢
登录查看更多
相关内容
专知会员服务
24+阅读 · 2020年4月4日
专知会员服务
20+阅读 · 2020年1月26日
Arxiv
21+阅读 · 2018年12月25日
Arxiv
9+阅读 · 2018年3月14日
Arxiv
7+阅读 · 2018年2月3日


