
【导读】 基于谱域的图卷积网络用多项式近似卷积核的方式来避免计算的高复杂度,但这会导致模型的性能损失。TAGCN是基于空域方法的图卷积模型,通过多个固定尺寸的卷积核来学习图的拓扑结构特征。TAGCN本质上和CNN中的卷积是一致的。本教程将结合TAGCN原理,教你手把手构建基于Tensorflow的TAGCN模型,在Cora数据集上进行节点分类任务。
系列教程《GNN-algorithms》
本文为系列教程《GNN-algorithms》中的内容,该系列教程不仅会深入介绍GNN的理论基础,还结合了TensorFlow GNN框架tf_geometric对各种GNN模型(GCN、GAT、GIN、SAGPool等)的实现进行了详细地介绍。本系列教程作者王有泽(https://github.com/wangyouze)也是tf_geometric框架的贡献者之一。
系列教程《GNN-algorithms》Github链接: * https://github.com/wangyouze/GNN-algorithms
TensorFlow GNN框架tf_geometric的Github链接: * https://github.com/CrawlScript/tf_geometric
前序讲解: 系列教程GNN-algorithms之一:《图卷积网络(GCN)的前世今生》
系列教程GNN-algorithms之二:《切比雪夫显神威—ChebyNet》 系列教程GNN-algorithms之三:《将图卷积简化进行到底—SGC》 系列教程GNN-algorithms之四:《Inductive Learning 大神—GraphSAGE》
系列教程GNN-algorithms之五:《注意力机制在图上的应用—GAT》
前言
在教程第二节介绍了GCN的变体SGC,这一届我们继续介绍GCN的另外一个变体TAGCN模型。本教程将教你如何使用Tensorflow构建GCN的变体TAGCN模型进行节点分类任务。完整代码可在Github中下载: https://github.com/CrawlScript/tf_geometric/blob/master/demo/demo_tagcn.py
TAGCN模型简介
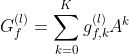
TAGCN是GCN的变体之一,全称TOPOLOGY ADAPTIVE GRAPH CONVOLUTIONAL NETWORKS(TAGCN)。相比于GCN对卷积核进行Chebyshev多项式近似后取k=1,TAGCN用k个图卷积核来提取不同尺寸的局部特征,并且将k保留下来作为超参数。其中的K个卷积核的感受野分别为1到K,类似于GoogleNet中每一个卷积层都有大小不同的卷积核提取特征。 TAGCN的卷积过程如下:
添加自环,对邻接矩阵进行归一化处理:


-
k个卷积核在图结构数据上提取特征,进行线性组合:
-
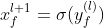
仿照CNN结构,添加非线性操作:

下图展示了TAGCN在k=3时的卷积过程,类似于CNN中的每一个卷积层由多个卷积核提取feature map后形成多个channel:
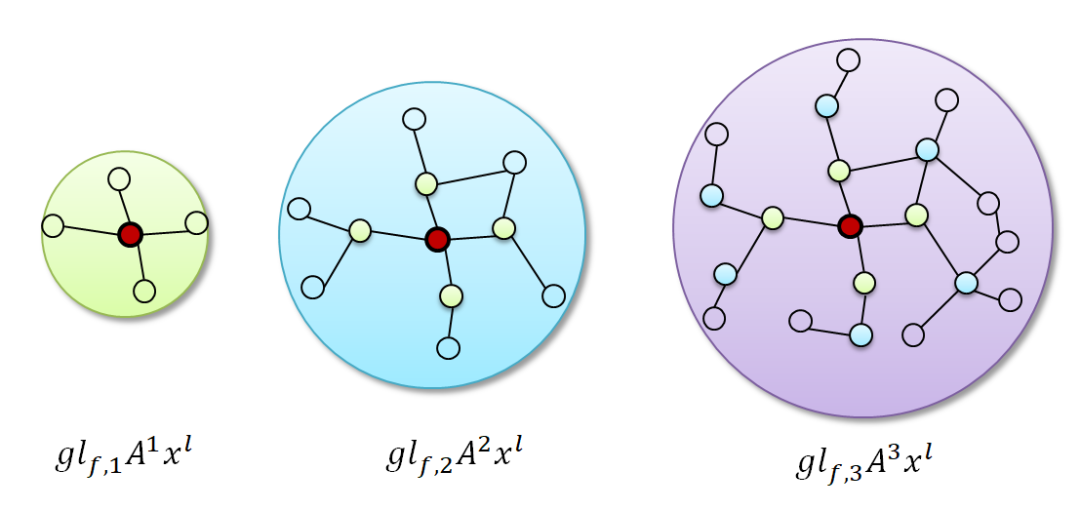
将3个卷积核提取的特征进行线性组合:

总结:
TAGCN仿照CNN在每一层使用K个图卷积核分别提取不同尺寸的局部特征,避免了之前对卷积核进行近似而不能完整,充分的提取图信息的缺陷,提高了模型的表达能力。 1. TAGCN可以用于无向图和有向图,由于只需计算邻接矩阵的系数,降低了计算复杂度。
教程完整代码链接:https://github.com/CrawlScript/tf_geometric/blob/master/demo/demo_tagcn.py * 论文地址:https://arxiv.org/pdf/1710.10370.pdf
教程目录
开发环境 * TAGCN的实现 * 模型构建 * TAGCN训练 * TAGCN评估
开发环境
操作系统: Windows / Linux / Mac OS
Python 版本: >= 3.5 * 依赖包: * tf_geometric(一个基于Tensorflow的GNN库) 根据你的环境(是否已安装TensorFlow、是否需要GPU)从下面选择一条安装命令即可一键安装所有Python依赖:
        pip install -U tf_geometric # 这会使用你自带的TensorFlow,注意你需要tensorflow/tensorflow-gpu >= 1.14.0 or >= 2.0.0b1

 pip install -U tf_geometric[tf1-cpu] # 这会自动安装TensorFlow 1.x CPU版

 pip install -U tf_geometric[tf1-gpu] # 这会自动安装TensorFlow 1.x GPU版

 pip install -U tf_geometric[tf2-cpu] # 这会自动安装TensorFlow 2.x CPU版

 pip install -U tf_geometric[tf2-gpu] # 这会自动安装TensorFlow 2.x GPU版
教程使用的核心库是tf_geometric,一个基于TensorFlow的GNN库。tf_geometric的详细教程可以在其Github主页上查询: * https://github.com/CrawlScript/tf_geometric
TAGCN的实现
首先我们对图的邻接矩阵添加自环,进行归一化处理:
其中xs用来存储k个多项式卷积核提取的feature map。``` xs = [x] updated_edge_index, normed_edge_weight = gcn_norm_edge(edge_index, x.shape[0], edge_weight, renorm, improved, cache)
分别计算每个图卷积核提取图中节点的邻域信息,即计算k阶多项式,并以此将结果存储到xs中:
for k in range(K): h = aggregate_neighbors( xs[-1], updated_edge_index, normed_edge_weight, gcn_mapper, sum_reducer, identity_updater )
xs.append(h)
将K个图卷积核提取的feature_map拼接,然后线性变换输出结果:```
h = tf.concat(xs, axis=-1)

 out = h @ kernel
 if bias is not None:
 out += bias

 if activation is not None:
 out = activation(out)

 return out
模型构建
导入相关库 本教程使用的核心库是tf_geometric,我们用它来进行图数据导入、图数据预处理及图神经网络构建。SGC的具体实现已经在上面详细介绍,另外我们后面会使用keras.metrics.Accuracy评估模型性能。```
coding=utf-8
import os
os.environ["CUDA_VISIBLE_DEVICES"] = "0" import tensorflow as tf import numpy as np from tensorflow import keras from tf_geometric.layers.conv.tagcn import TAGCN from tf_geometric.datasets.cora import CoraDataset
*
使用**tf_geometric**自带的图结构数据接口加载Cora数据集:```
graph, (train_index, valid_index, test_index) = CoraDataset().load_data()
定义模型,引入keras.layers中的Dropout层随机关闭神经元缓解过拟合。由于Dropout层在训练和预测阶段的状态不同,为此,我们通过参数training来决定是否需要Dropout发挥作用。``` tagcn0 = TAGCN(16) tagcn1 = TAGCN(num_classes) dropout = keras.layers.Dropout(0.3)
def forward(graph, training=False): h = tagcn0([graph.x, graph.edge_index, graph.edge_weight], cache=graph.cache) h = dropout(h, training=training) h = tagcn1([h, graph.edge_index, graph.edge_weight], cache=graph.cache)
return h
**TAGCN训练**

***


模型的训练与其他基于Tensorflow框架的模型训练基本一致,主要步骤有定义优化器,计算误差与梯度,反向传播等。TAGCN论文用模型在第100轮训练后的表现来评估模型,因此这里我们设置epoches=100。```
optimizer = tf.keras.optimizers.Adam(learning_rate=0.01)

best_test_acc = tmp_valid_acc = 0
for step in range(1, 101):
 with tf.GradientTape() as tape:
 logits = forward(graph, training=True)
 loss = compute_loss(logits, train_index, tape.watched_variables())

 vars = tape.watched_variables()
 grads = tape.gradient(loss, vars)
 optimizer.apply_gradients(zip(grads, vars))

 valid_acc = evaluate(valid_index)
 test_acc = evaluate(test_index)
 if test_acc > best_test_acc:
 best_test_acc = test_acc
 tmp_valid_acc = valid_acc
 print("step = {}\tloss = {}\tvalid_acc = {}\tbest_test_acc = {}".format(step, loss, tmp_valid_acc, best_test_acc))
用交叉熵损失函数计算模型损失。注意在加载Cora数据集的时候,返回值是整个图数据以及相应的train_mask,valid_mask,test_mask。TAGCN在训练的时候的输入时整个Graph,在计算损失的时候通过train_mask来计算模型在训练集上的迭代损失。因此,此时传入的mask_index是train_index。由于是多分类任务,需要将节点的标签转换为one-hot向量以便于模型输出的结果维度对应。由于图神经模型在小数据集上很容易就会疯狂拟合数据,所以这里用L2正则化缓解过拟合。``` def compute_loss(logits, mask_index, vars): masked_logits = tf.gather(logits, mask_index) masked_labels = tf.gather(graph.y, mask_index) losses = tf.nn.softmax_cross_entropy_with_logits( logits=masked_logits, labels=tf.one_hot(masked_labels, depth=num_classes) )
kernel_vals = [var for var in vars if "kernel" in var.name] l2_losses = [tf.nn.l2_loss(kernel_var) for kernel_var in kernel_vals]
return tf.reduce_mean(losses) + tf.add_n(l2_losses) * 5e-4
**TAGCN评估**

***


在评估模型性能的时候我们只需传入valid_mask或者test_mask,通过tf.gather函数就可以拿出验证集或测试集在模型上的预测结果与真实标签,用keras自带的keras.metrics.Accuracy计算准确率。
def evaluate(mask): logits = forward(graph) logits = tf.nn.log_softmax(logits, axis=-1) masked_logits = tf.gather(logits, mask) masked_labels = tf.gather(graph.y, mask)
y_pred = tf.argmax(masked_logits, axis=-1, output_type=tf.int32)
accuracy_m = keras.metrics.Accuracy() accuracy_m.update_state(masked_labels, y_pred) return accuracy_m.result().numpy()
**运行结果**

***


****
step = 1 loss = 1.9557496309280396 valid_acc = 0.3240000009536743 best_test_acc = 0.3700000047683716
step = 2 loss = 1.6913329362869263 valid_acc = 0.4519999921321869 best_test_acc = 0.5139999985694885 step = 3 loss = 1.3922057151794434 valid_acc = 0.5220000147819519 best_test_acc = 0.5849999785423279 step = 4 loss = 1.106893539428711 valid_acc = 0.6539999842643738 best_test_acc = 0.7110000252723694 ... step = 96 loss = 0.03752553462982178 valid_acc = 0.7960000038146973 best_test_acc = 0.8209999799728394 step = 97 loss = 0.03963441401720047 valid_acc = 0.7960000038146973 best_test_acc = 0.8209999799728394 step = 98 loss = 0.04120985418558121 valid_acc = 0.7960000038146973 best_test_acc = 0.8209999799728394 step = 99 loss = 0.03467567265033722 valid_acc = 0.7960000038146973 best_test_acc = 0.8209999799728394 step = 100 loss = 0.03561935946345329 valid_acc = 0.7960000038146973 best_test_acc = 0.8209999799728394
**完整代码**


教程中的完整代码链接:
*
demo_tagcn.py:https://github.com/CrawlScript/tf_geometric/blob/master/demo/demo_tagcn.py

**

**

本教程(属于系列教程**《GNN-algorithms》**)Github链接:
*
https://github.com/wangyouze/GNN-algorithms
