【专知-Java Deeplearning4j深度学习教程06】用卷积神经网络CNN进行图像分类
点击上方“专知”关注获取更多AI知识!
【导读】主题链路知识是我们专知的核心功能之一,为用户提供AI领域系统性的知识学习服务,一站式学习人工智能的知识,包含人工智能( 机器学习、自然语言处理、计算机视觉等)、大数据、编程语言、系统架构。使用请访问专知 进行主题搜索查看 - 桌面电脑访问www.zhuanzhi.ai, 手机端访问www.zhuanzhi.ai 或关注微信公众号后台回复" 专知"进入专知,搜索主题查看。继Pytorch教程后,我们推出面向Java程序员的深度学习教程DeepLearning4J。Deeplearning4j的案例和资料很少,官方的doc文件也非常简陋,基本上所有的类和函数的都没有解释。为此,我们推出来自中科院自动化所专知小组博士生Hujun与Sanglei创作的-分布式Java开源深度学习框架Deeplearning4j学习教程,第六篇,用卷积神经网络CNN进行图像分类。
使用多层神经网络分类MNIST数据集
使用CNN进行文本分类:图文+代码
无监督特征提取神器—AutoEncoder:图文+代码
基于DL4J的AutoEncoder、RNN、Word2Vec等模型的实现
在第四节中我们介绍卷积神经网络的基本操作,包括卷积核与池化操作,以及在文本处理中的简单应用。这次我们以经典的LeNet为例,介绍卷积神经网络的实现细节。
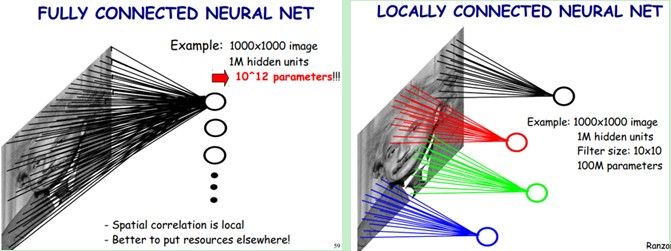
当处理图像时,全连接的网络存一个很重要的问题就是在处理大尺寸的图像效果不尽人意。比如在输入的图像大小为1000x1000像素。在全连接的网络中,第一个隐含层的每个神经元到输入层都有1000x1000*1000000=10^12个连接个相互独立的连接。每个连接都对应一个权重参数。随着隐含层神经元的增加,参数规模也会急剧增加。这会导致整个神经网络的训练效率会非常低,也很容易出现过拟合。
局部连接 然而图像的空间联系是局部的每一个神经元都不需要对全局图像做感受,每个神经元只感受局部的图像区域,然后在更高层,将这些感受不同局部的神经元综合起来就可以得到全局的信息了。这样,我们就可以减少连接的数目,也就是减少神经网络需要训练的权值参数的个数了。如下图右:假如局部滤波器是10x10,隐层每个神经元只需要和这10x10的局部图像相连接,所以1百万个隐层神经元就只有一亿个连接,即10^8个参数。比原来减少了四个0(数量级),这样训练起来就没那么费力了,但还是感觉很多的啊,那还有啥办法没?
权值共享 隐含层的每一个神经元都连接10x10个图像区域,也就是说每一个神经元存在10x10=100个连接权值参数。我们让隐含层的1百万个隐层神经元都共享着100个连接权值。也就是说不管你隐层的神经元个数有多少,两层间的连接我只有100个参数这就是权值共享。
feature map 这时候你可能会觉得就这100个参数只能学这么大图片的一个特征,未免也太弱了吧。我们需要提取多种特征对不?假如一种滤波器,也就是一种卷积核就是提出图像的一种特征,例如某个方向的边缘。那么我们需要提取不同的特征,怎么办,加多几种滤波器不就行了吗?对了。所以假设我们加到100种滤波器,每种滤波器的参数不一样,表示它提出输入图像的不同特征,例如不同的边缘。这样每种滤波器去卷积图像就得到对图像的不同特征的放映,我们称之为Feature Map。
LeNet为例
一种典型的用来识别数字的卷积网络是LeNet-5。当年美国大多数银行就是用它来识别支票上面的手写数字的。
可以看出,CNN中主要有两种类型的网络层,分别是卷积层和池化/采样层(Pooling)。卷积层的作用是提取图像的各种特征;池化层的作用是对原始特征信号进行抽象,从而大幅度减少训练参数,另外还可以减轻模型过拟合的程度。
C1是卷积层
6个特征图输入图片由。特征图中每个神经元与输入中55的邻域相连。特征图的大小为2828
每个滤波器55=25个unit参数和一个bias参数,一共6个滤波器,共(55+1)6=156个参数),共156(2828)=122,304个连接
参考:
https://github.com/nndl/nndl.github.io
http://www.jeyzhang.com/cnn-learning-notes-1.html
http://blog.csdn.net/zouxy09/article/details/8781543
用DL4J训练LeNet模型进行图像分类
代码需要用到一个动物图像数据集,数据集可以从专知“DeepLearning4j”主题(登录www.zhuanzhi.ai,搜索“DeepLearning4j” 主题即可)下面进行下载:
将animals文件夹放到项目目录下。
import org.datavec.api.io.filters.BalancedPathFilter;
import org.datavec.api.io.labels.ParentPathLabelGenerator;
import org.datavec.api.split.FileSplit;
import org.datavec.api.split.InputSplit;
import org.datavec.image.loader.NativeImageLoader;
import org.datavec.image.recordreader.ImageRecordReader;
import org.datavec.image.transform.FlipImageTransform;
import org.datavec.image.transform.ImageTransform;
import org.datavec.image.transform.WarpImageTransform;
import org.deeplearning4j.datasets.datavec.RecordReaderDataSetIterator;
import org.deeplearning4j.datasets.iterator.MultipleEpochsIterator;
import org.deeplearning4j.eval.Evaluation;
import org.deeplearning4j.nn.api.OptimizationAlgorithm;
import org.deeplearning4j.nn.conf.*;
import org.deeplearning4j.nn.conf.inputs.InputType;
import org.deeplearning4j.nn.conf.layers.*;
import org.deeplearning4j.nn.multilayer.MultiLayerNetwork;
import org.deeplearning4j.nn.weights.WeightInit;
import org.deeplearning4j.optimize.listeners.ScoreIterationListener;
import org.deeplearning4j.util.ModelSerializer;
import org.nd4j.linalg.activations.Activation;
import org.nd4j.linalg.dataset.DataSet;
import org.nd4j.linalg.dataset.api.iterator.DataSetIterator;
import org.nd4j.linalg.dataset.api.preprocessor.DataNormalization;
import org.nd4j.linalg.dataset.api.preprocessor.ImagePreProcessingScaler;
import org.nd4j.linalg.learning.config.Nesterovs;
import org.nd4j.linalg.lossfunctions.LossFunctions;
import org.slf4j.Logger;
import org.slf4j.LoggerFactory;

import java.io.File;
import java.util.Arrays;
import java.util.List;
import java.util.Random;


/**
 * 用LeNet(一种卷积神经网络)对4类动物的图像进行分类
 * 该示例用较为简单的卷积网络模型LeNet和较低的分辨率(60*60*3),训练得到的模型准确率较低
 * 可以尝试讲模型修改为较为复杂的网络模型和使用更高的分辨率以获得更高的准确率
 */

public class AnimalsClassification {
    protected static final Logger log = LoggerFactory.getLogger(AnimalsClassification.class);
    protected static int height = 60;
    protected static int width = 60;
    protected static int channels = 3;
    protected static int numExamples = 80;
    protected static int numLabels = 4;
    protected static int batchSize = 20;

    protected static long seed = 42;
    protected static Random rng = new Random(seed);

    protected static int iterations = 1;
    protected static int epochs = 200;
    protected static double splitTrainTest = 0.8;
    protected static boolean save = false;


    public void run(String[] args) throws Exception {

        log.info("Load data....");
        /**cd
         *
         * 下面的代码从文件夹中读取图片作为输入数据
         * 将每种类别的图片分别放在不同的文件夹下,并将这些文件夹放在同一个根目录下
         * DL4J会为不同文件夹下的图片分配不同个label,为相同文件夹下的图片分配相同的label
         **/
        ParentPathLabelGenerator labelMaker = new ParentPathLabelGenerator();
        File mainPath = new File("animals");
        FileSplit fileSplit = new FileSplit(mainPath, NativeImageLoader.ALLOWED_FORMATS, rng);
        BalancedPathFilter pathFilter = new BalancedPathFilter(rng, labelMaker, numExamples, numLabels, batchSize);

        //将数据分为训练数据和测试数据
        InputSplit[] inputSplit = fileSplit.sample(pathFilter, splitTrainTest, 1 - splitTrainTest);
        InputSplit trainData = inputSplit[0];
        InputSplit testData = inputSplit[1];

        //利用一些图像变换来生成一些训练数据
        ImageTransform flipTransform1 = new FlipImageTransform(rng);
        ImageTransform flipTransform2 = new FlipImageTransform(new Random(123));
        ImageTransform warpTransform = new WarpImageTransform(rng, 42);
        List<ImageTransform> transforms = Arrays.asList(new ImageTransform[]{flipTransform1, warpTransform, flipTransform2});


        //归一化
        DataNormalization scaler = new ImagePreProcessingScaler(0, 1);

        log.info("Build model....");

        MultiLayerNetwork network = lenetModel();
        network.init();
        network.setListeners(new ScoreIterationListener(10));

        ImageRecordReader recordReader = new ImageRecordReader(height, width, channels, labelMaker);
        DataSetIterator dataIter;
        MultipleEpochsIterator trainIter;


        log.info("Train model....");
        // 用原始图像来训练
        recordReader.initialize(trainData, null);
        dataIter = new RecordReaderDataSetIterator(recordReader, batchSize, 1, numLabels);
        scaler.fit(dataIter);
        dataIter.setPreProcessor(scaler);
        trainIter = new MultipleEpochsIterator(epochs, dataIter);
        network.fit(trainIter);

        // 用变换的图像来训练
        for (ImageTransform transform : transforms) {
            System.out.print("\nTraining on transformation: " + transform.getClass().toString() + "\n\n");
            recordReader.initialize(trainData, transform);
            dataIter = new RecordReaderDataSetIterator(recordReader, batchSize, 1, numLabels);
            scaler.fit(dataIter);
            dataIter.setPreProcessor(scaler);
            trainIter = new MultipleEpochsIterator(epochs, dataIter);
            network.fit(trainIter);
        }


        //评价模型
        log.info("Evaluate model....");
        recordReader.initialize(testData);
        dataIter = new RecordReaderDataSetIterator(recordReader, batchSize, 1, numLabels);
        scaler.fit(dataIter);
        dataIter.setPreProcessor(scaler);
        Evaluation eval = network.evaluate(dataIter);
        log.info(eval.stats(true));

        // 取出第一条数据进行预测
        dataIter.reset();
        DataSet testDataSet = dataIter.next();
        List<String> allClassLabels = recordReader.getLabels();
        int labelIndex = testDataSet.getLabels().argMax(1).getInt(0);
        int[] predictedClasses = network.predict(testDataSet.getFeatures());
        String expectedResult = allClassLabels.get(labelIndex);
        String modelPrediction = allClassLabels.get(predictedClasses[0]);
        System.out.print("\nFor a single example that is labeled " + expectedResult + " the model predicted " + modelPrediction + "\n\n");

        // 保存模型
        if (save) {
            log.info("Save model....");
            ModelSerializer.writeModel(network, "model.bin", true);
        }
        log.info("****************Example finished********************");
    }

    private ConvolutionLayer convInit(String name, int in, int out, int[] kernel, int[] stride, int[] pad, double bias) {
        return new ConvolutionLayer.Builder(kernel, stride, pad).name(name).nIn(in).nOut(out).biasInit(bias).build();
    }

    private ConvolutionLayer conv5x5(String name, int out, int[] stride, int[] pad, double bias) {
        return new ConvolutionLayer.Builder(new int[]{5, 5}, stride, pad).name(name).nOut(out).biasInit(bias).build();
    }

    private SubsamplingLayer maxPool(String name, int[] kernel) {
        return new SubsamplingLayer.Builder(kernel, new int[]{2, 2}).name(name).build();
    }

    //构建LeNet
    public MultiLayerNetwork lenetModel() {
        MultiLayerConfiguration conf = new NeuralNetConfiguration.Builder()
                .seed(seed)
                .iterations(iterations)
                .regularization(false)
                .activation(Activation.RELU) // 用RELU激活
                .learningRate(1e-2) // 学习速率
                .weightInit(WeightInit.XAVIER)
                .optimizationAlgo(OptimizationAlgorithm.STOCHASTIC_GRADIENT_DESCENT)
                .updater(new Nesterovs(0.9))
                .list()
                .layer(0, convInit("cnn1", channels, 50, new int[]{5, 5}, new int[]{1, 1}, new int[]{0, 0}, 0))
                .layer(1, maxPool("maxpool1", new int[]{2, 2}))
                .layer(2, conv5x5("cnn2", 100, new int[]{5, 5}, new int[]{1, 1}, 0))
                .layer(3, maxPool("maxool2", new int[]{2, 2}))
                .layer(4, new DenseLayer.Builder().nOut(500).build())
                .layer(5, new OutputLayer.Builder(LossFunctions.LossFunction.NEGATIVELOGLIKELIHOOD)
                        .nOut(numLabels)
                        .activation(Activation.SOFTMAX)
                        .build())
                .backprop(true).pretrain(false)
                .setInputType(InputType.convolutional(height, width, channels))
                .build();

        return new MultiLayerNetwork(conf);

    }

    public static void main(String[] args) throws Exception {
        new AnimalsClassification().run(args);
    }

}
运行结果:
Examples labeled as bear classified by model as bear: 2 times
Examples labeled as bear classified by model as deer: 1 times
Examples labeled as deer classified by model as deer: 1 times
Examples labeled as deer classified by model as duck: 1 times
Examples labeled as deer classified by model as turtle: 1 times
Examples labeled as duck classified by model as duck: 3 times
Examples labeled as duck classified by model as turtle: 1 times
Examples labeled as turtle classified by model as deer: 1 times
Examples labeled as turtle classified by model as duck: 1 times
Examples labeled as turtle classified by model as turtle: 2 times


==========================Scores========================================
 # of classes:    4
 Accuracy:        0.5714
 Precision:       0.6083
 Recall:          0.5625
 F1 Score:        0.5750
Precision, recall & F1: macro-averaged (equally weighted avg. of 4 classes)
========================================================================

For a single example that is labeled duck the model predicted duck

2017-10-17 21:40:37 INFO  AnimalsClassification:175 - ****************Example finished********************
请登录www.zhuanzhi.ai或者点击阅读原文,
搜索“DeepLearning4j” 主题,查看获得工程项目、代码、数据集等资源!
明天请继续关注“DeepLearning4j”教程。
完整系列搜索查看,请PC登录
www.zhuanzhi.ai, 搜索“DeepLearning4j”即可得。
对DeepLearning4j教程感兴趣的同学,欢迎进入我们的专知DeepLearning4j主题群一起交流、学习、讨论,扫一扫如下群二维码即可进入:
群满,请扫描小助手,加入专知DeepLearning4j主题群,交流分享~
欢迎转发分享到微信群和朋友圈!
获取更多关于机器学习以及人工智能知识资料,请访问www.zhuanzhi.ai, 或者点击阅读原文,即可得到!
-END-
欢迎使用专知
专知,一个新的认知方式!目前聚焦在人工智能领域为AI从业者提供专业可信的知识分发服务, 包括主题定制、主题链路、搜索发现等服务,帮你又好又快找到所需知识。
使用方法>>访问www.zhuanzhi.ai, 或点击文章下方“阅读原文”即可访问专知
中国科学院自动化研究所专知团队
@2017 专知
专 · 知
关注我们的公众号,获取最新关于专知以及人工智能的资讯、技术、算法、深度干货等内容。扫一扫下方关注我们的微信公众号。

点击“阅读原文”,使用专知!


