只讲关键点之兼容100+种关键点检测数据增强方法

极市导读
本文介绍了已有的几种关键点检测数据增强的方法,将其的优缺点进行了对比并整合出了一个兼容100+种关键点检测方法的小工具,附有详细的代码实操。 >>加入极市CV技术交流群,走在计算机视觉的最前沿
0. 前言

准备写个关键点检测的专栏,名字就叫“只讲关键点”,这是篇是只讲关键点(人脸/人体/手部关键点检测)系列的第一篇。我寻思着,既然是第一篇,那应该讲一些基础且实用的东西,就好比小说里的修仙打怪开新地图,如果你练得一手好药,无论你是筑基金丹还是元婴老怪,总是能胜人一筹。那么,对于关键点检测来说,什么样的知识点是属于“基础且实用”的“好药”范畴呢,那当然是数据增强了,因为无论您正在研究或需要解决的是哪种关键点检测任务(人脸关键点、人体关键点、手部关键点),都需要用到数据增强,如果您手上有一个简单好用的数据增强的工具,那将能为您节省不少的时间。这篇文章可能是这个专栏的所有文章里实用性最强的一篇,所以作为这个专栏的首篇是再合适不过了。这篇文章不仅介绍已有的数据增强工具,也介绍一下我自己整合的一个兼容100+ 种关键点检测方法的小工具 torchlm,简单易用,可pip一键安装。下文所述均为个人理解,如有偏误欢迎指正。
GitHub(欢迎star和pr): https://github.com/DefTruth/torchlm
1. 现有数据增强工具是怎样的?
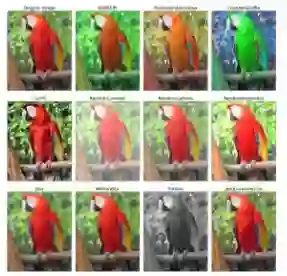
现在有哪些数据增强工具?比较出名的imgaug和albumentations,当然torchvision中也包含一些常用的图像数据增强方法。imgaug和albumentations包含非常多的基础的数据增强方法,它们可以实现的效果包括添加噪音、仿射变换、裁剪、翻转、旋转等,也支持矩形框、关键点等数据类型的变换。其效果图如下所示:
此外,Albumentations更是发了篇论文《Albumentations: fast and flexible image augmentations》,也是十分骚气。到目前为止,albumentations已经包含了70多种数据增强方法,也都涵盖了图像、矩形框、关键点、分割等各个数据类型的变换。这些开源库的特点就是非常全面,支持很多不同数据类型的变换,我在日常的工作中也经常会用到。
但用的多了,也慢慢地发现了一些使用体验上的问题。比如,当我想结合imgaug、albumentations和torchvision来用的时候,会发现他们各自有一套数据类型的定义,为了兼容不同的规范,我经常要捏一些函数来做转换,整个pipeline就变得ugly了;
又比如,当我想按照albumentations的风格来写一个关键点的transforms时,发现albumentations对类要求不仅仅是要实现apply_to_keypoints,还要实现兼容apply_to_bboxes、apply_to_mask等方法来兼容其他的数据类型的变换,但其实我只想要一个关于关键点变换的功能,然后能够以比较优雅的方式直接放到Compose的pipeline里面,最终我还是选择了在外部写一个函数来实现这个事情,这就不太pythonic;
再比如,imgaug和albumentations并没有对“数据安全”做很好的检查,在albumentations中设置remove_invisible=True时,会自动删除越界的点位,而为False时,则会保留越界的点位,哪怕点位已经在图像外面,但在实际应用中,这两种方式,对于关键点检测这个任务来说,都不是很合理。如果是删除越界点位,那么,在你经过一连串的数据增强的变化后,原来是10个点位,现在变成8个了,这8个点位大概率是不能用的,因为索引对不上。如果是保留图像外的点位,那么可能会给训练数据引入额外的误差。毫无疑问,他们都是非常优秀的开源工具,但是就关键点检测这个任务来说,我还是想要一个更加简洁一致的数据增强工具,不需要过多的抽象,可以有one-line code的风格。
imgaug仓库(12k+star):https://github.com/aleju/imgaug
albumentations仓库(9k+star):https://github.com/albumentations-team/albumentations
2. 我想要一个什么样的数据增强工具?
那么,这个工具,在我的想象里,应该是怎么样的呢?我想,它应该是一个带有“极简主义”色彩的工具箱,它需要满足:
-
只关注一件事情,就是关键点检测。 -
可选的方法要足够多,但用法要足够简单。 -
one-line code兼容其他主流库的方法,一行代码解决。 -
尽可能不引入额外的抽象,支持用户自定义方法的绑定。 -
数据增强具备 安全性,可自动回退,撤销不安全的增强变换。 -
零代码自动兼容numpy和Tensor的数据类型,不需要用户做任何的转换。
现有的开源工具目前看来似乎还没有能全部满足上述这些要求的,那就自己写一个吧,于是就有了torchlm的transforms模块。当然,必须强调的是,这并没有做出什么有用的创新,也没有和这些非常成熟的开源项目比较的意思,它的出现仅仅是为了让这些关键点的数据增强方法更好用而已。torchlm不仅提供了自定义的将近30种关键点数据增强方式,并且可以通过torchlm.bind方法,one-line-code style 兼容 80+ 种来自torchvision和albumentations的数据增强方法,也支持一行代码绑定用户自定义方法,自动兼容numpy和Tensor的数据类型,不需要用户做任何的转换。并且torchlm提供的将近30种关键点数据增强方法以及被torchlm.bind绑定后的80+种来自torchvision和albumentations的数据增强方法都是“安全”的,可自动回退,撤销不安全的增强变换。
3. torchlm的transforms模块介绍
-
数据格式要求: 所有的transform统一规范为(img, landmarks)输入输出,无论实际上是否对点位进行变动,不变动点位的image-only变换会直接返回原始点位。np.ndarray或者torch.Tensor均可,因为这两种是最常用的。albumentations中的list格式,反而不是很常用。我们经常需要对landmarks做一些数学运算,list不是很方便。img是RGB格式输入输出,shape为(H,W,3),landmarks是xy格式输入输出,shape为(N,2),N表示点位的数量。 -
类型命名风格: 命名风格统一为LandmarksXXX或者LandmarksRandomXXX,遵循torchvision和albumentations的命名风格,Random表示该类型属于随机变换类型,可在初始化时指定一个概率。而torchlm提供的非Random则表示非随机类型,在torchlm的pipeline中一定会被执行(而bind自其他主流库的不一定是必须执行的,比如albumentations中非Random类型还是可以指定概率的...)。 -
自动数据类型转换,autodtype: 这个问题很常见,比如你刚刚正愉快地把你的landmarks处理成了numpy数组,正想把torchvision的image-only transforms和albumentations捏在一起用时,却发现torchvision需要的输入是Tensor,而albumentations的landmarks输入要求是list,emmm...,啊这,numpy表示不服(你们都不考虑一下兼容我的么?)。嗯,其实解决的方式其实也并不复杂,就是利用python的装饰器,给函数或被bind的transform做一个自动转换数据类型的标记。我写了一个autodtype的装饰器,就是专门来干这种无聊的事情的,它会把你的数据类型转换成函数需要的输入类型,并且在数据增强完成后,再将数据类型转换成原始的类型。 -
数据增强的安全性和简洁性: 通常情况下,在做关键点检测任务的时候,我们希望经过一系列数据增强后的点位是完备的。比如我做个98点的人脸关键点检测,如果数据增强导致点位数量变少或引入额外的误差,都不是理想的选择。所以,数据增强的“安全性”就比较重要了。torchlm.bind会自动对被bind的类型或方法做这种安全性检查,并且所有torchlm的transforms模块中的方法都是支持这种安全性检查的,不会出现奇怪的点位,当发现变换前后点位数量不一致时,可自动回退,撤销不安全的增强变换。 -
torchlm.bind方法说明: 这里单独把torchlm.bind拿出来讲几句。所有torchvision、albumentations和用户自定义的方法,经过torchlm.bind绑定后,会自动带有autodtype和“安全性”的特性,你只需要正常定义一个关键点数据增强的函数就行,剩下边边角角的事情,就交给torchlm.bind吧。另外,torchlm.bind还提供了一个有用的参数,prob,如果指定了这个参数,torchlm.bind就会把所有被绑定的transform或callable方法都变成random风格的,会按照随机的概率执行。在torchvision中,有些transform并非是随机的,那么就可以通过这种方式变成随机的;还有用户自定义的函数,也不需要手动进行随机的设置,通过torchlm.bind的prob设置就可以变为随机的版本了。这样有个好处,就是,无论是来自torchvision、albumentations,还是用户自定义的方法,都可以比较优雅地放到一个Compose的pipeline中了。比如,以下这个混合使用的例子:
import torchvision
import albumentations
import torchlm
transform = torchlm.LandmarksCompose([
        # use native torchlm transforms
        torchlm.LandmarksRandomScale(prob=0.5),
        # bind torchvision image only transforms, bind with a given prob
        torchlm.bind(torchvision.transforms.GaussianBlur(kernel_size=(5, 25)), prob=0.5),  # 不需要做数据转换了
        torchlm.bind(torchvision.transforms.RandomAutocontrast(p=0.5)),
        # bind albumentations image only transforms
        torchlm.bind(albumentations.ColorJitter(p=0.5)), # 也不需要在外部检查点位数量
        torchlm.bind(albumentations.GlassBlur(p=0.5)),
        # bind albumentations dual transforms
        torchlm.bind(albumentations.RandomCrop(height=200, width=200, p=0.5)),
        torchlm.bind(albumentations.Rotate(p=0.5)),
        # bind custom callable array functions
        torchlm.bind(callable_array_noop, bind_type=torchlm.BindEnum.Callable_Array),
        # bind custom callable Tensor functions with a given prob,指定一个概率,变成随机版本
        torchlm.bind(callable_tensor_noop, bind_type=torchlm.BindEnum.Callable_Tensor, prob=0.5),
        # ...
    ])
 new_img, new_landmarks = transform(img, landmarks) # img,landmarks可以是np.ndarray或Tensor
瞧瞧,这个用法看起来是不是优雅多了,torchlm.bind帮你处理了那些边边角角的事情。
4. torchlm一键安装
torchlm的已经发布在pypi上了,因此可以通过pip一键安装,很方便。
pip3 install torchlm
# install from specific pypi mirrors use '-i'
pip3 install torchlm -i https://pypi.org/simple/
或者从github源码下载安装
# clone torchlm repository locally
git clone --depth=1 https://github.com/DefTruth/torchlm.git
cd torchlm
# install in editable mode
pip install -e .
5. torchlm原生数据增强方法
-
LandmarksNormalize: 对img进行归一化处理,x = (x - mean) / std,对于landmarks不做任何处理。初始化参数说明,mean: float, 均值,默认为127.5;std: float, 标准差,默认128.0;
class LandmarksNormalize(LandmarksTransform):
   def __init__(
            self,
            mean: float = 127.5,
            std: float = 128.
   ):
-
LandmarksUnNormalize:对img进行反归一化处理,x = x * std + std,对于landmarks不做任何处理。初始化参数说明,mean: float, 均值,默认为127.5;std: float, 标准差,默认128.0;
class LandmarksUnNormalize(LandmarksTransform):
    def __init__(
            self,
            mean: float = 127.5,
            std: float = 128.
    ):
-
LandmarksToTensor:将img和landmarks从numpy数组转换成Tensor,无初始化参数
class LandmarksToTensor(LandmarksTransform):
    def __init__(self):
-
LandmarksToNumpy: 将img和landmarks从Tensor转换成numpy数组,无初始化参数
class LandmarksToNumpy(LandmarksTransform):
    def __init__(self):
-
LandmarksResize: 对img进行resize,并且调整landmarks坐标。初始化参数说明,size: Union[Tuple[int, int], int],目标图片resize后大小,顺序为(w,h);keep_aspect: bool,是否保持尺度不变,默认False;如果设置为True,则保持输入img宽高比率不变,并对空白区域进行零值padding。
class LandmarksResize(LandmarksTransform):
    def __init__(
            self,
            size: Union[Tuple[int, int], int],
            keep_aspect: bool = False
    ):
-
LandmarksClip:以landmarks外接矩形框为中心,在img上进行裁剪操作。比如我们通常要去掉一些冗余的背景区域,只在landmarks外接矩形的某个延展区域内进行估计点位。初始化参数说明,width_pad: float,默认0.2,相对于landmarks的宽的扩张比率,扩张后的框宽为landmarks外接矩形的(width_pad+1.+width_pad)倍;height_pad: float,默认0.2,相对于landmarks的高的扩张比率,扩张后的框高为landmarks外接矩形的(height_pad+1.+height_pad)倍;target_size:Union[Tuple[int, int], int],默认为None,这个表示clip之后,是否要再resize到某个指定的尺寸;如果要对clip后得到的img重新resize到指定的target_size,则kwargs,表示传给LandmarksResize的参数,否则该参数无任何作用。
class LandmarksClip(LandmarksTransform):
    def __init__(
            self,
            width_pad: float = 0.2,
            height_pad: float = 0.2,
            target_size: Union[Tuple[int, int], int] = None,
            **kwargs
    ):
-
LandmarksRandomCenterCrop: 随机中心裁剪,将会以img的中心点(cx,cy)为中心,按照指定的宽高可选的比率范围,随机选择宽高比率进行裁剪。该改变换会根据图片实际裁剪的比率变动landmarks的坐标,并且会自动检查点位坐标是否越界的“安全性”,确保crop的区域一定会包含所有的点位。一般来说,随机中心裁剪对 模拟人脸检测器带来的抖动比较有用,避免对某种固定尺寸比率的人脸矩形框过拟合。实际应用的时候,通常无法保证上游的人脸检测器是不会更改的,所以这种人脸框的抖动几乎是必然存在的。随机中心裁剪就可以模拟这种情形。初始化参数说明,width_range: Tuple[float, float],宽的比率选择范围,默认为,(0.8, 1.0),假设随机选择了一个比率w_r,原来图像的宽为img_w,则最后crop的宽是(w_r * img_w),并且这个crop不是以(cx,cy)为中心对称的,而是会在确保包含所有点位的基础上,随机左右偏移;height_range: Tuple[float, float],宽的比率选择范围,默认为,(0.8, 1.0),假设随机选择了一个比率h_r,原来图像的宽为img_h,则最后crop的宽是(h_r * img_h),并且这个crop不是以(cx,cy)为中心对称的,而是会在确保包含所有点位的基础上,随机上下偏移;prob: float,默认0.5,发生的概率。
class LandmarksRandomCenterCrop(LandmarksTransform):
    def __init__(
            self,
            width_range: Tuple[float, float] = (0.8, 1.0),
            height_range: Tuple[float, float] = (0.8, 1.0),
            prob: float = 0.5
    ):
transform = torchlm.LandmarksCompose([
        torchlm.LandmarksRandomCenterCrop(width_range=(0.5, 0.1), height_range=(0.5, 0.1), prob=1.),
        torchlm.LandmarksResize((256, 256))
    ])

-
LandmarksHorizontalFlip: 水平镜像翻转,无初始化参数。注意,这个方法会改变点位的索引顺序,所以一般不要使用,除非你的任务是允许进行镜像的,否则你的loss可能一直无法收敛哦。这是个坑来的(亲自踩过的),这里还是实现了这个方法,留给有缘人踩一踩。
class LandmarksHorizontalFlip(LandmarksTransform):
    """WARNING: HorizontalFlip augmentation mirrors the input image. When you apply
     that augmentation to keypoints that mark the side of body parts (left or right),
     those keypoints will point to the wrong side (since left on the mirrored image
     becomes right). So when you are creating an augmentation pipeline look carefully
     which augmentations could be applied to the input data. Also see:
     https://albumentations.ai/docs/getting_started/keypoints_augmentation/
    """
    def __init__(self):
-
LandmarksRandomHorizontalFlip: 随机版本的水平镜像翻转,初始化参数说明,prob: float,默认0.5,发生的概率。这个是随机版本的坑,更坑,是留给更有缘人去踩的。如果你的任务本质上不允许进行镜像,而你又用了这个数据增强,那么恭喜你,有缘人,你更难发现这个坑了,因为这个loss可能时而下降时而上升,也可能是收敛到某个看似正常的地方却一直下不去了(当镜像发生的概率很小时)。 用咱们修真界的话来讲就是,这就是一颗传说中的“天品毒丹”啊,非有缘人而不可得,实乃调参炼药坑己坑人,必备良药啊,请各位有缘人务必收好。
class LandmarksRandomHorizontalFlip(LandmarksTransform):
    """WARNING: HorizontalFlip augmentation mirrors the input image. When you apply
     that augmentation to keypoints that mark the side of body parts (left or right),
     those keypoints will point to the wrong side (since left on the mirrored image
     becomes right). So when you are creating an augmentation pipeline look carefully
     which augmentations could be applied to the input data. Also see:
     https://albumentations.ai/docs/getting_started/keypoints_augmentation/
    """
    def __init__(
            self,
            prob: float = 0.5
    ):
-
LandmarksAlign:人脸对齐。这个主要是用在人脸关键点检测的任务上,并且不一定是数据增强,主要为为了便于获得一张对齐后的人脸和对齐后的关键点。初始化参数说明,eyes_index: Union[Tuple[int, int], List[int]],必须要指定的左右眼中心点在landmarks中的索引。
class LandmarksAlign(LandmarksTransform):
    def __init__(
            self,
            eyes_index: Union[Tuple[int, int], List[int]] = None
    ):
transform = torchlm.LandmarksCompose([
        torchlm.LandmarksRandomRotate(80, prob=1.),  # 先增加旋转
        torchlm.LandmarksRandomAlign(eyes_index=(96, 97), prob=1.),  # 再进行对齐看效果
        torchlm.LandmarksResize((256, 256))
    ])

-
LandmarksRandomAlign:随机版本的人脸对齐。这个主要是用在人脸关键点检测的任务上,可用作数据增强。可能出于某种奇怪的原因,你想随机地将一部分人脸根据关键点进行对齐后,作为训练数据,那么就可以使用这个数据增强方法。初始化参数说明,eyes_index: Union[Tuple[int, int], List[int]],必须要指定的左右眼中心点在landmarks中的索引;prob: float,默认0.5,发生的概率。
class LandmarksRandomAlign(LandmarksTransform):
    def __init__(
            self,
            eyes_index: Union[Tuple[int, int], List[int]] = None,
            prob: float = 0.5
    ):
-
LandmarksRandomScale:随机尺度变换。从指定的scale可选值域范围内挑选比率,对输入的图片进行尺度变换,拉伸变形,并同时调整landmarks的坐标。初始化参数说明,scale: Union[Tuple[float, float], float],scale变化的范围比率,相对于原图片的宽高;prob: float,默认0.5,发生的概率;diff: bool,是否让宽高的比率是随机不一致的,默认True,若为False,对图片按照宽高选择到的相同比率进行拉伸。
class LandmarksRandomScale(LandmarksTransform):
    def __init__(
            self,
            scale: Union[Tuple[float, float], float] = 0.4,
            prob: float = 0.5,
            diff: bool = True
    ):
transform = torchlm.LandmarksCompose([
        torchlm.LandmarksRandomScale(scale=(-0.5, 1.5), prob=1.),
        torchlm.LandmarksResize((256, 256), keep_aspect=True)
    ])

-
LandmarksRandomShear:随机剪切变化。对图片进行剪切变化,并同时调整landmarks坐标。初始化参数说明,shear_factor: Union[Tuple[float, float], List[float], float],随机剪切的比率范围,通常是(-1.,1)之间;prob: float,默认0.5,发生的概率;
class LandmarksRandomShear(LandmarksTransform):
    def __init__(
            self,
            shear_factor: Union[Tuple[float, float], List[float], float] = 0.2,
            prob: float = 0.5
    ):
transform = torchlm.LandmarksCompose([
        torchlm.LandmarksRandomShear(prob=1.),
        torchlm.LandmarksResize((256, 256))
    ])

-
LandmarksRandomHSV: 随机HSV颜色空间变换。对图片进行颜色HSV的颜色空间的随机像素调整,这是一个image-only变换,不改变landmarks的坐标位置。初始化参数说明,hue: Union[Tuple[int, int], int],色度色温变画范围,建议(-20,+20)之间;saturation: Union[Tuple[int, int], int],饱和度变化范围,建议(-20,+20)之间;brightness: Union[Tuple[int, int], int],亮度变化范围,建议(-20,+20)之间;prob: float,默认0.5,发生的概率;
class LandmarksRandomHSV(LandmarksTransform):
    def __init__(
            self,
            hue: Union[Tuple[int, int], int] = 20,
            saturation: Union[Tuple[int, int], int] = 20,
            brightness: Union[Tuple[int, int], int] = 20,
            prob: float = 0.5
    ):
transform = torchlm.LandmarksCompose([
        torchlm.LandmarksRandomHSV(prob=1.),
        torchlm.LandmarksResize((256, 256))
    ])

-
LandmarksRandomTranslate:随机平移变换。对输入的图像,从给定的平移比率范围内随机选择一个比率进行平移变化,并且对应改变landmarks的坐标位置。平移变换有可能会使得部分landmarks越界,这也在内部做了数据的"安全性"判断,会自动撤销不安全的变换,确保landmarks在变换前后数量的一致性。初始化参数说明,translate: Union[Tuple[float, float], float],平移的比率范围,建议是(-0.2,0.2);prob: float,默认0.5,发生的概率;diff: bool,是否在宽高方向使用不同的平移比率,默认为False;
class LandmarksRandomTranslate(LandmarksTransform):
    def __init__(
            self,
            translate: Union[Tuple[float, float], float] = 0.2,
            prob: float = 0.5,
            diff: bool = False
    ):
transform = torchlm.LandmarksCompose([
        torchlm.LandmarksRandomTranslate(prob=1.),
        torchlm.LandmarksResize((256, 256))
    ])

-
LandmarksRandomRotate: 随机旋转变换。对输入的图像,从给定的角度范围内随机选择一个角度进行旋转变化,并且对应改变landmarks的坐标位置。旋转变换有可能会使得部分landmarks越界,这也在内部做了数据的"安全性"判断,会自动撤销不安全的变换,确保landmarks在变换前后数量的一致性。初始化参数说明,angle: Union[Tuple[int, int], List[int], int],角度变化的范围,建议(-90,+90);prob: float,默认0.5,发生的概率;bins: Optional[int],可以指定将angle范围内的角度,等距离地划分为多少bin;
class LandmarksRandomRotate(LandmarksTransform):
    def __init__(
            self,
            angle: Union[Tuple[int, int], List[int], int] = 10,
            prob: float = 0.5,
            bins: Optional[int] = None
    ):
transform = torchlm.LandmarksCompose([
        torchlm.LandmarksRandomRotate(angle=80, prob=1.),
        torchlm.LandmarksResize((256, 256))
    ])

-
LandmarksRandomBlur: 随机高斯模糊。对输入的图像,从给定的kernel范围内随机选择一个kernel,进行高斯模糊,该变换是image-only变换,不改变landmarks的坐标位置。这种变换可用用来模拟模糊的场景,能够提高模型的泛化能力。可以想象,如果你的关键点检测器都是在很清晰的图片上训练的,那么实际应用的时候,遇到模糊的场景可能就完了,况且,模糊是一种很常见的场景。初始化参数说明,kernel_range: Tuple[int, int],高斯kernel的选择范围,值越大越模糊,默认是(3, 11);prob: float,默认0.5,发生的概率;sigma_range: Tuple[int, int] ,方差的选择范围,默认 (0, 4),用默认的就行。
class LandmarksRandomBlur(LandmarksTransform):
    def __init__(
            self,
            kernel_range: Tuple[int, int] = (3, 11),
            prob: float = 0.5,
            sigma_range: Tuple[int, int] = (0, 4)
    ):
transform = torchlm.LandmarksCompose([
        torchlm.LandmarksResize((256, 256)),
        torchlm.LandmarksRandomBlur(kernel_range=(5, 35), prob=1.)
    ])

-
LandmarksRandomBrightness: 随机亮度和对比度变化。对输入的图像,从给定的亮度和对比度变化范围内随机选择值,进行亮度和对比度变化,该变换是image-only变换,不改变landmarks的坐标位置。初始化参数说明,brightness: Tuple[float, float],亮度变化范围,默认 (-30., 30.);contrast: Tuple[float, float],对比度变化范围,默认(0.5, 1.5);prob: float,默认0.5,发生的概率;
class LandmarksRandomBrightness(LandmarksTransform):
    def __init__(
            self,
            brightness: Tuple[float, float] = (-30., 30.),
            contrast: Tuple[float, float] = (0.5, 1.5),
            prob: float = 0.5
    ):
transform = torchlm.LandmarksCompose([
        torchlm.LandmarksRandomBrightness(prob=1.),
        torchlm.LandmarksResize((256, 256))
    ])

-
LandmarksRandomMask: 随机遮挡变换。从给定的mask面积比率范围内随机选择一个面积比率,在原图上随机选一块该面积大小,矩形形状随机的方块进行mask,并且mask的值也是随机的。该变换是image-only变换,不改变landmarks的坐标位置。初始化参数说明,mask_ratio: float,遮挡的比率最大值,默认0.1,指被遮挡区域占输入图片的面积的比率;prob: float,默认0.5,发生的概率;trans_ratio: float,默认0.5,控制mask区域的随机形状,用默认值行。
class LandmarksRandomMask(LandmarksTransform):
    def __init__(
            self,
            mask_ratio: float = 0.1,
            prob: float = 0.5,
            trans_ratio: float = 0.5
    ):
transform = torchlm.LandmarksCompose([
        torchlm.LandmarksRandomMask(prob=1.),
        torchlm.LandmarksResize((256, 256))
    ])

-
LandmarksRandomMaskMixUp:带Alpha融合的随机遮挡变化。torchlm特有的。 随机遮挡变换。从给定的mask面积比率范围内随机选择一个面积比率,在原图上随机选一块该面积大小,矩形形状随机的方块,按照随机挑选的alpha比率进行alpha融合,制造类似阴影的效果,mask的值也是随机的。该变换是image-only变换,不改变landmarks的坐标位置。初始化参数说明,mask_ratio: float,遮挡的比率最大值,默认0.1,指被遮挡区域占输入图片的面积的比率;prob: float,默认0.5,发生的概率;trans_ratio: float,默认0.5,控制mask区域的随机形状,用默认值行; alpha: float,mask可选最大alpha值,默认0.9;
class LandmarksRandomMaskMixUp(LandmarksTransform):
    def __init__(
            self,
            mask_ratio: float = 0.25,
            prob: float = 0.5,
            trans_ratio: float = 0.5,
            alpha: float = 0.9
    ):
transform = torchlm.LandmarksCompose([
        torchlm.LandmarksRandomMaskMixUp(prob=1.),
        torchlm.LandmarksResize((256, 256))
    ])

-
LandmarksRandomPatches:随机打补丁变换。这是torchlm特有的,该版本类似随机mask,其实是一个假的MixUp,这里没有使用alpha进行融合;该类型会把随机选择到的patch图像块,随机地填充到原图的一块区域,该类型需要指定patches图片集。当然,除了可以手动指定patches图片集合的路径外,也可以使用默认的,torchlm已经内置了100张随机的背景图片,大家可以不用额外准备这个图片集。初始化参数说明,patch_dirs: List[str],指定使用的patches图片集,若不指定则会使用torchlm自带的;patch_ratio: float,最大的打补丁面积,默认0.15;prob: float,默认0.5,发生的概率;trans_ratio: float,默认0.5,控制打补丁区域的随机形状,用默认值行。
class LandmarksRandomPatches(LandmarksTransform):
    def __init__(
            self,
            patch_dirs: List[str] = None,
            patch_ratio: float = 0.15,
            prob: float = 0.5,
            trans_ratio: float = 0.5
    ):
transform = torchlm.LandmarksCompose([
        torchlm.LandmarksRandomPatches(prob=1.),
        torchlm.LandmarksResize((256, 256))
    ])

-
LandmarksRandomPatchesMixUp:带Alpha融合的随机打补丁变换。这是torchlm特有的,针对关键点检测的改造的一个MixUp版本,在分类和目标检测领域大名鼎鼎的MixUp,当然可以考虑修改一下用到关键点检测当中。该类型会把随机选择到的patch图像块,根据随机选择的alpha比率,随机地填充到原图的一块区域,该类型需要指定patches图片集。当然,除了可以手动指定patches图片集合的路径外,也可以使用默认的,torchlm已经内置了100张随机的背景图片,大家可以不用额外准备这个图片集。初始化参数说明,patch_dirs: List[str],指定使用的patches图片集,若不指定则会使用torchlm自带的;patch_ratio: float,最大的打补丁面积,默认0.15;prob: float,默认0.5,发生的概率;trans_ratio: float,默认0.5,控制打补丁区域的随机形状,用默认值行;alpha: float,patch可选最大alpha值,默认0.9;
class LandmarksRandomPatchesMixUp(LandmarksTransform):
    def __init__(
            self,
            patch_dirs: List[str] = None,
            patch_ratio: float = 0.2,
            prob: float = 0.5,
            trans_ratio: float = 0.5,
            alpha: float = 0.9
    ):
transform = torchlm.LandmarksCompose([
        torchlm.LandmarksRandomPatchesMixUp(alpha=0.5, prob=1.),
        torchlm.LandmarksResize((256, 256))
    ])

-
LandmarksRandomBackground:随机背景替换变换。torchlm特有的。随机从指定的背景图片集合中选择一张背景图片,从中随机裁剪一块,按照填充的方式,将输入的图片填充到选定的背景上,该变换会改变landmarks的坐标位置。初始化参数说明,background_dirs: List[str],指定使用的backgrounds图片集,若不指定则会使用torchlm自带的;prob: float,默认0.5,发生的概率;
class LandmarksRandomBackground(LandmarksTransform):
    def __init__(
            self,
            background_dirs: List[str] = None,
            prob: float = 0.5
    ):
transform = torchlm.LandmarksCompose([
        torchlm.LandmarksRandomBackground(prob=1.),
        torchlm.LandmarksResize((256, 256))
    ])

-
LandmarksRandomBackgroundMixUp:带Alpha融合的随机背景替换变换。torchlm特有的。是我实现的MixUp在关键点检测的一个特例。随机从指定的背景图片集合中选择一张背景图片,从中随机裁剪一块,按照随机选择一个alpha比率融合到输入的图片上,该变换是image-only变换,不会改变Landmarks的坐标位置。这种方法,在训练样本比较少的时候,可以用来防止模型对少数的人脸过拟合。初始化参数说明,background_dirs: List[str],指定使用的backgrounds图片集,若不指定则会使用torchlm自带的;prob: float,默认0.5,发生的概率;alpha: float,background可选最大alpha值,默认0.3,注意这个值不能太大;
class LandmarksRandomBackgroundMixUp(LandmarksTransform):
    def __init__(
            self,
            background_dirs: List[str] = None,
            alpha: float = 0.3,
            prob: float = 0.5
    ):
transform = torchlm.LandmarksCompose([
        torchlm.LandmarksRandomBackgroundMixUp(alpha=0.5, prob=1.),
        torchlm.LandmarksResize((256, 256))
    ])

-
BindAlbumentationsTransform:绑定albumentations数据增强方法的wrapper类,不建议直接使用。初始化参数说明,transform,指定一个albumentations的transform;prob,发生的概率,和torchlm.bind中的prob参数含义相同。
class BindAlbumentationsTransform(LandmarksTransform):
    def __init__(
            self,
            transform: Albumentations_Transform_Type,
            prob: float = 1.0
    ):
-
BindTorchVisionTransform:绑定torchvision数据增强方法的wrapper类,不建议直接使用。初始化参数说明,transform,指定一个torchvision的transform;prob,发生的概率,和torchlm.bind中的prob参数含义相同。
class BindTorchVisionTransform(LandmarksTransform):
    def __init__(
            self,
            transform: TorchVision_Transform_Type,
            prob: float = 1.0
    ):
-
BindArrayCallable:绑定自定义numpy输入输出数据增强方法的wrapper类,不建议直接使用。初始化参数说明,call_func,指定一个numpy输入输出的自定义数据增强函数;prob,发生的概率,和torchlm.bind中的prob参数含义相同。
class BindArrayCallable(LandmarksTransform):
    def __init__(
            self,
            call_func: Callable_Array_Func_Type,
            prob: float = 1.0
    ):
-
BindTensorCallable:绑定自定义Tensor输入输出数据增强方法的wrapper类,不建议直接使用。初始化参数说明,call_func,指定一个Tensor输入输出的自定义数据增强函数;prob,发生的概率,和torchlm.bind中的prob参数含义相同。
class BindTensorCallable(LandmarksTransform):
    def __init__(
            self,
            call_func: Callable_Tensor_Func_Type,
            prob: float = 1.0
    ):
-
LandmarksCompose:关键点数据增强的pipeline。初始化参数说明,transforms,指定一个数据增强类型列表。
class LandmarksCompose(object):

    def __init__(
            self,
            transforms: List[LandmarksTransform]
    ):
6. 使用torchlm中的数据增强方法
一个示例性质的pipeline如下所示,用法很简单。
import torchlm
transform = torchlm.LandmarksCompose([
        # use native torchlm transforms
        torchlm.LandmarksRandomScale(prob=0.5),
        torchlm.LandmarksRandomTranslate(prob=0.5),
        torchlm.LandmarksRandomShear(prob=0.5),
        torchlm.LandmarksRandomMask(prob=0.5),
        torchlm.LandmarksRandomBlur(kernel_range=(5, 25), prob=0.5),
        torchlm.LandmarksRandomBrightness(prob=0.),
        torchlm.LandmarksRandomRotate(40, prob=0.5, bins=8),
        torchlm.LandmarksRandomCenterCrop((0.5, 1.0), (0.5, 1.0), prob=0.5),
        # ...
    ])

7. 绑定torchvision和albumentations的数据增强方法
通过 torchlm.bind 可以一行代码兼容torchvision和albumentations的 80+ 种数据增强方法,并且自动处理数据类型转换和数据“安全性”检查。
import torchvision
import albumentations
import torchlm
transform = torchlm.LandmarksCompose([
        # use native torchlm transforms
        torchlm.LandmarksRandomScale(prob=0.5),
        # bind torchvision image only transforms, bind with a given prob
        torchlm.bind(torchvision.transforms.GaussianBlur(kernel_size=(5, 25)), prob=0.5),
        torchlm.bind(torchvision.transforms.RandomAutocontrast(p=0.5)),
        # bind albumentations image only transforms
        torchlm.bind(albumentations.ColorJitter(p=0.5)),
        torchlm.bind(albumentations.GlassBlur(p=0.5)),
        # bind albumentations dual transforms
        torchlm.bind(albumentations.RandomCrop(height=200, width=200, p=0.5)),
        torchlm.bind(albumentations.Rotate(p=0.5)),
        # ...
    ])
8. 绑定用户自定义的数据增强方法
还可以通过 torchlm.bind 可以一行代码绑定用户自定义的数据增强方法,并且自动处理数据类型转换和数据“安全性”检查。
# First, defined your custom functions
def callable_array_noop(img: np.ndarray, landmarks: np.ndarray) -> Tuple[np.ndarray, np.ndarray]:
    # do some transform here ...
    return img.astype(np.uint32), landmarks.astype(np.float32)

def callable_tensor_noop(img: Tensor, landmarks: Tensor) -> Tuple[Tensor, Tensor]:
    # do some transform here ...
    return img, landmarks
# Then, bind your functions and put it into the transforms pipeline.
transform = torchlm.LandmarksCompose([
        # use native torchlm transforms
        torchlm.LandmarksRandomScale(prob=0.5),
        # bind custom callable array functions
        torchlm.bind(callable_array_noop, bind_type=torchlm.BindEnum.Callable_Array),
        # bind custom callable Tensor functions with a given prob
        torchlm.bind(callable_tensor_noop, bind_type=torchlm.BindEnum.Callable_Tensor, prob=0.5),
        # ...
    ])
9. torchlm的全局调试设置
torchlm提供良心的全局调试设置,通过设置一些全局选项,方便你对数据增强进行调试,以便定位到底是哪里出了问题。
import torchlm
# some global setting
torchlm.set_transforms_debug(True)
torchlm.set_transforms_logging(True)
torchlm.set_autodtype_logging(True)
如果设置了这些全局选项为True,那么每次数据增强的pipeline在运行时,都会输出一些有用的信息,辅助你进行判断和检查。
LandmarksRandomScale() AutoDtype Info: AutoDtypeEnum.Array_InOut
LandmarksRandomScale() Execution Flag: False
BindTorchVisionTransform(GaussianBlur())() AutoDtype Info: AutoDtypeEnum.Tensor_InOut
BindTorchVisionTransform(GaussianBlur())() Execution Flag: True
BindAlbumentationsTransform(ColorJitter())() AutoDtype Info: AutoDtypeEnum.Array_InOut
BindAlbumentationsTransform(ColorJitter())() Execution Flag: True
BindTensorCallable(callable_tensor_noop())() AutoDtype Info: AutoDtypeEnum.Tensor_InOut
BindTensorCallable(callable_tensor_noop())() Execution Flag: False
Error at LandmarksRandomTranslate() Skip, Flag: False Error Info: LandmarksRandomTranslate() have 98 input landmarks, but got 96 output landmarks!
LandmarksRandomTranslate() Execution Flag: False
-
Execution Flag: True 表示该变换被成功执行, False 则表示没有被成功执行,这可能是由于随机概率被跳过了,也可能是出现了运行时异常 (当debug mode 是 True 时,torchlm会中断pipeline并抛出详细的异常信息).
-
AutoDtype Info:
如果你不小心往一个需要numpy数组输入的变换传了Tensor,也是没有影响的,torchlm 会通过 autodtype 装饰器自动兼容不同的数据类型,并且在变换完成后,自动地将输出的数据转换为原来的类型。
-
Array_InOut 意味着当前的变换需要 np.ndnarray 作为输入,并且输出 np.ndarray. -
Tensor_InOut 意味着当前的变换需要 Tensor 作为输入,并且输出 Tensor. -
Array_In 意味着当前的变换需要 np.ndnarray 作为输入,并且输出 Tensor. -
Tensor_In 意味着当前的变换需要 Tensor 作为输入,并且输出 np.ndarray.
10. 一个torchlm关键点数据增强的完整案例
import cv2
import numpy as np
import torchvision
import albumentations
from torch import Tensor
from typing import Tuple

import torchlm

def callable_array_noop(
        img: np.ndarray,
        landmarks: np.ndarray
) -> Tuple[np.ndarray, np.ndarray]:
    # Do some transform here ...
    return img.astype(np.uint32), landmarks.astype(np.float32)


def callable_tensor_noop(
        img: Tensor,
        landmarks: Tensor
) -> Tuple[Tensor, Tensor]:
    # Do some transform here ...
    return img, landmarks


def test_torchlm_transforms_pipeline():
    print(f"torchlm version: {torchlm.__version__}")
    seed = np.random.randint(0, 1000)
    np.random.seed(seed)

    img_path = "./2.jpg"
    anno_path = "./2.txt"
    save_path = f"./logs/2_wflw_{seed}.jpg"
    img = cv2.imread(img_path)[:, :, ::-1].copy()  # RGB
    with open(anno_path, 'r') as fr:
        lm_info = fr.readlines()[0].strip('\n').split(' ')

    landmarks = [float(x) for x in lm_info[:196]]
    landmarks = np.array(landmarks).reshape(98, 2)  # (5,2) or (98, 2) for WFLW

    # some global setting will show you useful details
    torchlm.set_transforms_debug(True)
    torchlm.set_transforms_logging(True)
    torchlm.set_autodtype_logging(True)

    transform = torchlm.LandmarksCompose([
        # use native torchlm transforms
        torchlm.LandmarksRandomScale(prob=0.5),
        torchlm.LandmarksRandomTranslate(prob=0.5),
        torchlm.LandmarksRandomShear(prob=0.5),
        torchlm.LandmarksRandomMask(prob=0.5),
        torchlm.LandmarksRandomBlur(kernel_range=(5, 25), prob=0.5),
        torchlm.LandmarksRandomBrightness(prob=0.),
        torchlm.LandmarksRandomRotate(40, prob=0.5, bins=8),
        torchlm.LandmarksRandomCenterCrop((0.5, 1.0), (0.5, 1.0), prob=0.5),
        # bind torchvision image only transforms with a given bind prob
        torchlm.bind(torchvision.transforms.GaussianBlur(kernel_size=(5, 25)), prob=0.5),
        torchlm.bind(torchvision.transforms.RandomAutocontrast(p=0.5)),
        torchlm.bind(torchvision.transforms.RandomAdjustSharpness(sharpness_factor=3, p=0.5)),
        # bind albumentations image only transforms
        torchlm.bind(albumentations.ColorJitter(p=0.5)),
        torchlm.bind(albumentations.GlassBlur(p=0.5)),
        torchlm.bind(albumentations.RandomShadow(p=0.5)),
        # bind albumentations dual transforms
        torchlm.bind(albumentations.RandomCrop(height=200, width=200, p=0.5)),
        torchlm.bind(albumentations.RandomScale(p=0.5)),
        torchlm.bind(albumentations.Rotate(p=0.5)),
        # bind custom callable array functions with a given bind prob
        torchlm.bind(callable_array_noop, bind_type=torchlm.BindEnum.Callable_Array, prob=0.5),
        # bind custom callable Tensor functions
        torchlm.bind(callable_tensor_noop, bind_type=torchlm.BindEnum.Callable_Tensor, prob=0.5),
        torchlm.LandmarksResize((256, 256)),
        torchlm.LandmarksNormalize(),
        torchlm.LandmarksToTensor(),
        torchlm.LandmarksToNumpy(),
        torchlm.LandmarksUnNormalize()
    ])

    trans_img, trans_landmarks = transform(img, landmarks)
    new_img = torchlm.draw_landmarks(trans_img, trans_landmarks, circle=2)
    cv2.imwrite(save_path, new_img[:, :, ::-1])

    # unset the global status when you are in training process
    torchlm.set_transforms_debug(False)
    torchlm.set_transforms_logging(False)
    torchlm.set_autodtype_logging(False)

你看,现在整个数据增强的pipeline是不是优雅很多了,无论是torchlm原生的transforms,还是来自torchvision和albumentations的transforms,都可以很自然地放到一个流程里面来了,顺眼多了。也不用去管输入是numpy数组还是Tensor了。而且,当你想要自定义一个关键点数据增强的方法放入到整个pipeline时,需要做的,仅仅就是定义好这个方法。torchlm.bind帮你处理了很多边边角角的事情。
11. 总结
-
(1) 本文介绍了比较常用的数据增强开源工具,并且,笔者根据关键点检测任务的特点,重新整合了一个带有“极简主义”色彩,可同时兼容 100+种关键点数据增强方法的小工具torchlm,它有以下特点: -
只关注一件事情,就是关键点检测。 -
可选的方法要足够多,但用法要足够简单。 -
one-line code兼容其他主流库的方法,一行代码解决。 -
尽可能不引入额外的抽象,支持用户自定义方法的绑定。 -
数据增强具备 安全性,可自动回退,撤销不安全的增强变换。 -
零代码自动兼容numpy和Tensor的数据类型,不需要用户做任何的转换。 -
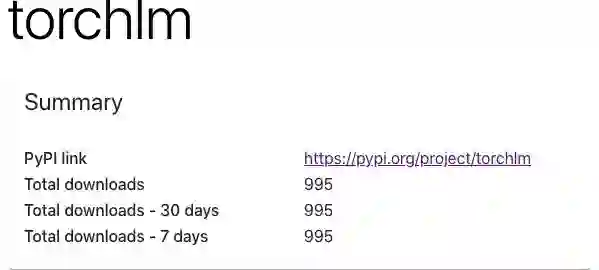
(2) 瞄了两眼,torhclm发布有一段时间了,pip安装量不知道为啥已经接近1千了(emmm....,应该不是个很fancy的东西啊,感觉统计有问题吧,算了算了,就这样吧),希望这个工具能帮到大家哈,后续还会继续增加更多的方法,或者兼容一下imgaug。 -
(3) torchlm不只是关于数据增强,后面有时间会复现一些算法或者整合一些小工具到torchlm,取之开源用之开源,如果你觉得还算有用,不妨来star支持一下,也欢迎PR一些有用的关键点检测数据增强方法(也就是写个函数的事情)。“只讲关键点”这个系列,后面会陆续展开讲解一些关键点检测相关的论文,大家感兴趣的话可以先点赞关注一波。 -
(4) 必须强调的是, torchlm并没有作出什么创新,它只是笔者个人兴趣的集合,是一个用来保存业余写的垃圾代码的地方。看到有句话,当你决定输出的时候,通常意味着你需要获取更多的输入。因此,用心写好一篇文章,一行代码,既是输出,也是更多的输入。当然,如果若是有人看了后觉得还算有用,那便是最好不过了。 -
(5) 一些有关数据增强使用的题外话: 多不一定好,适度最重要。笔者在实践过程中,发现有个现象,就是数据增强并不是越多越好,要适度。过度的数据增强不一定能提点,反而可能掉点。因为整体的数据分布可能会由于数据增强的使用带来改变,当你堆了几十种数据增强方式时,最后进入模型的数据,几乎都是增强后的数据,而真实的数据占比变得很少。这就可能带来一些潜在的问题,比如模型反而在真实场景精度变低了。所以,数据增强,多不一定好,要适度使用。
更多的文档资料,请查看torchlm的主页:
GitHub(欢迎star和pr): https://github.com/DefTruth/torchlm
pypi download stats:https://pepy.tech/project/torchlm
如果觉得有用,就请分享到朋友圈吧!
公众号后台回复“transformer”获取最新Transformer综述论文下载~

# 极市平台签约作者#

DefTruth
知乎:DefTruth
一名缺少天赋的文科生、图形AI算法工程师、推理引擎业余玩家
研究领域:计算机视觉(检测/分割/抠图/识别/跟踪)、计算机图形学(动画驱动/UE4),
业余玩一玩推理引擎,热爱开源。
心态:保持学习,认为完整比完美更重要~