Keras实现基于MSCNN的人群计数

AI科技评论按,对图片中的物体进行计数是一个非常常见的场景,尤其是对人群或者车辆计数,通过计数我们可以获得当前环境的流量与拥挤状况。现有的人群计数方法通常可以分为两类:基于检测的方法和基于回归的方法。基于目标检测的方法在密集的小目标上效果并不理想,因此很多研究采用了基于像素回归的方法进行计数。本文实现了一个基于Keras的MSCNN人群计数模型。
github:
https://github.com/xiaochus/MSCNN
paper:
Multi-scale convolutional neural network for crowd counting
环境
Python 3.6
Keras 2.2.2
Tensorflow-gpu 1.8.0
OpenCV 3.4
数据
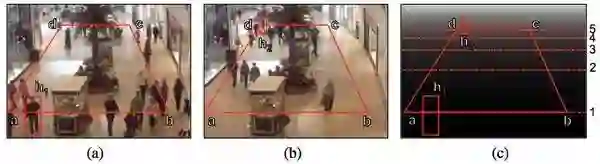
实验数据采用Mall Dataset crowd counting dataset,该数据库包括jpeg格式的视频帧,地面实况,透视标准化特征和透视标准化图,如下所示:

shopping_mall_annotated
shopping_mall_perspective
数据处理的代码如下所示:
1.首先根据标注文件读入图像和标注。
2.根据网络输入输出大小处理标注文件。
3.将人群位置映射为密度图,其中密度图使用了高斯滤波处理。
def read_annotations():
    """read annotation data.    Returns:        count: ndarray, head count.
        position: ndarray, coordinate.
    """    data = sio.loadmat('data\\mall_dataset\\mall_gt.mat')
    count = data['count']
    position = data['frame'][0]

    return count, position
        def map_pixels(img, image_key, annotations, size):
    """map annotations to density map.    Arguments:        img: ndarray, img.
        image_key: int, image_key.
        annotations: ndarray, annotations.
        size: resize size.

    Returns:        pixels: ndarray, density map.
    """    gaussian_kernel = 15    h, w = img.shape[:-1]
    sh, sw = size / h, size / w    pixels = np.zeros((size, size))

    for a in annotations[image_key][0][0][0]:
        x, y = int(a[0] * sw), int(a[1] * sh)
        if y >= size or x >= size:
            print("{},{} is out of range, skipping annotation for {}".format(x, y, image_key))
        else:
            pixels[y, x] += 1    pixels = cv2.GaussianBlur(pixels, (gaussian_kernel, gaussian_kernel), 0)

    return pixels


def get_data(i, size, annotations):
    """get data accoding to the image_key.    Arguments:        i: int, image_key.
        size: int, input shape of network.
        annotations: ndarray, annotations.

    Returns:        img: ndarray, img.
        density_map: ndarray, density map.
    """    name = 'data\\mall_dataset\\frames\\seq_{}.jpg'.
            format(str(i + 1).zfill(6))
    img = cv2.imread(name)

    density_map = map_pixels(img, i, annotations, size // 4)

    img = cv2.resize(img, (size, size))
    img = img / 255.

    density_map = np.expand_dims(density_map, axis=-1)

    return img, density_map
密度图还要使用高斯滤波处理是因为在空间中计数时,每个人只占一个像素点导致最终得到的密度分布图特别稀疏,会导致模型收敛到全0状态。因此通过高斯处理后,密度图呈现出热力图的形式,一定程度上解决了稀疏问题。而且高斯处理后的密度图,总计数是不变的。
处理过的输入图像以及其对应的密度图如下所示:
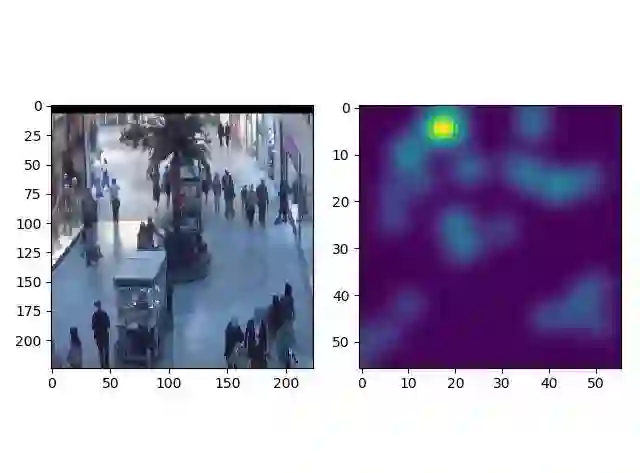
density_map
模型
模型的整体如下图所示,是一个比较简单的端对端网络。
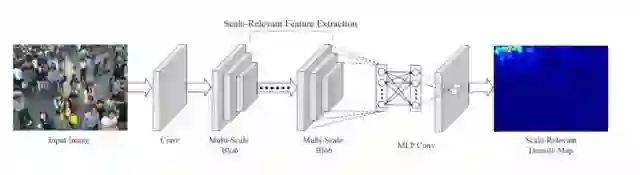
Multi-scale convolutional neural network for crowd counting
针对图像中的目标都是小目标的问题,作者借鉴了Inception模型提出了一个Multi-Scale Blob (MSB) 结构,用来增强特征的多样性。
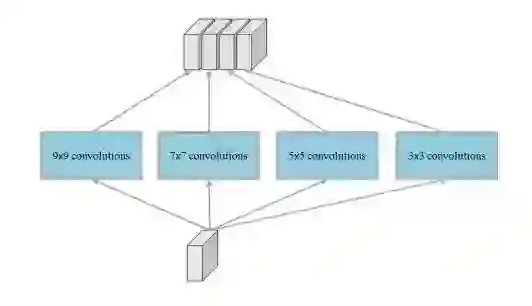
Multi-scale blob with different kernel size
论文中给出的网络结构如下所示:
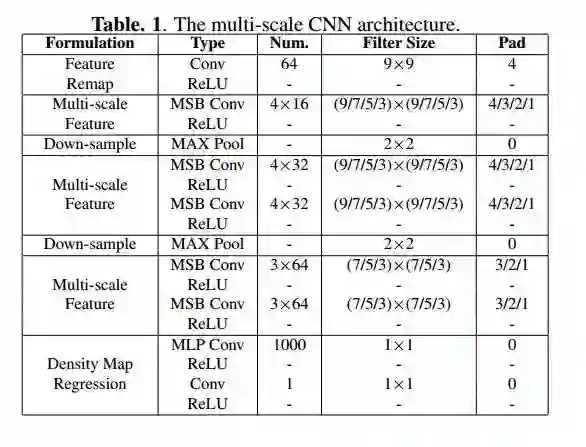
The multi scale CNN architecture
实现
基于Keras实现这个网络结构:
# -*- coding: utf-8 -*-from keras.layers import Input, Conv2D, MaxPooling2D, concatenate, Activationfrom keras.layers.normalization import BatchNormalizationfrom keras.models import Modelfrom keras.regularizers import l2from keras.utils.vis_utils import plot_modeldef MSB(filters):    """Multi-Scale Blob.

    Arguments:
        filters: int, filters num.

    Returns:
        f: function, layer func.
    """    params = {'activation': 'relu', 'padding': 'same',
              'kernel_regularizer': l2(5e-4)}

    def f(x):        x1 = Conv2D(filters, 9, **params)(x)
        x2 = Conv2D(filters, 7, **params)(x)
        x3 = Conv2D(filters, 5, **params)(x)
        x4 = Conv2D(filters, 3, **params)(x)
        x = concatenate([x1, x2, x3, x4])
        x = BatchNormalization()(x)
        x = Activation('relu')(x)

        return x
    return f

    def MSCNN(input_shape):    """Multi-scale convolutional neural network for crowd counting.

    Arguments:
        input_shape: tuple, image shape with (w, h, c).

    Returns:
        model: Model, keras model.
    """    inputs = Input(shape=input_shape)

    x = Conv2D(64, 9, activation='relu', padding='same')(inputs)
    x = MSB(4 * 16)(x)
    x = MaxPooling2D()(x)
    x = MSB(4 * 32)(x)
    x = MSB(4 * 32)(x)
    x = MaxPooling2D()(x)
    x = MSB(3 * 64)(x)
    x = MSB(3 * 64)(x)
    x = Conv2D(1000, 1, activation='relu', kernel_regularizer=l2(5e-4))(x)
    x = Conv2D(1, 1, activation='relu')(x)

    model = Model(inputs=inputs, outputs=x)

    return model


 if __name__ == '__main__':
    model = MSCNN((224, 224, 3))

    print(model.summary())
    plot_model(model, to_file='images\model.png', show_shapes=True)
实验
在项目里通过下列命令训练模型:
python train.py --size 224 --batch 16 --epochs 10
由于目前没有足量的计算资源使用,我们对模型做了一个初步训练测试效果。
下面是测试集中相同场景的图片进行测试的结果,真实的count是30,预测的count是27,结果大致接近。而且其人群密度图也与图片中的真实人群分布对应。
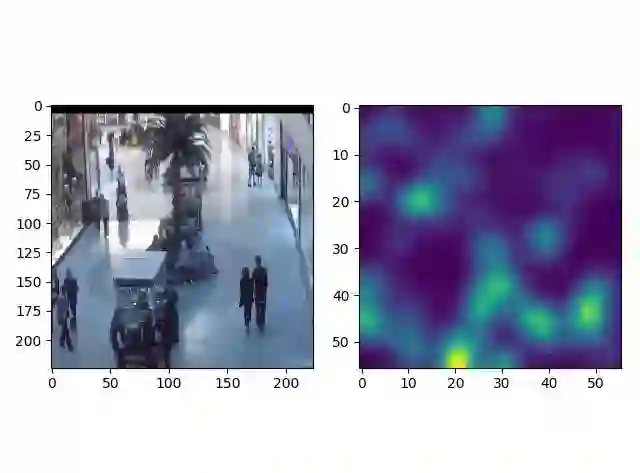
res1
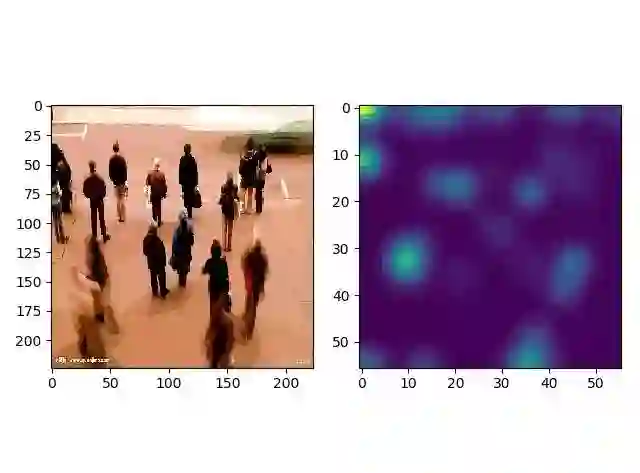
下面是随便找了一张背景和角度都不同的人群图,可以看出预测出现了较大的偏差。这是因为训练集较为单一的缘故,想要得到针对真实场景的模型,需要一个多样性的训练集。
count:24
res2
count:31
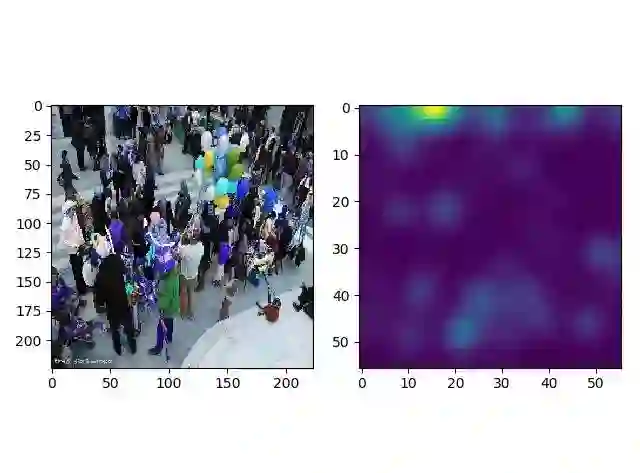
res3