ECCV2018|ShuffleNetV2:轻量级CNN网络中的桂冠
由极市、机器之心和中科创达联合举办的“2018计算机视觉最具潜力开发者榜单”评选活动,现已接受报名,杨强教授、俞扬教授等大牛嘉宾亲自评审,高通、中科创达、微众银行等大力支持,丰厚奖励,丰富资源,千万渠道,助力您的计算机视觉工程化能力认证,提升个人价值及算法变现。极市与您一起定义自己,发现未来~点击阅读原文即可报名~
作者:我是小将
来源:https://zhuanlan.zhihu.com/p/48261931
近来,深度CNN网络如ResNet和DenseNet,已经极大地提高了图像分类的准确度。但是除了准确度外,计算复杂度也是CNN网络要考虑的重要指标,过复杂的网络可能速度很慢,一些特定场景如无人车领域需要低延迟。另外移动端设备也需要既准确又快的小模型。为了满足这些需求,一些轻量级的CNN网络如MobileNet和ShuffleNet被提出,它们在速度和准确度之间做了很好地平衡。今天我们要讲的是ShuffleNetv2,它是旷视最近提出的ShuffleNet升级版本,并被ECCV2018收录。在同等复杂度下,ShuffleNetv2比ShuffleNet和MobileNetv2更准确。
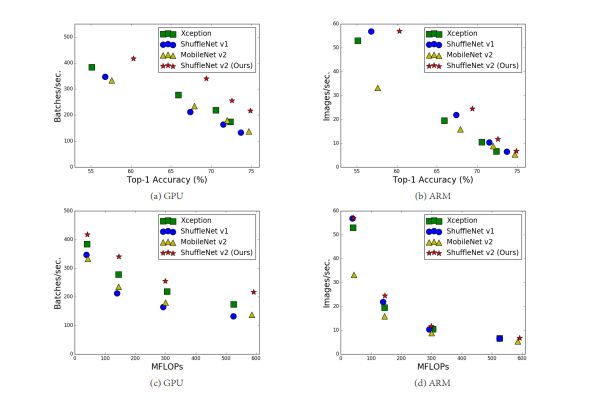
图1:ShuffleNetv2与其它算法在不同平台下的复杂度、速度以及准确度对比
设计理念
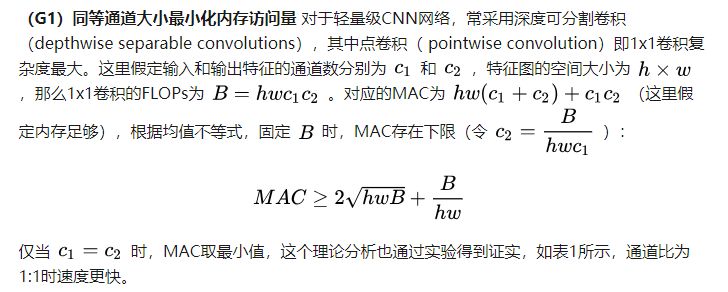
目前衡量模型复杂度的一个通用指标是FLOPs,具体指的是multiply-add数量,但是这却是一个间接指标,因为它不完全等同于速度。如图1中的(c)和(d),可以看到相同FLOPs的两个模型,其速度却存在差异。这种不一致主要归结为两个原因,首先影响速度的不仅仅是FLOPs,如内存使用量(memory access cost, MAC),这不能忽略,对于GPUs来说可能会是瓶颈。另外模型的并行程度也影响速度,并行度高的模型速度相对更快。另外一个原因,模型在不同平台上的运行速度是有差异的,如GPU和ARM,而且采用不同的库也会有影响。
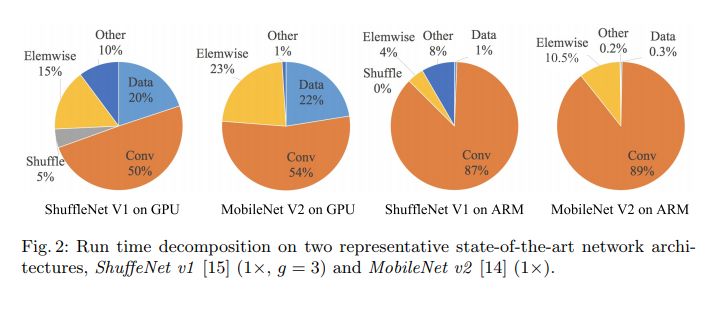
图2:不同模型的运行时间分解
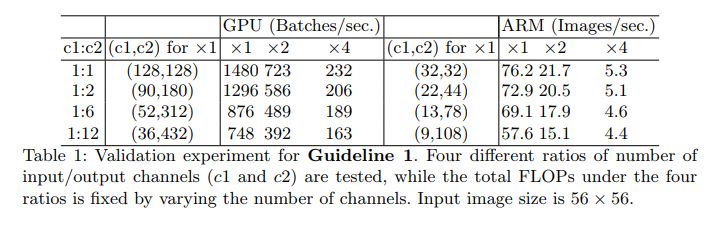
据此,作者在特定的平台下研究ShuffleNetv1和MobileNetv2的运行时间,并结合理论与实验得到了4条实用的指导原则:
(G3)网络碎片化会降低并行度 一些网络如Inception,以及Auto ML自动产生的网络NASNET-A,它们倾向于采用“多路”结构,即存在一个lock中很多不同的小卷积或者pooling,这很容易造成网络碎片化,减低模型的并行度,相应速度会慢,这也可以通过实验得到证明。
(G4)不能忽略元素级操作 对于元素级(element-wise operators)比如ReLU和Add,虽然它们的FLOPs较小,但是却需要较大的MAC。这里实验发现如果将ResNet中残差单元中的ReLU和shortcut移除的话,速度有20%的提升。
上面4条指导准则总结如下:
1x1卷积进行平衡输入和输出的通道大小;
组卷积要谨慎使用,注意分组数;
避免网络的碎片化;
减少元素级运算。
网络结构
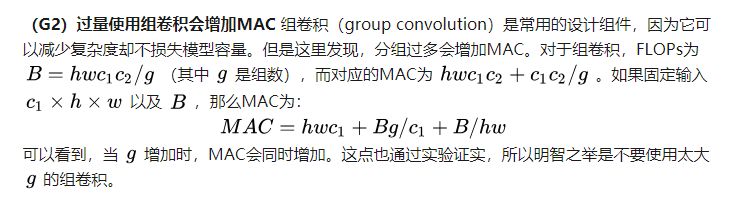
根据前面的4条准则,作者分析了ShuffleNetv1设计的不足,并在此基础上改进得到了ShuffleNetv2,两者模块上的对比如图3所示:
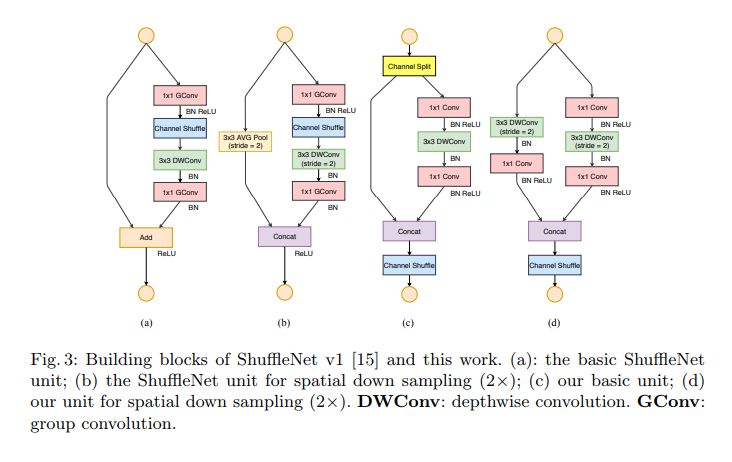
图3:ShuffleNet两个版本结构上的对比
在ShuffleNetv1的模块中,大量使用了1x1组卷积,这违背了G2原则,另外v1采用了类似ResNet中的瓶颈层(bottleneck layer),输入和输出通道数不同,这违背了G1原则。同时使用过多的组,也违背了G3原则。短路连接中存在大量的元素级Add运算,这违背了G4原则。
对于下采样模块,不再有channel split,而是每个分支都是直接copy一份输入,每个分支都有stride=2的下采样,最后concat在一起后,特征图空间大小减半,但是通道数翻倍。
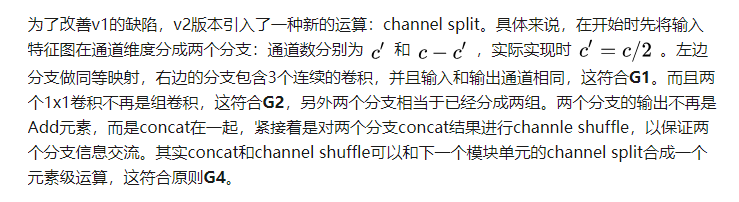
ShuffleNetv2的整体结构如下表所示,基本与v1类似,其中设定每个block的channel数,如0.5x,1x,可以调整模型的复杂度。
值得注意的一点是,v2在全局pooling之前增加了个conv5卷积,这是与v1的一个区别。最终的模型在ImageNet上的分类效果如下表所示:
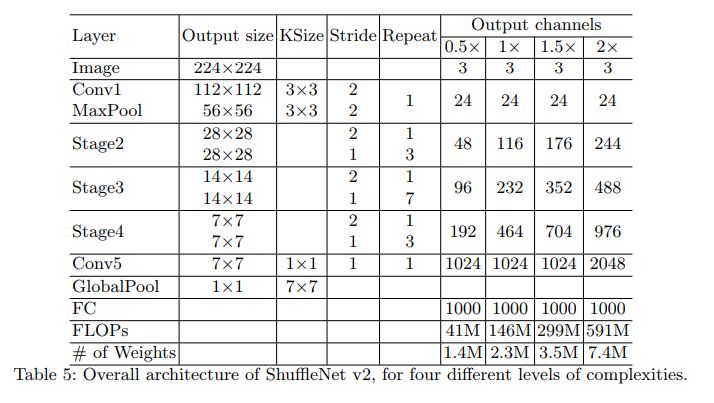
可以看到,在同等条件下,ShuffleNetv2相比其他模型速度稍快,而且准确度也稍好一点。同时作者还设计了大的ShuffleNetv2网络,相比ResNet结构,其效果照样具有竞争力。
从一定程度上说,ShuffleNetv2借鉴了DenseNet网络,把shortcut结构从Add换成了Concat,这实现了特征重用。但是不同于DenseNet,v2并不是密集地concat,而且concat之后有channel shuffle以混合特征,这或许是v2即快又好的一个重要原因。
TensorFlow上的实现
目前ShuffleNetv2没有看到官方开源实现,这里参考
tensorpack(https://github.com/tensorpack/tensorpack/blob/master/examples/ImageNetModels/shufflenet.py)中的复现(其中Top1 acc基本接近paper),给出v2在TensorFlow上实现。我们使用TensorFlow中
[tf.keras.Model(https://www.tensorflow.org/api_docs/python/tf/keras/models/Model)来实现ShuffleNetv2。
首先我们先定义网络中最基本的单元:Conv2D->BN->ReLU和DepthwiseConv2D->BN:
class Conv2D_BN_ReLU(tf.keras.Model):
    """Conv2D -> BN -> ReLU"""
    def __init__(self, channel, kernel_size=1, stride=1):
        super(Conv2D_BN_ReLU, self).__init__()

        self.conv = Conv2D(channel, kernel_size, strides=stride,
                            padding="SAME", use_bias=False)
        self.bn = BatchNormalization(axis=-1, momentum=0.9, epsilon=1e-5)
        self.relu = Activation("relu")

    def call(self, inputs, training=True):
        x = self.conv(inputs)
        x = self.bn(x, training=training)
        x = self.relu(x)
        return xclass DepthwiseConv2D_BN(tf.keras.Model):
    """DepthwiseConv2D -> BN"""
    def __init__(self, kernel_size=3, stride=1):
        super(DepthwiseConv2D_BN, self).__init__()

        self.dconv = DepthwiseConv2D(kernel_size, strides=stride,
                                     depth_multiplier=1,
                                     padding="SAME", use_bias=False)
        self.bn = BatchNormalization(axis=-1, momentum=0.9, epsilon=1e-5)

    def call(self, inputs, training=True):
        x = self.dconv(inputs)
        x = self.bn(x, training=training)
对于channel shuffle,只需要通过reshape操作即可:
def channle_shuffle(inputs, group):
    """Shuffle the channel
    Args:
        inputs: 4D Tensor
        group: int, number of groups
    Returns:
        Shuffled 4D Tensor    """
    in_shape = inputs.get_shape().as_list()
    h, w, in_channel = in_shape[1:]
    assert in_channel % group == 0
    l = tf.reshape(inputs, [-1, h, w, in_channel // group, group])
    l = tf.transpose(l, [0, 1, 2, 4, 3])
    l = tf.reshape(l, [-1, h, w, in_channel])

    return l
下面,定义v2中的基本模块,先定义stride=1的模块:
class ShufflenetUnit1(tf.keras.Model):
    def __init__(self, out_channel):
        """The unit of shufflenetv2 for stride=1
        Args:
            out_channel: int, number of channels        """        super(ShufflenetUnit1, self).__init__()

        assert out_channel % 2 == 0
        self.out_channel = out_channel

        self.conv1_bn_relu = Conv2D_BN_ReLU(out_channel // 2, 1, 1)
        self.dconv_bn = DepthwiseConv2D_BN(3, 1)
        self.conv2_bn_relu = Conv2D_BN_ReLU(out_channel // 2, 1, 1)

    def call(self, inputs, training=False):
        # split the channel
        shortcut, x = tf.split(inputs, 2, axis=3)

        x = self.conv1_bn_relu(x, training=training)
        x = self.dconv_bn(x, training=training)
        x = self.conv2_bn_relu(x, training=training)

        x = tf.concat([shortcut, x], axis=3)
        x = channle_shuffle(x, 2)
        return x
对于stride=2的下采样模块,与上面模块略有不同:
class ShufflenetUnit2(tf.keras.Model):
    """The unit of shufflenetv2 for stride=2"""
    def __init__(self, in_channel, out_channel):
        super(ShufflenetUnit2, self).__init__()

        assert out_channel % 2 == 0
        self.in_channel = in_channel
        self.out_channel = out_channel

        self.conv1_bn_relu = Conv2D_BN_ReLU(out_channel // 2, 1, 1)
        self.dconv_bn = DepthwiseConv2D_BN(3, 2)
        self.conv2_bn_relu = Conv2D_BN_ReLU(out_channel - in_channel, 1, 1)

        # for shortcut
        self.shortcut_dconv_bn = DepthwiseConv2D_BN(3, 2)
        self.shortcut_conv_bn_relu = Conv2D_BN_ReLU(in_channel, 1, 1)

    def call(self, inputs, training=False):
        shortcut, x = inputs, inputs

        x = self.conv1_bn_relu(x, training=training)
        x = self.dconv_bn(x, training=training)
        x = self.conv2_bn_relu(x, training=training)

        shortcut = self.shortcut_dconv_bn(shortcut, training=training)
        shortcut = self.shortcut_conv_bn_relu(shortcut, training=training)

        x = tf.concat([shortcut, x], axis=3)
        x = channle_shuffle(x, 2)
        return x
根据定义的两个模块,我们可以实现stage的整合:
class ShufflenetStage(tf.keras.Model):
    """The stage of shufflenet"""
    def __init__(self, in_channel, out_channel, num_blocks):
        super(ShufflenetStage, self).__init__()

        self.in_channel = in_channel
        self.out_channel = out_channel

        self.ops = []
        for i in range(num_blocks):
            if i == 0:
                op = ShufflenetUnit2(in_channel, out_channel)
            else:
                op = ShufflenetUnit1(out_channel)
            self.ops.append(op)

    def call(self, inputs, training=False):
        x = inputs        for op in self.ops:
            x = op(x, training=training)
        return x
建立所有准备模块后,我们可以很快递地实现ShuffleNetv2,这里实现1x模型:
class ShuffleNetv2(tf.keras.Model):
    """Shufflenetv2"""
    def __init__(self, num_classes, first_channel=24, channels_per_stage=(116, 232, 464)):
        super(ShuffleNetv2, self).__init__()

        self.num_classes = num_classes

        self.conv1_bn_relu = Conv2D_BN_ReLU(first_channel, 3, 2)
        self.pool1 = MaxPool2D(3, strides=2, padding="SAME")
        self.stage2 = ShufflenetStage(first_channel, channels_per_stage[0], 4)
        self.stage3 = ShufflenetStage(channels_per_stage[0], channels_per_stage[1], 8)
        self.stage4 = ShufflenetStage(channels_per_stage[1], channels_per_stage[2], 4)
        self.conv5_bn_relu = Conv2D_BN_ReLU(1024, 1, 1)
        self.gap = GlobalAveragePooling2D()
        self.linear = Dense(num_classes)

    def call(self, inputs, training=False):
        x = self.conv1_bn_relu(inputs, training=training)
        x = self.pool1(x)
        x = self.stage2(x, training=training)
        x = self.stage3(x, training=training)
        x = self.stage4(x, training=training)
        x = self.conv5_bn_relu(x, training=training)
        x = self.gap(x)
        x = self.linear(x)
        return x
我从tensorpack已训练好的权重文件迁移到上面实现的模型,然后就可以测试模型效果:
from tensorflow.keras.preprocessing import image
from tensorflow.keras.applications.densenet import preprocess_input, decode_predictions

img_path = './images/cat.jpg'img = image.load_img(img_path, target_size=(224, 224))x = image.img_to_array(img)x = np.expand_dims(x, axis=0)x = preprocess_input(x)inputs = tf.placeholder(tf.float32, [None, 224, 224, 3])model = ShuffleNetv2(1000)outputs = model(inputs, training=False)outputs = tf.nn.softmax(outputs)saver = tf.train.Saver()with tf.Session() as sess:
    saver.restore(sess, "./models/shufflene_v2_1.0.ckpt")
    preds = sess.run(outputs, feed_dict={inputs: x})
    print(decode_predictions(preds, top=3)[0])
参考
1.ShuffleNet V2: Practical Guidelines for Efficient CNN Architecture Design.
(https://arxiv.org/abs/1807.11164)
2.tensorpack/examples
(https://github.com/tensorpack/tensorpack/tree/master/examples/ImageNetModels)
3.pretrained weights
(https://pan.baidu.com/s/1ZXKqzm5p23uUYr6HXUuMaQ)
*推荐阅读*
NIPS 2018 |谷歌大脑提出 DropBlock 卷积正则化方法,显著改进 CNN 精度
DeepMind开源图深度学习(GraphDL)工具包,基于Tensorflow和Sonnet
杨强教授、俞扬教授等大牛嘉宾评审团,万元大奖,丰富资源,助力您的计算机视觉工程化能力认证,点击阅读原文即可报名“2018计算机视觉最具潜力开发者榜单”~