本想浅试一下,结果冠军和奖金都到手了!记一次成功的算法项目实践

极市导读
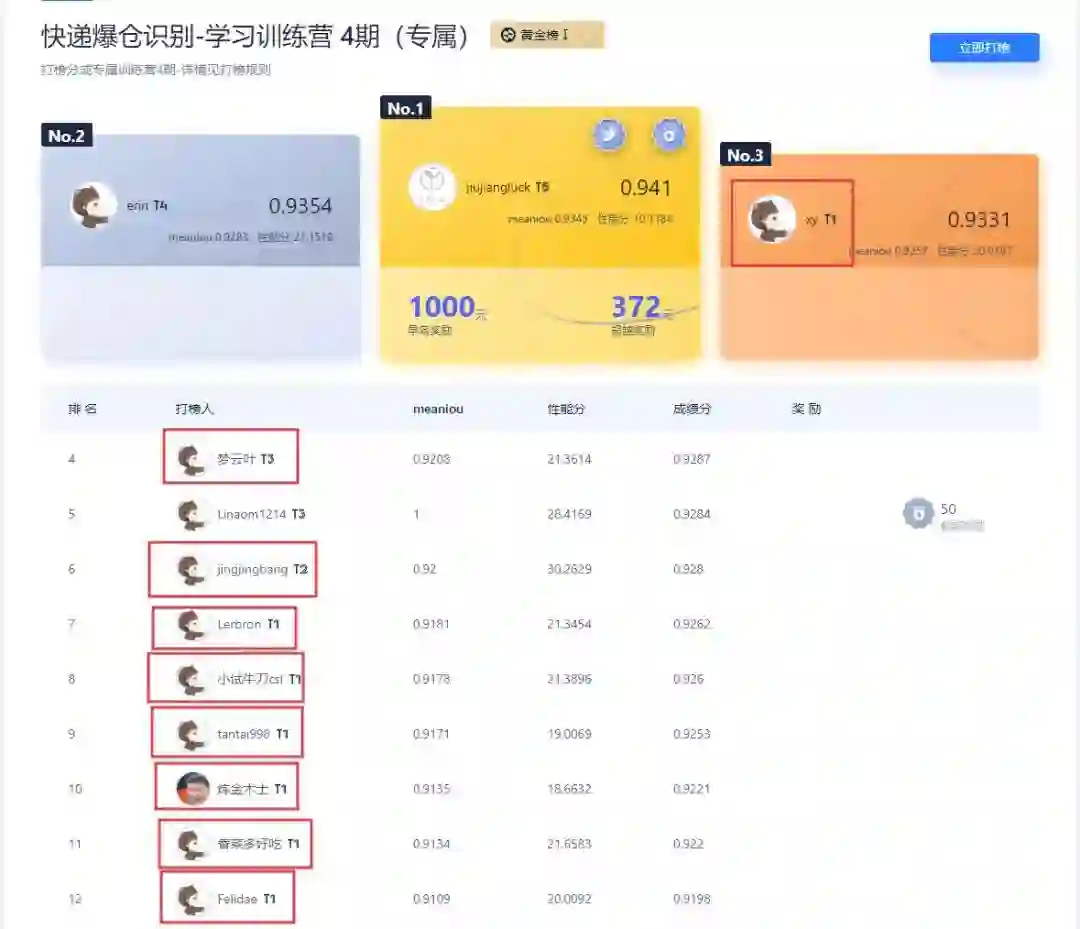
本文作者是极市打榜二月新星jiujiangluck,也是极市平台的快递爆仓榜单第一名。jiujiangluck在参与极市打榜的过程中积累了丰富的真实项目开发经验,同时还极市平台签约合作,在2月获得了4万元以上的分成收益。以下是他在快递爆仓识别任务的经验分享,相信能够帮助到大家。 >>加入极市CV技术交流群,走在计算机视觉的最前沿
前言
任务介绍
任务描述
ROI区域,通过识别盒子、袋子等物品来识别
ROI区域内包裹占整个区域的比例,从而判定是否爆仓。
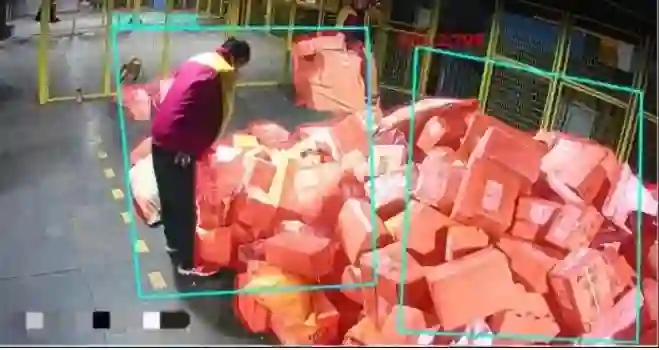
根据任务描述来看,拟采用语义分割来解决该任务。
评价指标
| 评审指标指标说明权重分 | ||
|---|---|---|
| 算法精度 | MIoU(Mean Intersection over Union) |
90 |
| 算法性能值 | 性能分=fps/10,如果fps>10则当满分100计算 | 10 |
| 总分 | Score=算法精度*90+算法性能值*10 |
从算法评价指标来看,算法精度占很大一部分,因此首要考虑精度,然后再进一步提升模型的速度。值得注意的是由于极市采用的评测规则是将每张图片预测的结果保存为图片的形式,因此得到的结果fps相对比较低,大部分时间都耗在保存图片的io上。
数据集
1280 x 720。
| 原图 | 分割图(图中白色仅为示意,实际快递像素值为1) |
|---|---|
 |
 |
解决方案
模型选取
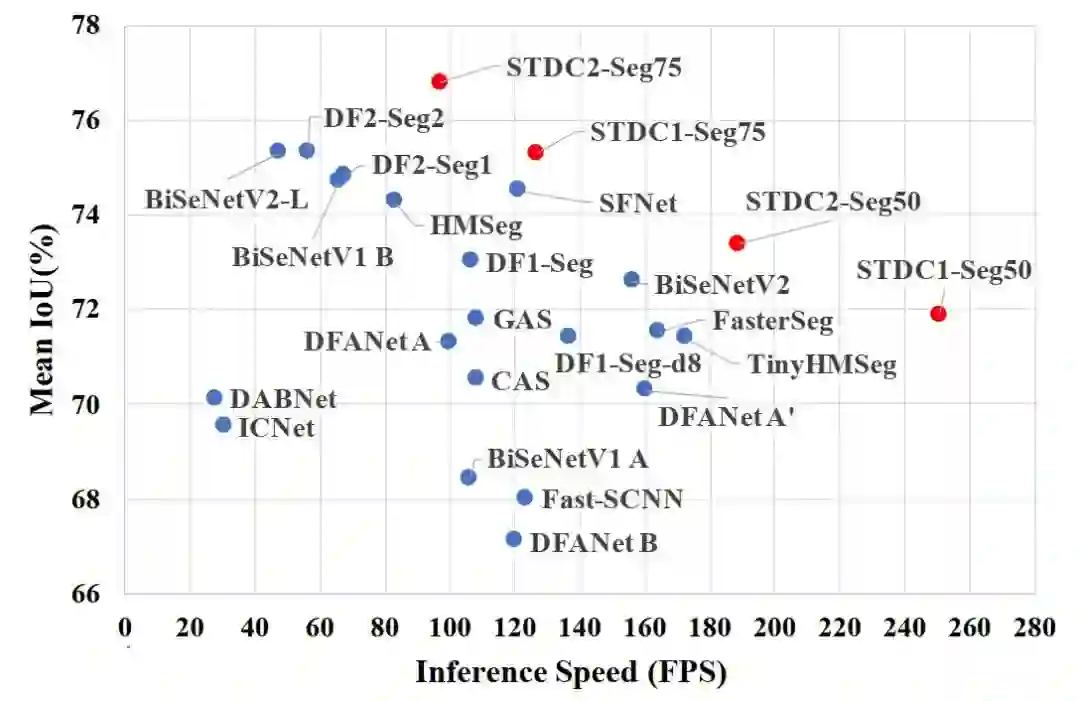
STDC算法和
BiSeNetV2算法在速度和精度上都是较为优秀的算法。这里选择
BiSeNetV2算法来作为
Baseline。
BiSeNetV2的具体代码可以参考GitHub【2】(本文采用该代码),当然也可以使用mmsegmentation【3】。
编码训练
Baseline的代码编码训练部分进行讲解。
-
cuda 10.2 -
cudnn 7 -
python 3.8.8 -
pytorch 1.8.1
trian:val=4:1的比例随机划分数据集。划分完数据集后要得到两个txt文档,分别是训练集和测试集对应的输入和标签映射关系。txt中每行是一组数据,格式如下:
/home/data/version/aa.jpg,/home/data/version/aa.png原图的地址,标签掩码图的地址
      '''
Usage: python split_dataset.py /home/data
'''


      from __future__


      import division


      from __future__


      import print_function


      from __future__


      import absolute_import


      import os


      import sys


      import shutil


      import pathlib


      import random


      import xml.etree.ElementTree


      as ET


      import io


dataset_root =


      '/project/train/src_repo/dataset'


supported_fmt = [


      '.jpg',


      '.JPG']


      if __name__ ==


      '__main__':


    os.makedirs(dataset_root, exist_ok=


      True)


      if


      not os.path.exists(sys.argv[


      1]):


        print(


      f'{sys.argv[1]} 不存在!')


        exit(


      -1)


      # 遍历数据集目录下所有xml文件及其对应的图片


    dataset_path = pathlib.Path(sys.argv[


      1])


    found_data_list = []


      for mask_file


      in dataset_path.glob(


      '**/*.png'):


        possible_images = [mask_file.with_suffix(suffix)


      for suffix


      in supported_fmt]


        supported_images = list(filter(


      lambda p: p.is_file(), possible_images))


      if len(supported_images) ==


      0:


            print(


      f'找不到对应的图片文件:`{mask_file.as_posix()}`')


      continue


        found_data_list.append({


      'image': supported_images[


      0],


      'label': mask_file})


      # 随机化数据集,将数据集拆分成训练集和验证集,并将其拷贝到/project/train/src_repo/dataset下


    random.shuffle(found_data_list)


    train_data_count = len(found_data_list) *


      4 /


      5


    train_data_list = []


    valid_data_list = []


      for i, data


      in enumerate(found_data_list):


      if i < train_data_count:


      # 训练集


            data_list = train_data_list


      else:


      # 验证集


            data_list = valid_data_list


        data_list.append(data)


      with open(os.path.join(dataset_root,


      'train.txt'),


      'w')


      as f:


      for name


      in train_data_list:


            f.write(name[


      'image'].as_posix() +


      ',' + name[


      'label'].as_posix() +


      '\n')


      with open(os.path.join(dataset_root,


      'val.txt'),


      'w')


      as f:


      for name


      in valid_data_list:


            f.write(name[


      'image'].as_posix() +


      ',' + name[


      'label'].as_posix() +


      '\n')


    print(


      'Done')
数据集和配置文件
demo数据集类编码。主要更改的地方是数据集的语义类别和数据集的均值和方差。以下是自定义数据集类代码部分:
      #!/usr/bin/python


      # -*- encoding: utf-8 -*-


      import os


      import os.path


      as osp


      import json


      import torch


      from torch.utils.data


      import Dataset, DataLoader


      import torch.distributed


      as dist


      import cv2


      import numpy


      as np


      import lib.transform_cv2


      as T


      from lib.sampler


      import RepeatedDistSampler


      from lib.base_dataset


      import BaseDataset


      class Expressage(BaseDataset):


      def __init__(self, dataroot, annpath, trans_func=None, mode='train'):


        super(Expressage, self).__init__(dataroot, annpath, trans_func, mode)


        self.n_cats =


      2


        self.lb_ignore =


      255


        self.to_tensor = T.ToTensor(


            mean=(


      0.46962251,


      0.4464104,


      0.40718787),


            std=(


      0.27469736,


      0.27012361,


      0.28515933),


        )
      import torch


      from torch.utils.data


      import Dataset, DataLoader


      import torch.distributed


      as dist


      import lib.transform_cv2


      as T


      from lib.sampler


      import RepeatedDistSampler


      from lib.cityscapes_cv2


      import CityScapes


      from lib.coco


      import CocoStuff


      # 添加下面的语句


      from lib.expressage


      import Expressage


      class TransformationTrain(object):


      def __init__(self, scales, cropsize):


        self.trans_func = T.Compose([


            T.RandomResizedCrop(scales, cropsize),


            T.RandomHorizontalFlip(),


            T.ColorJitter(


                brightness=


      0.4,


                contrast=


      0.4,


                saturation=


      0.4


            ),


        ])


      def __call__(self, im_lb):


        im_lb = self.trans_func(im_lb)


      return im_lb


      class TransformationVal(object):


      def __call__(self, im_lb):


        im, lb = im_lb[


      'im'], im_lb[


      'lb']


      return dict(im=im, lb=lb)


      def get_data_loader(cfg, mode='train', distributed=True):


      if mode ==


      'train':


        trans_func = TransformationTrain(cfg.scales, cfg.cropsize)


        batchsize = cfg.ims_per_gpu


        annpath = cfg.train_im_anns


        shuffle =


      True


        drop_last =


      True


      elif mode ==


      'val':


        trans_func = TransformationVal()


        batchsize = cfg.eval_ims_per_gpu


        annpath = cfg.val_im_anns


        shuffle =


      False


        drop_last =


      False


    ds = eval(cfg.dataset)(cfg.im_root, annpath, trans_func=trans_func, mode=mode)


      if distributed:


      assert dist.is_available(),


      "dist should be initialzed"


      if mode ==


      'train':


      assert


      not cfg.max_iter


      is


      None


            n_train_imgs = cfg.ims_per_gpu * dist.get_world_size() * cfg.max_iter


            sampler = RepeatedDistSampler(ds, n_train_imgs, shuffle=shuffle)


      else:


            sampler = torch.utils.data.distributed.DistributedSampler(


                ds, shuffle=shuffle)


        batchsampler = torch.utils.data.sampler.BatchSampler(


            sampler, batchsize, drop_last=drop_last


        )


        dl = DataLoader(


            ds,


            batch_sampler=batchsampler,


            num_workers=


      4,


            pin_memory=


      True,


        )


      else:


        dl = DataLoader(


            ds,


            batch_size=batchsize,


            shuffle=shuffle,


            drop_last=drop_last,


            num_workers=


      4,


            pin_memory=


      True,


        )


      return dl
bisenetv2进行训练,同时网络输出维度为
2。数据集的输入采用上面划分数据集得到的两个
txt文档的地址。整个训练一共迭代
40000次,
batch size(ims_per_gpu)为16,同时采用
混合精度训练(use_fp16)。采用混合精度训练的好处是:推理的时候后可以采用fp16进行推理,从而加快网络推理速度同时不损失很多精度。最后一定要注意模型保存路径,这里可以设置为
/project/train/models,这是平台保存模型的路径。
      ## bisenetv2


cfg = dict(


    model_type=


      'bisenetv2',


    n_cats=


      2,


    num_aux_heads=


      4,


    lr_start=


      5e-3,


    weight_decay=


      1e-4,


    warmup_iters=


      1000,


    max_iter=


      40000,


    dataset=


      'Expressage',


    im_root=


      '',


    train_im_anns=


      '/project/train/src_repo/dataset/train.txt',


    val_im_anns=


      '/project/train/src_repo/dataset/val.txt',


    scales=[


      0.75,


      2.],


    cropsize=[


      640,


      640],


    eval_crop=[


      640,


      640],


    eval_scales=[


      0.5,


      0.75,


      1,


      1.25,


      1.5,


      1.75],


    ims_per_gpu=


      16,


    eval_ims_per_gpu=


      1,


    use_fp16=


      True,


    use_sync_bn=


      True,


    respth=


      '/project/train/models',


)
    project_root_dir=/project/train/src_repo


dataset_dir=/home/data


log_file=/project/train/log/log.txt


echo "Prepare environment..."


pip install -i https://mirrors.cloud.tencent.com/pypi/simple -r ${project_root_dir}/BiSeNet/requirements.txt


echo "Prepare dataset..."


cd ${project_root_dir} && python split_dataset.py ${dataset_dir} | tee -a ${log_file}


echo "Start training..."


cd ${project_root_dir}/BiSeNet


      #


       bisenetv2 expressage


export CUDA_VISIBLE_DEVICES=0


cfg_file=configs/bisenetv2_expressage.py


NGPUS=1


python -m torch.distributed.launch --nproc_per_node=$NGPUS tools/train_amp.py --config $cfg_file | tee -a ${log_file}


echo "Convert model to onnx..."


python tools/export_onnx.py --config $cfg_file --weight-path /project/train/models/model_final.pth --outpath /project/train/models/model.onnx


python -m onnxsim /project/train/models/model.onnx /project/train/models/model_sim.onnx
onnx模型的代码,这里加入这部分代码是为了后续采用TensorRT进行推理做准备。
推理测试
TensorRT进行模型推理加速,具体的环境安装方法可参考笔者之前的文章。
onnx模型,注意Baseline这里没有使用
onnx-simplifier进行简化。
$ python tools/export_onnx.py --config configs/bisenetv2_city.py --weight-path /path/to/your/model.pth --outpath ./model.onnx
    mkdir -p tensorrt/build


      cd tensorrt/build


cmake ..


make
./segment 的二进制执行文件在
build目录中。
$ ./segment compile /path/to/onnx.model /path/to/saved_model.trt
--fp16 采用
fp16进行推理:
$ ./segment compile /path/to/onnx.model /path/to/saved_model.trt --fp16
c++代码转模型,只想用python转模型,这里可以参考yolov5的转模型的代码
https://github.com/ultralytics/yolov5/blob/master/export.py#L195
"""
An example that uses TensorRT's Python api to make inferences for BiSeNet.
"""
import os
import shutil
import random
import sys
import threading
import time
import cv2
import numpy as np
import pycuda.autoinit
import pycuda.driver as cuda
import tensorrt as trt

def get_img_path_batches(batch_size, img_dir):
    ret = []
    batch = []
    for root, dirs, files in os.walk(img_dir):
        for name in files:
            if len(batch) == batch_size:
                ret.append(batch)
                batch = []
            batch.append(os.path.join(root, name))
    if len(batch) > 0:
        ret.append(batch)
    return ret

class BiSeNet_TRT(object):
    """
    description: A BiSeNet class that warps TensorRT ops, preprocess and postprocess ops.
    """

    def __init__(self, engine_file_path):
        # Create a Context on this device,
        self.cfx = cuda.Device(0).make_context()
        stream = cuda.Stream()
        runtime = trt.Runtime(trt.Logger(trt.Logger.INFO))
        assert runtime

        # Deserialize the engine from file
        with open(engine_file_path, "rb") as f:
            engine = runtime.deserialize_cuda_engine(f.read())
        context = engine.create_execution_context()

        host_inputs = []
        cuda_inputs = []
        host_outputs = []
        cuda_outputs = []
        bindings = []

        for binding in engine:
            size = trt.volume(engine.get_binding_shape(binding)) * engine.max_batch_size
            dtype = trt.nptype(engine.get_binding_dtype(binding))
            # Allocate host and device buffers
            host_mem = cuda.pagelocked_empty(size, dtype)
            cuda_mem = cuda.mem_alloc(host_mem.nbytes)
            # Append the device buffer to device bindings.
            bindings.append(int(cuda_mem))
            # Append to the appropriate list.
            if engine.binding_is_input(binding):
                self.input_w = engine.get_binding_shape(binding)[-1]
                self.input_h = engine.get_binding_shape(binding)[-2]
                host_inputs.append(host_mem)
                cuda_inputs.append(cuda_mem)
            else:
                host_outputs.append(host_mem)
                cuda_outputs.append(cuda_mem)

        # Store
        self.stream = stream
        self.context = context
        self.engine = engine
        self.host_inputs = host_inputs
        self.cuda_inputs = cuda_inputs
        self.host_outputs = host_outputs
        self.cuda_outputs = cuda_outputs
        self.bindings = bindings
        self.batch_size = engine.max_batch_size

        self.img_mean = (0.46962251, 0.4464104,  0.40718787)
        self.img_std = (0.27469736, 0.27012361, 0.28515933)

    def infer(self, image_raw):
        threading.Thread.__init__(self)
        # Make self the active context, pushing it on top of the context stack.
        self.cfx.push()
        # Restore
        stream = self.stream
        context = self.context
        engine = self.engine
        host_inputs = self.host_inputs
        cuda_inputs = self.cuda_inputs
        host_outputs = self.host_outputs
        cuda_outputs = self.cuda_outputs
        bindings = self.bindings
        print('ori_shape: ', image_raw.shape)
        # if image_raw is constant, image_raw.shape[1] != self.input_w
        w_ori, h_ori = image_raw.shape[1], image_raw.shape[0]
        # Do image preprocess
        input_image = self.preprocess_image(image_raw)
        # Copy input image to host buffer
        np.copyto(host_inputs[0], input_image.ravel())
        # Transfer input data to the GPU.
        cuda.memcpy_htod_async(cuda_inputs[0], host_inputs[0], stream)
        # Run inference.
        context.execute_async(bindings=bindings, stream_handle=stream.handle)
        # Transfer predictions back from the GPU.
        cuda.memcpy_dtoh_async(host_outputs[0], cuda_outputs[0], stream)
        # Synchronize the stream
        stream.synchronize()
        # Remove any context from the top of the context stack, deactivating it.
        self.cfx.pop()
        # Here we use the first row of output in that batch_size = 1
        output = host_outputs[0]

        # Do postprocess
        output = output.reshape(self.input_h, self.input_w).astype('uint8')
        output = cv2.resize(output, (w_ori, h_ori), interpolation=cv2.INTER_NEAREST)

        #palette = np.random.randint(0, 256, (256, 3), dtype=np.uint8)
        #output = palette[output]
        return output

    def destroy(self):
        # Remove any context from the top of the context stack, deactivating it.
        self.cfx.pop()

    def preprocess_image(self, image_raw):
        """
        description: Read an image from image path
        param:
            image_raw: numpy, raw image
        return:
            img_input:  the processed image
        """

        img_resize = cv2.resize(image_raw, (self.input_w, self.input_h))[:, :, ::-1] #bgr2rgb
        img_input = np.transpose(img_resize, [2, 0, 1]) # hwc2chw

        img_input = img_input.astype(np.float32) / 255.0
        img_mean = np.array(self.img_mean, dtype=np.float32).reshape(3, 1, 1)
        img_std = np.array(self.img_std, dtype=np.float32).reshape(3, 1, 1)
        img_input = (img_input - img_mean) / img_std
        # expand dims
        img_input = np.expand_dims(img_input, axis=0)

        return img_input

    def get_raw_image(self, image_path_batch):
        """
        description: Read an image from image path
        """
        for img_path in image_path_batch:
            return cv2.imread(img_path)

    def get_raw_image_zeros(self, image_path_batch=None):
        """
        description: Ready data for warmup
        """
        for _ in range(self.batch_size):
            return np.zeros([self.input_h, self.input_w, 3], dtype=np.uint8)


class inferThread(threading.Thread):
    def __init__(self, bisenet, image_path_batch):
        threading.Thread.__init__(self)
        self.bisenet = bisenet
        self.image_path_batch = image_path_batch

    def run(self):
        batch_image_raw = self.bisenet.infer(self.bisenet.get_raw_image(self.image_path_batch))

class warmUpThread(threading.Thread):
    def __init__(self, bisenet):
        threading.Thread.__init__(self)
        self.bisenet = bisenet

    def run(self):
        batch_image_raw = self.bisenet.infer(self.bisenet.get_raw_image_zeros())


if __name__ == "__main__":
    # load custom engine
    engine_file_path = "build/model.trt"  # the generated engine file

    if len(sys.argv) > 1:
        engine_file_path = sys.argv[1]

    if os.path.exists('output/'):
        shutil.rmtree('output/')
    os.makedirs('output/')
    # a hrnet instance
    bisenet = BiSeNet_TRT(engine_file_path)
    try:
        print('batch size is', bisenet.batch_size)  # batch size is set to 1!

        image_dir = "samples/"
        image_path_batches = get_img_path_batches(bisenet.batch_size, image_dir)

        for i in range(10):
            # create a new thread to do warm_up
            thread1 = warmUpThread(bisenet)
            thread1.start()
            thread1.join()
        for batch in image_path_batches:
            # create a new thread to do inference
            thread1 = inferThread(bisenet, batch)
            thread1.start()
            thread1.join()
    finally:
        # destroy the instance
        bisenet.destroy()
from BiSeNet_trt import *
import json
import cv2
import numpy as np


def init():

    """Initialize model
    Returns: model
    """
    onnx_file_path = "/project/train/models/model_sim.onnx"
    engine_file_path = "/usr/local/ev_sdk/model/model.trt"
    os.system("/usr/local/ev_sdk/3rd/BiSeNet/bin/segment compile " + onnx_file_path + " " + engine_file_path)
    bisenet = BiSeNet_TRT(engine_file_path)
    try:
        for i in range(10):
            # create a new thread to do warm_up
            thread1 = warmUpThread(bisenet)
            thread1.start()
            thread1.join()
    finally:
        # destroy the instance
        bisenet.destroy()
    return bisenet


def process_image(handle=None,input_image=None,args=None, **kwargs):

    """Do inference to analysis input_image and get output
    Attributes:
        handle: algorithm handle returned by init()
        input_image (numpy.ndarray): image to be process, format: (h, w, c), BGR
        args: string in JSON format, format: {
            "mask_output_path": "/path/to/output/mask.png"
        }
    Returns: process result
    """
    args =json.loads(args)
    mask_output_path =args['mask_output_path']
    output = handle.infer( input_image)
    cv2.imwrite(mask_output_path, output)
    return json.dumps({'mask': mask_output_path}, indent=4)

if __name__ == '__main__':
    # Test API
    img = cv2.imread('/project/ev_sdk/data/test.png')
    predictor = init()
    res = process_image(predictor, img, "{\"mask_output_path\":\"./out.jpg\"}")
    print(res)

讨论和总结
讨论
-
测试时,如果最后模型的输出尺寸和原图尺寸不相同时,可以将最后一个 Resize操作嵌入到onnx模型中,那么最后导出TensorRT模型时,最后的Resize操作就可以在GPU上进行了,从而加快推理速度; -
可以尝试其他优秀的实时语义分割算法,例如STDC等; -
可以尝试大尺寸训练和推理。
总结
    Reference


[1] https://openaccess.thecvf.com/content/CVPR2021/papers/Fan_Rethinking_BiSeNet_for_Real-Time_Semantic_Segmentation_CVPR_2021_paper.pdf<br>


[2] https://github.com/CoinCheung/BiSeNet<br>


[3] https://github.com/open-mmlab/mmsegmentation<br>


[4] https://github.com/MichaelFan01/STDC-Seg<br>


[5] https://github.com/wang-xinyu/tensorrtx
https://www.cvmart.net/topList

公众号后台回复“数据集”获取30+深度学习数据集下载~

# CV技术社群邀请函 #

备注:姓名-学校/公司-研究方向-城市(如:小极-北大-目标检测-深圳)
即可申请加入极市目标检测/图像分割/工业检测/人脸/医学影像/3D/SLAM/自动驾驶/超分辨率/姿态估计/ReID/GAN/图像增强/OCR/视频理解等技术交流群
每月大咖直播分享、真实项目需求对接、求职内推、算法竞赛、干货资讯汇总、与 10000+来自港科大、北大、清华、中科院、CMU、腾讯、百度等名校名企视觉开发者互动交流~

登录查看更多
相关内容

Arxiv
10+阅读 · 2018年1月29日


相关VIP内容
相关资讯