烟雾识别冠军方案分享|极市打榜

极市导读
本文对烟雾识别榜单的整体流程进行了细致的讲解,阐述自己的算法思路,希望能给极市打榜的各位一些帮助~ >>加入极市CV技术交流群,走在计算机视觉的最前沿
一、前言
参与极市社区的打榜活动也有一段时间了,也稍微有了一些经验,在此也和大家分享一下,希望能帮助大家更快的跑通整个流程,享受CV的乐趣。本文将介绍“烟雾识别”榜单的整体流程,方便大家在极市发起训练和测试。
二、任务介绍
背景描述
烟雾检测算法适用于工地、工厂、商场等任何有火灾隐患和蒸汽作业的场所,可用于多种复杂环境。该算法基于大规模烟雾数据识别训练,配合摄像头,实时识别监控区内烟雾情况。如检测到一定浓度的烟雾,立刻发出警报。因此该算法不仅可保障人员安全,而且可以将财产损失最小化,保障安全作业。
项目算法要达到的目的
识别一定浓度的黑色/白色烟雾,对于淡烟雾等不进行识别。
数据集

三、解决方案
本任务属于目标检测任务,我们应该关注到,任务得分为F1-score与FPS的加权得分,总分计算方式为:Score=算法精度95+算法性能值5,而本榜单算法性能值权重较小,对fps的没有那么高,所以我们可以选用更大的一些网络(ViT可不行🤣)来获得更高的精度。
数据分析
数据多为山地场景,并且我们只需要关注烟雾这单一类别即可,因为一些原因,全部的训练数据我们并不可见,所以数据分析这部分我们不做过多讨论,但是在数据可见的情况下,还是建议大家重视数据分析这一步骤。
模型选取和训练
-
模型选取
我们应该熟悉一些常见的目标检测模型,如Faster RCNN,YOLOv3,YOLOv5等等,选取一个合适的Baseline会让你事半功倍。这里我建议大家选择YOLOv5作为Baseline,YOLOv5训练速度较快,精度也是很不错的。当然,其仓库代码质量略显糟糕,类和类之间耦合非常严重,对于初学者理解代码是有一定困难的。但不同于其他竞赛,极市的打榜活动对于FPS的要求是较高的,我们推理的更快自然会有更高的FPS,这对提高总分来说是更优的选择。
大家在理解yolov5的代码时,可以更多的关注一下models文件夹下的源码(common.py & yolo.py),这对我们理解整个模型结构是非常有帮助的,也为我们自定义修改模型打下了基础。
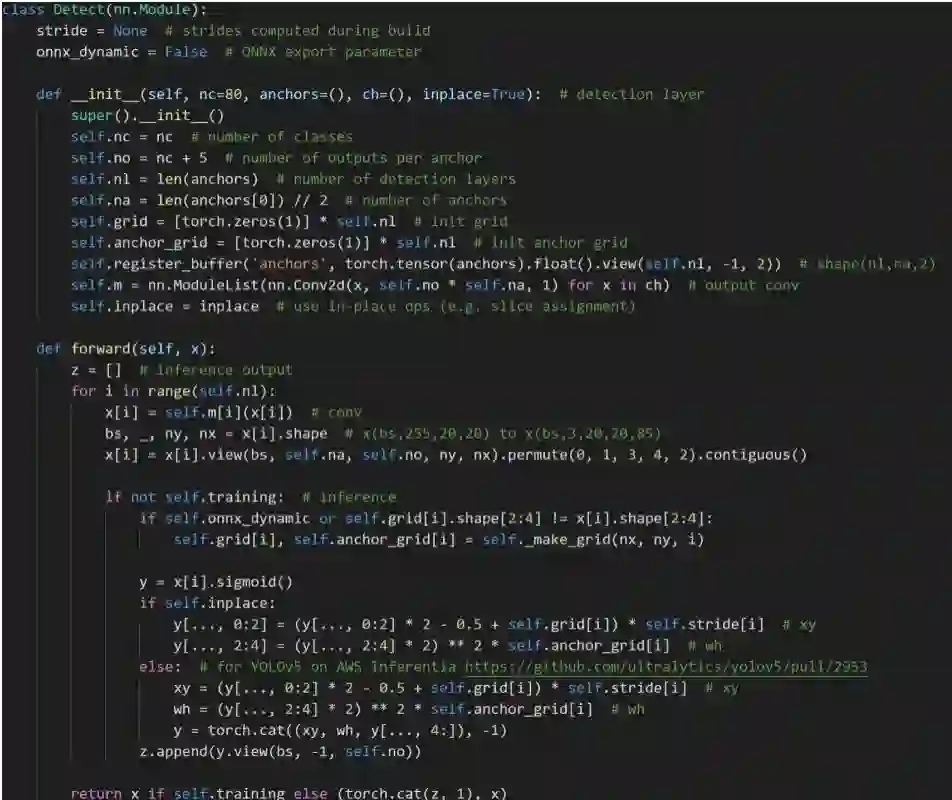
以yolo.py为例,我们可以一起理解一下一下代码片段:
1、parse_model函数,读入模型yaml中的参数定义
self.model, self.save = parse_model(self.md, ch=[ch])
2、对网络组件进行处理,生成所需要的格式
m_ = nn.Sequential(*[m(*args) for _ in range(n)]) if n > 1 else m(*args)  # module
t = str(m)[8:-2].replace('__main__.', '')  # module type
np = sum([x.numel() for x in m_.parameters()])  # number params
m_.i, m_.f, m_.type, m_.np = i, f, t, np  # attach index, 'from' index, type, number params
print('%3s%15s%3s%10.0f  %-40s%-30s' % (i, f, n, np, t, args))  # print
save.extend(x % i for x in ([f] if isinstance(f, int) else f) if x != -1)  # append to savelist
layers.append(m_)
ch.append(c2)
3、检测部分前向传播逻辑
当我们想去修改损失函数时,我们可以关注utils下的loss.py,在这个文件里,我们可以加入自己的loss并在train.py里调用
class FocalLoss(nn.Module):
    # Wraps focal loss around existing loss_fcn(), i.e. criteria = FocalLoss(nn.BCEWithLogitsLoss(), gamma=1.5)
    def __init__(self, loss_fcn, gamma=1.5, alpha=0.25):
        super().__init__()
        self.loss_fcn = loss_fcn  # must be nn.BCEWithLogitsLoss()
        self.gamma = gamma
        self.alpha = alpha
        self.reduction = loss_fcn.reduction
        self.loss_fcn.reduction = 'none'  # required to apply FL to each element

    def forward(self, pred, true):
        loss = self.loss_fcn(pred, true)
        # p_t = torch.exp(-loss)
        # loss *= self.alpha * (1.000001 - p_t) ** self.gamma  # non-zero power for gradient stability

        # TF implementation https://github.com/tensorflow/addons/blob/v0.7.1/tensorflow_addons/losses/focal_loss.py
        pred_prob = torch.sigmoid(pred)  # prob from logits
        p_t = true * pred_prob + (1 - true) * (1 - pred_prob)
        alpha_factor = true * self.alpha + (1 - true) * (1 - self.alpha)
        modulating_factor = (1.0 - p_t) ** self.gamma
        loss *= alpha_factor * modulating_factor

        if self.reduction == 'mean':
            return loss.mean()
        elif self.reduction == 'sum':
            return loss.sum()
        else:  # 'none'
            return loss
当然,大家还是应该多涉猎一些代码:
YOLOX
YOLOR
MMDetection
PaddleDetection
TODO
......
如何训练呢?
我们应该先了解极市的训练及其评测机制,数据出于保密原因我们不可见,所以我们是把代码写好之后,提交上去发起自动的训练,测试也是类似的。
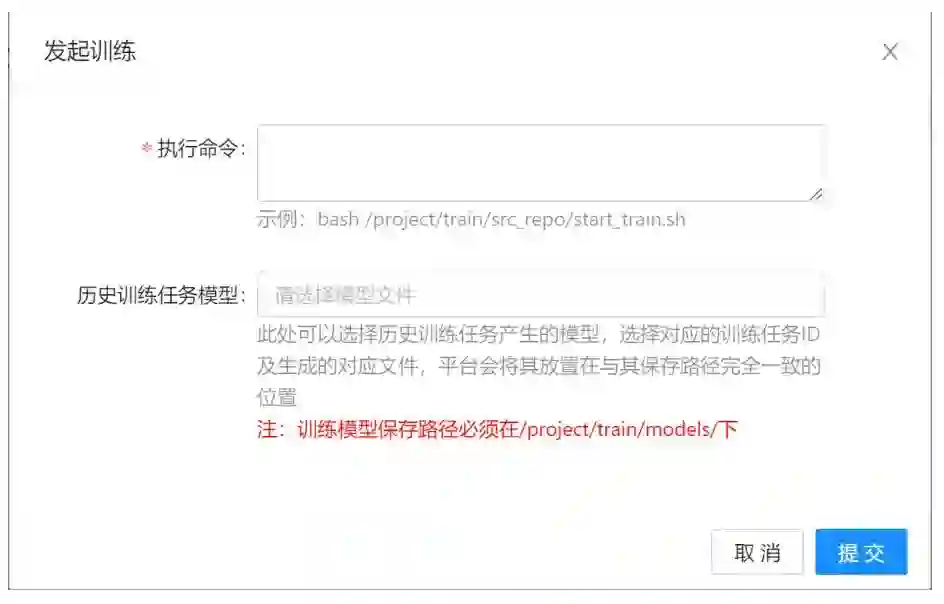
我们如何操作这个“发起训练”的界面呢?
首先,你必须输入执行命令,举个例子,我们本地训练的时候,是需要先处理好数据,然后执行一些类似于python train.py的命令,那在这里呢,就是需要你把这些操作写成一个脚本,一键执行。而“历史训练任务模型”是方便你对上一次训练的模型进行resume或者finetune的(数据和训练好的模型我们都是不可见的哦)。
1、如何写一键脚本?
首先,YOLOv5代码发起训练的逻辑非常简单,如下所示:
python train.py --data coco.yaml --cfg yolov5n.yaml --weights '' --batch-size 128
                                       yolov5s                                64
                                       yolov5m                                40
                                       yolov5l                                24
                                       yolov5x                                16
--data coco.yaml 来指定数据配置
--cfg yolov5n.yaml 来指定模型
--weights 来指定预训练权重
--batch-size 来指定batch大小
--img 来指定训练及验证图片大小 ...
还有非常多的参数可以自定义设置,大家可以自行打开train.py看他的解释说明。
在训练之前,我们还是需要做一步,即处理数据。
平台给出的数据是VOC数据集,YOLO所需的数据集是txt文档的格式,其内容为(class x_center y_center w h),所以我们需要把VOC格式的标注转换成YOLO格式的标注,这也比较简单,转换逻辑是:
1、提取VOC标注中的xmin, ymin, xmax, ymax和class
2、通过加减乘除转化成class x_center y_center w h
3、存成与图片名前缀相同的txt文档
核心代码
def convert(size, box, name, sp):
    dw = 1./(size[0])
    dh = 1./(size[1])
    x = (box[0] + box[1])/2.0 - 1
    y = (box[2] + box[3])/2.0 - 1
    w = box[1] - box[0]
    h = box[3] - box[2]
    x = x*dw
    w = w*dw
    y = y*dh
    h = h*dh
    x = min(x, 1.0)
    y = min(y, 1.0)
    w = min(w, 1.0)
    h = min(h, 1.0)

    return (x,y,w,h)

def convert_annotation(year, image_id,image_set):
    in_file = open('./datasets/VOCdevkit/VOC2007/Annotations/%s.xml'%(image_id),encoding="utf-8")
    out_file = open('./labels/%s.txt'%(image_id), 'w')
    # print(in_file)
    tree=ET.parse(in_file)
    root = tree.getroot()
    # size = root.find('size')
    # w = int(size.find('width').text)
    # h = int(size.find('height').text)

    img = cv2.imread("./datasets/VOCdevkit/VOC2007/JPEGImages/"+image_id+".jpg")
    sp = img.shape

    h = sp[0] #height(rows) of image
    w = sp[1] #width(colums) of image

    for obj in root.iter('object'):

        cls_ = obj.find('name').text
        if cls_ not in list(class2id.keys()):
            print("No label: {}".format(cls_))
            continue
        cls_id = class2id[cls_]
        xmlbox = obj.find('bndbox')
        b = (float(xmlbox.find('xmin').text), float(xmlbox.find('xmax').text), float(xmlbox.find('ymin').text), float(xmlbox.find('ymax').text))
        bb = convert((w,h), b, str(image_id), sp)
        out_file.write(str(cls_id) + " " + " ".join([str(a) for a in bb]) + '\n')
然后大家就可以按照自己喜欢的方式写一键脚本啦
发起测试
大家直接看这份ji.py就可以理解测试逻辑了
import argparse
import os
import platform
import shutil
import time
from pathlib import Path
import sys
import json
sys.path.insert(1, '/project/ev_sdk/src/yolov5/')
import cv2
import torch
import torch.backends.cudnn as cudnn
from numpy import random
import numpy as np
import argparse
import time
import cv2
import torch
import torch.backends.cudnn as cudnn
from numpy import random
from models.common import DetectMultiBackend
from utils.augmentations import letterbox
from models.experimental import attempt_load
from utils.datasets import LoadImages, LoadStreams
from utils.general import apply_classifier, check_img_size, check_imshow, check_requirements, check_suffix, colorstr, \
    increment_path, non_max_suppression, print_args, scale_coords, set_logging, \
    strip_optimizer, xyxy2xywh
from utils.plots import Annotator, colors
from utils.torch_utils import select_device, time_sync
以上都是import一些包,直接忽略
####### 参数设置
conf_thres = 0.44
iou_thres = 0.4
prob_thres = 0.44
#######
imgsz = 480
weights = "/project/ev_sdk/src/best.pt"
device = '0'
stride = 32
names = ["smoke']
我们需要重写的是init函数和process_image函数,init部分,顾名思义,我们是初始化我们的model,那process_image自然就是处理图片了。
也就是说,init函数return的是一个加载好权重的model,然后process_image会接受这个model然后用这个model处理图片,process_image需要返回打榜赛题指定的json,所以我们不需要关心系统怎么发起测试,我们只需要把模型初始化好,然后图片处理完成返回json即可。
大家可以参考下面代码理解下逻辑:
def init():
    # Initialize
    global imgsz, device, stride
    set_logging()
    device = select_device('0')
    half = device.type != 'cpu'  # half precision only supported on CUDA

    # Load model
    model = DetectMultiBackend(weights, device=device, dnn=False)
    stride, pt, jit, engine = model.stride, model.pt, model.jit, model.engine
    imgsz = check_img_size(imgsz, s=stride)  # check img_size
    model.half()  # to FP16
    model.eval()
    model.warmup(imgsz=(1, 3, 480, 480), half=half)  # warmup
    return model

def process_image(model, input_image=None, args=None, **kwargs):
    # Padded resize
    img0 = input_image
    img = letterbox(img0, new_shape=imgsz, stride=stride, auto=True)[0]

    # Convert
    img = img.transpose((2, 0, 1))[::-1]  # HWC to CHW, BGR to RGB
    img = np.ascontiguousarray(img)

    img = torch.from_numpy(img).to(device)
    img = img.half()
#     img = img.float()
    img /= 255.0  # 0 - 255 to 0.0 - 1.0
    if len(img.shape) == 3:
        img = img[None]
    pred = model(img, augment=False, val=True)[0]
    # Apply NMS
    pred = non_max_suppression(pred, conf_thres, iou_thres, agnostic=False)

    fake_result = {}

    fake_result["algorithm_data"] = {
       "is_alert": False,
       "target_count": 0,
       "target_info": []
   }
    fake_result["model_data"] = {"objects": []}
    # Process detections
    cnt = 0
    for i, det in enumerate(pred):  # detections per image
        gn = torch.tensor(img0.shape)[[1, 0, 1, 0]]  # normalization gain whwh
        if det is not None and len(det):
            # Rescale boxes from img_size to im0 size
            det[:, :4] = scale_coords(img.shape[2:], det[:, :4], img0.shape).round()
            for *xyxy, conf, cls in det:
                if conf < prob_thres:
                    continue
                cnt += 1
                fake_result["model_data"]['objects'].append({
                    "xmin":int(xyxy[0]),
                    "ymin":int(xyxy[1]),
                    "xmax":int(xyxy[2]),
                    "ymax":int(xyxy[3]),
                    "confidence":float(conf),
                    "name":names[int(cls)]
                })
                fake_result["algorithm_data"]["target_info"].append({
                    "xmin":int(xyxy[0]),
                    "ymin":int(xyxy[1]),
                    "xmax":int(xyxy[2]),
                    "ymax":int(xyxy[3]),
                    "confidence":float(conf),
                    "name":names[int(cls)]
                }
                )
    if cnt:
        fake_result ["algorithm_data"]["is_alert"] = True
        fake_result ["algorithm_data"]["target_count"] = cnt
    return json.dumps(fake_result, indent = 4)

if __name__ == '__main__':
    from glob import glob
    # Test API
    image_names = glob('/home/data/605/*.jpg')
    predictor = init()
    s = 0
    for image_name in image_names:
#         print('image_path:', os.path.join(image_dir, image_name))
        img = cv2.imread(image_name)
        t1 = time.time()
        res = process_image(predictor, img)
        print(res)
        t2 = time.time()
        s += t2 - t1
    print(1/(s/100))
四、讨论与总结
本次打榜使用的YOLOv5 s模型,兼顾了速度与精度。
后续还有很多可以优化的地方,如:
1、更佳的数据增强组合方式
例如我们可以更改mixup的概率以及mosaic的概率,或者我们可以利用albu库选取自己觉得可能会work的一些增强方式(高斯模糊等等)
2、知识蒸馏 等等
公众号后台回复“目标检测综述”获取目标检测二十年综述下载~


# CV技术社群邀请函 #

备注:姓名-学校/公司-研究方向-城市(如:小极-北大-目标检测-深圳)
即可申请加入极市目标检测/图像分割/工业检测/人脸/医学影像/3D/SLAM/自动驾驶/超分辨率/姿态估计/ReID/GAN/图像增强/OCR/视频理解等技术交流群
每月大咖直播分享、真实项目需求对接、求职内推、算法竞赛、干货资讯汇总、与 10000+来自港科大、北大、清华、中科院、CMU、腾讯、百度等名校名企视觉开发者互动交流~