社区分享 | 在 Windows 下编译和使用 TensorFlow Lite


发布人:腾讯研究员 华超
TensorFlow Lite 官方在移动端提供了官方编译好的库,我们直接拿来用就好。TensorFlow 在 Linux 平台与 Mac 平台下编译也非常轻松,基本不会遇到太多问题。但是在 Windows 10 下编译我们还是花费了一些时间,最后编译成功了。这里记录一下 Windows 10 下 TensorFlow Lite 编译过程,希望能够帮助到需要的人。


1.1 安装 MSYS2
到 MSYS2 官方下载地址直接下载安装即可。安装完成后,将安装路径的 usr\bin 添加到环境变量:假设安装目录为 E:\msys64,则要将 E:\msys64\usr\bin 加入到环境变量 %PATH% 中。
MSYS2
https://www.msys2.org
打开控制台 cmd.exe,输入如下命令:
pacman -S git patch unzip用于安装 git、patch 以及 unzip。
1.2 安装 visual studio
visual studio 可以安装 2019 版本或者最新版本即可。
1.3 安装 python
编译过程中,需要用 python 运行一些脚本,去 python 官网下载最新版 python 安装即可,这里不介绍 python 安装。这里我本机已经安装了Anaconda,使用的 python 版本为 3.6.3 :
E:\>python --version
Python 3.6.3 :: Anaconda 4.4.0 (64-bit)
理论上 python 版本直接安装最新的即可。
值得注意的是,安装完 python 后,还需要安装 numpy 库。否则编译期间会报错找不到 numpy。numpy 可以通过 pip install numpy 来安装。
1.4 下载 TensorFlow 源码
前往 github 下载 TensorFow 源码。目前最新版本是 2.4.0,2.4.0 的 c_api 变动比较大,因此选择 2.3.1 版本,等 2.4.x 版本稳定后再考虑用更新的,如下图所示:
github
https://github.com/tensorflow/tensorflow
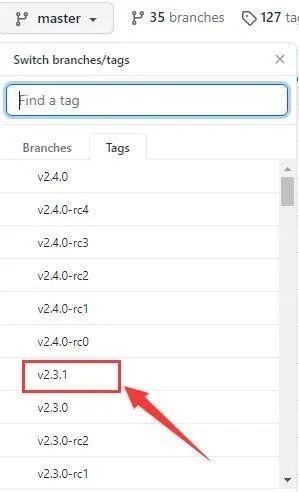
下载 2.3.2 版本 tensorflow
1.5 安装 bazel
每个版本的 TensorFlow 都有其对应的 bazel 版本,如果版本不一致,可能会在编译期间出现错误,这种错误还很难排查,-_-||。因此,要确认好当前的 TensorFlow 源码应该使用哪个 bazel 版本。
解压缩 TensorFlow-2.3.1.zip 文件后,打开 cmd,进入 TensorFlow-2.3.1。输入命令 cat configure.py | grep -i bazel_ver。如下:
E:\>cd tensorflow-2.3.1
E:\tensorflow-2.3.1>cat configure.py | grep -i bazel_ve
_TF_CURRENT_BAZEL_VERSION = None
_TF_MIN_BAZEL_VERSION = '3.1.0'
_TF_MAX_BAZEL_VERSION = '3.99.0'

def check_bazel_version(min_version, max_version):
      'TF_IGNORE_MAX_BAZEL_VERSION' not in os.environ):
  global _TF_CURRENT_BAZEL_VERSION
    current_bazel_version = check_bazel_version(_TF_MIN_BAZEL_VERSION,
       _TF_MAX_BAZEL_VERSION)
  _TF_CURRENT_BAZEL_VERSION = convert_version_to_int(current_bazel_version)
可以看到,最小的 bazel 版本为 3.1.0。最大版本是 3.99.0,这里看最大的版本意义不大,本意应该是希望在 3.1.0 以上。按照我对 TensorFlow 的了解, 他们每个版本都会使用当前最新的 bazel ,换言之,在编译 TensorFlow 2.3.1 期间很有可能最新的 bazel 版本是 3.1.0,也就是说官方用的是 bazel 3.1.0 编译的。为了确保编译不出问题,跟官方保持一致的版本是最明智的选择。
前往下载 bazel-3.1.0-windows-x86_64.exe,如下所示:
下载
https://github.com/bazelbuild/bazel/releases
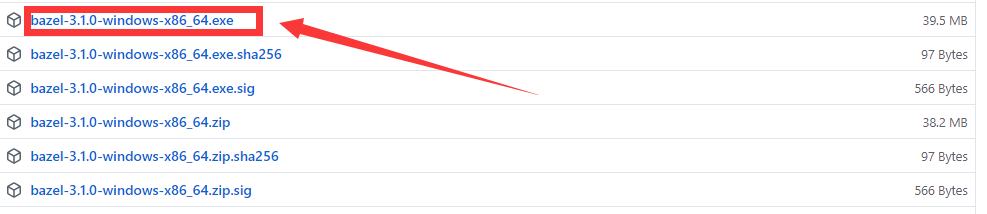
bazel-3.1.0-windows-x86_64.exe
下载后,放入到 E:\bazel 目录中,并把 E:\bazel 加入到环境变量 PATH 中,同时,把 bazel-3.1.0-windows-x86_64.exe 重命名为 bazel.exe。做完这一切后,打开 cmd,输入 bazel --version 确认 bazel 是否安装成功,以及版本是否正确。
E:\tensorflow-2.3.1>bazel --version
bazel 3.1.0
官方评论:建议使用 bazelisk,它自己自动下载需要的 bazel 版本,这样就不用自己每次去更新 bazel。
bazelisk
https://github.com/bazelbuild/bazelisk
2.1 执行 configure.py
configure.py 文件会预先设置 python 等一些相关可选项,需要先运行这个文件。
E:\tensorflow-2.3.1>python configure.py
You have bazel 3.1.0 installed.
Please specify the location of python. [Default is E:\Anaconda3\python.exe]:

Found possible Python library paths:
  E:\Anaconda3\lib\site-packages
Please input the desired Python library path to use. Default is [E:\Anaconda3\lib\site-packages]

Do you wish to build TensorFlow with ROCm support? [y/N]: n
No ROCm support will be enabled for TensorFlow.

Do you wish to build TensorFlow with CUDA support? [y/N]: n
No CUDA support will be enabled for TensorFlow.

Please specify optimization flags to use during compilation when bazel option "--config=opt" is specified [Default is /arch:AVX]:


Would you like to override eigen strong inline for some C++ compilation to reduce the compilation time? [Y/n]: n
Not overriding eigen strong inline, some compilations could take more than 20 mins.

Would you like to interactively configure ./WORKSPACE for Android builds? [y/N]: n
Not configuring the WORKSPACE for Android builds.

Preconfigured Bazel build configs. You can use any of the below by adding "--config=<>" to your build command. See .bazelrc for more details.
        --config=mkl # Build with MKL support.
        --config=monolithic # Config for mostly static monolithic build.
        --config=ngraph # Build with Intel nGraph support.
        --config=numa # Build with NUMA support.
        --config=dynamic_kernels # (Experimental) Build kernels into separate shared objects.
        --config=v2 # Build TensorFlow 2.x instead of 1.x.
Preconfigured Bazel build configs to DISABLE default on features:
        --config=noaws # Disable AWS S3 filesystem support.
        --config=nogcp # Disable GCP support.
        --config=nohdfs # Disable HDFS support.
        --config=nonccl # Disable NVIDIA NCCL support.
运行期间,会确认 python 路径、是否配置 android 等等,因为我这边是编译精简 CPU 版的 TFLite,且是为了编译 dll。因此 android、cuda、ROCm 等我都选择了N。
2.2 编译
直接执行 bazel 进行编译即可:
bazel build -c opt --config=mkl //tensorflow/lite/c:tensorflowlite_c.dll稍等片刻,等待自动下载相关库,并完成编译:
····
INFO: From Linking tensorflow/lite/c/tensorflowlite_c.dll:
LINK : warning LNK4044: 无法识别的选项“/s”;已忽略
  正在创建库 bazel-out/x64_windows-opt/bin/tensorflow/lite/c/tensorflowlite_c.dll.if.lib 和对象
bazel-out/x64_windows-opt/bin/tensorflow/lite/c/tensorflowlite_c.dll.if.exp
Target //tensorflow/lite/c:tensorflowlite_c.dll up-to-date:
  bazel-bin/tensorflow/lite/c/tensorflowlite_c.dll
INFO: Elapsed time: 291.250s, Critical Path: 60.46s
INFO: 305 processes: 305 local.
INFO: Build completed successfully, 444 total actions
打开 E:\tensorflow-2.3.1\bazel-out\x64_windows-opt\bin\tensorflow\lite\c 路径即可得看到 tensorflowlite_c.dll 和 tensorflowlite_c.dll.if.lib 两个文件。这里个文件即为我们最终的结果。
2.3 抠出头文件
光有 dll 和 lib 还不够,我们还需要头文件才能在 c++ 代码里面引用。最简单的方法是直接将整个 TensorFlow 源码根路径加入到 include 路径中,这样的话整个项目会过于庞大。
最佳做法是将 E:\tensorflow-2.3.1\tensorflow\lite\c 目录下,只需要如下几个头文件:
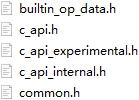
tflite 相关头文件
上文介绍了如何在 Windows 平台下编译 TFLite 为动态链接库 tensorflowlite_c.dll,接下来介绍如何使用 tensorflowlite_c.dll。上一篇文章中我们编译的 TFLite 库为 c 语言接口,即 c_api,在使用过程中,只需下面一条 include 语句即可:
#include "tensorflow/lite/c/c_api.h"注意,如果不想亲自动手编译,可以直接到本文最后下载作者已编译好的库即可。
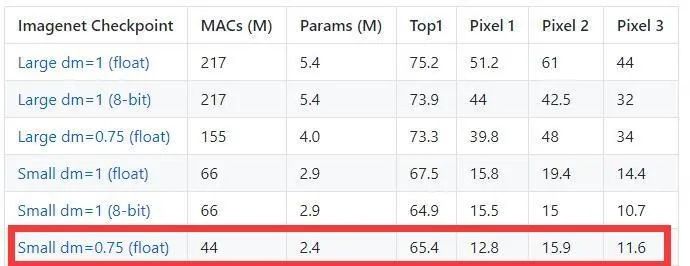
TFLite 模型可以使用 TensorFlow 官方提供的相关模型转换接口得到,这里为了演示,使用 mobilenet v3 提供的 TFLite 模型。前往找到如下 mobilenet v3 模型下载:
前往
https://github.com/tensorflow/models/blob/master/research/slim/nets/mobilenet/README.md
下载 mobilenet v3 tflite
如果无法打开链接或者是无法下载,请到附件中下载。
封装函数 initModel,传入 TFLite 模型路径,代码如下:
void initModel(string path ) {TfLiteModel* model = TfLiteModelCreateFromFile(path.c_str());
TfLiteInterpreterOptions* options = TfLiteInterpreterOptionsCreate();
interpreter = TfLiteInterpreterCreate(model, options);
if (interpreter == nullptr) {
printf("Failed to create interpreter");
cout << (path) << endl;
return ;
}
// Allocate tensor buffers.
if (TfLiteInterpreterAllocateTensors(interpreter) != kTfLiteOk) {
printf("Failed to allocate tensors!");
return ;
}
input_tf = getInputTensorByName(interpreter, "input");
output_tf = getOutputTensorByName(interpreter, "MobilenetV3/Predictions/Softmax");
}
上述代码中,主要使用了如下几个接口:
TfLiteModelCreateFromFile: 创建 TfLiteModel 对象 TfLiteInterpreterOptionsCreate: 设置一些选项,这里暂时没有设置更多的参数。TfLiteInterpreterCreate:创建 TfLiteInterpreter 对象,PS: 这个对象有点 Session 的感觉。TfLiteInterpreterAllocateTensors: 为所有的 Tensor 分配空间,用于向系统请求分配空间。getOutputTensorByName 和 getInputTensorByName 这两个函数是我这边单独封装。getOutputTensorByName 和 getInputTensorByName代码如下:
TfLiteTensor * getOutputTensorByName(TfLiteInterpreter * interpreter, const char * name)
{
int count = TfLiteInterpreterGetOutputTensorCount(interpreter);
for (int i = 0; i < count; ++i) {
TfLiteTensor* ts = (TfLiteTensor*)TfLiteInterpreterGetOutputTensor(interpreter, i);
if (!strcmp(ts->name, name)) {
return ts;
}
}
return nullptr;
}
TfLiteTensor * getInputTensorByName(TfLiteInterpreter * interpreter, const char * name)
{
int count = TfLiteInterpreterGetInputTensorCount(interpreter);
for (int i = 0; i < count; ++i) {
TfLiteTensor* ts = TfLiteInterpreterGetInputTensor(interpreter, i);
if (!strcmp(ts->name, name)) {
return ts;
}
}
return nullptr;
}前向推理主要包括 3 步:
向输入 Tensor 拷贝输入数据 执行推理 从输出 Tensor 将运算结果拷贝出来
示例代码如下:
void forward(float* data, int len) {
TfLiteTensorCopyFromBuffer(input_tf, data, len*sizeof(float));
TfLiteInterpreterInvoke(interpreter);
float logits[1001];
TfLiteTensorCopyToBuffer(output_tf, logits, 1001*sizeof(float));
float maxV = -1;
int maxIdx = -1;
for (int i = 0; i < 1001; ++i) {
if (logits[i] > maxV) {
maxV = logits[i];
maxIdx = i;
}
//printf("%d->%f\n", i, logits[i]);
}
cout << "类别:" << maxIdx << ",概率:" << maxV << endl;
}上面代码写的比较粗糙,用起来不灵活,但是足够作为一个示例来使用了。
接下来看完整代码,如下:
#include "pch.h"
#include <map>
#include <iostream>
#include <sstream>
#include <fstream>
#include <string>
#include "tensorflow/lite/c/c_api.h"
#pragma comment( lib, "tensorflowlite_c.dll.if.lib" )
using namespace std;
TfLiteTensor* input_tf;
TfLiteTensor* output_tf;
TfLiteInterpreter* interpreter;
TfLiteTensor * getOutputTensorByName(TfLiteInterpreter * interpreter, const char * name)
{
int count = TfLiteInterpreterGetOutputTensorCount(interpreter);
for (int i = 0; i < count; ++i) {
TfLiteTensor* ts = (TfLiteTensor*)TfLiteInterpreterGetOutputTensor(interpreter, i);
if (!strcmp(ts->name, name)) {
return ts;
}
}
return nullptr;
}
TfLiteTensor * getInputTensorByName(TfLiteInterpreter * interpreter, const char * name)
{
int count = TfLiteInterpreterGetInputTensorCount(interpreter);
for (int i = 0; i < count; ++i) {
TfLiteTensor* ts = TfLiteInterpreterGetInputTensor(interpreter, i);
if (!strcmp(ts->name, name)) {
return ts;
}
}
return nullptr;
}
void initModel(string path ) {        TfLiteModel* model = TfLiteModelCreateFromFile(path.c_str());
        TfLiteInterpreterOptions* options = TfLiteInterpreterOptionsCreate();
        interpreter = TfLiteInterpreterCreate(model, options);
        if (interpreter == nullptr) {
                 printf("Failed to create interpreter");
                 cout << (path) << endl;
                 return ;
        }
        // Allocate tensor buffers.
        if (TfLiteInterpreterAllocateTensors(interpreter) != kTfLiteOk) {
                 printf("Failed to allocate tensors!");
                 return ;
        }
        input_tf = getInputTensorByName(interpreter, "input");
        output_tf = getOutputTensorByName(interpreter, "MobilenetV3/Predictions/Softmax");
}
void forward(float* data, int len) {
       TfLiteTensorCopyFromBuffer(input_tf, data, len*sizeof(float));
       TfLiteInterpreterInvoke(interpreter);
       float logits[1001];
       TfLiteTensorCopyToBuffer(output_tf, logits, 1001*sizeof(float));
       float maxV = -1;
       int maxIdx = -1;
       for (int i = 0; i < 1001; ++i) {
                if (logits[i] > maxV) {
                         maxV = logits[i];
                         maxIdx = i;
                }
                //printf("%d->%f\n", i, logits[i]);
       }
       cout << "类别:" << maxIdx << ",概率:" << maxV << endl;
}
long getSize(string path) {
ifstream file(path, ios::in | ios::binary);
long l, m;
l = file.tellg();
file.seekg(0, ios::end);
m = file.tellg();
file.close();
return m - l;
}
float* readBmp(string path, int& len) {
len = getSize(path);
unsigned char* buff = (unsigned char*)calloc(len, sizeof(unsigned char*));
ifstream fin(path, std::ifstream::binary);
fin.read(reinterpret_cast<char*>(buff), len *sizeof(unsigned char*));
fin.close();
float* data = (float*)calloc(len, sizeof(float));
for (int i = 0; i < len; ++i) {
data[i] = (buff[i]/255.0-0.5)*2;
}
free(buff);
return data;
}
int main()
{
initModel("v3-small_224_0.75_float.tflite" );
int size=0;
float* bmp = readBmp("input.bin", size);
forward(bmp, size );
}bazel 3.1.0 下载
http://askonline.tech/download/2.html
TensorFlow 2.3.1 源码
http://askonline.tech/download/3.html
TFLite dll 2.3.1 包含头文件与 dll 和 lib 文件
http://askonline.tech/download/1.html
mobilenet v3 TFLite 模型下载地址
http://askonline.tech/download/4.html
完整打包下载
http://askonline.tech/download/5.html

点击“阅读原文”,填写相关信息分享自己的经验与案例

不要忘记“一键三连”哦~

分享

点赞

在看