社区分享 | 机器学习系统对数据变化的持续适应


发布人:谷歌开发者专家(机器学习方向)Chansung Park、Sayak Paul
持续集成和交付 (CI/CD) 在 DevOps 领域是非常受欢迎的话题。在 MLOps(机器学习 + 运维)领域,我们还有另一种形式的持续性——持续评估和重新训练。MLOps 系统随着世界的变化而发展,而这通常是由数据/概念漂移 (data/concept drift) 引起的。为了适应数据变化,我们需要持续评估部署的机器学习模型,并在必要时进行重新训练和重新部署。
本文展示的项目实现了一个结合批量预测和模型评估的工作流,用于持续评估重新训练,以捕捉数据变化。我们将首先探讨项目的常规设置,随后探讨对持续评估机器学习模型很重要的关键组件(批量预测、新数据跨度、重新训练等),然后在需要时对其进行重新训练。我们不会深入探讨项目的技术实现细节,而是保持在较高层次,专注于理解底层概念。
该项目通过 TensorFlow Extended (TFX)、Keras 和 Google Cloud Platform 所提供的丰富服务得以实现。您可以在 GitHub 上找到该项目。
在 GitHub 上找到该项目
https://github.com/deep-diver/Continuous-Adaptation-for-Machine-Learning-System-to-Data-Changes


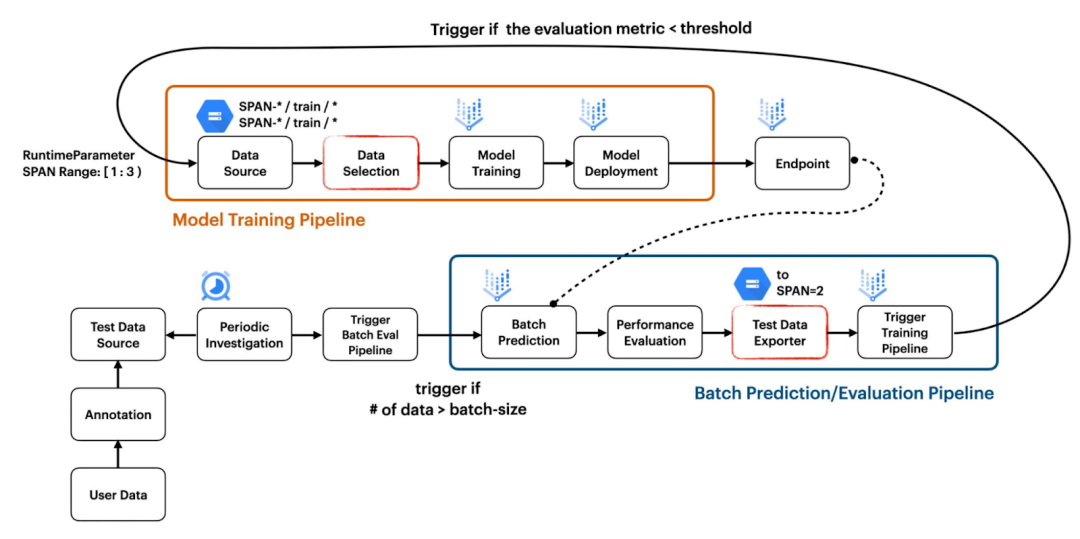
此项目展示了如何构建两个独立流水线并使其协同工作,以创建响应数据变化的 CI/CD 工作流。第一个流水线用于模型训练,第二个流水线用于基于批量预测结果的模型评估,如图 1 所示。

图 1. 项目结构概览(原图)
原图
https://github.com/deep-diver/Continuous-Adaptation-for-Machine-Learning-System-to-Data-Changes/blob/main/figures/overview.jpeg?raw=true
模型训练流水线通过将 ImportExampleGen 和 Trainer 等标准 TFX 组件与 VertexUploader 和 VertexDeployer 等自定义 TFX 组件相结合构建而成。我们在做这个项目时,Pusher 标准组件有问题,因此我们从先前的项目 Dual Deployments 中引入了自定义组件。
Pusher 标准组件有问题
https://github.com/tensorflow/tfx/issues/4159#issuecomment-907155575
Dual Deployments
https://github.com/sayakpaul/Dual-Deployments-on-Vertex-AI
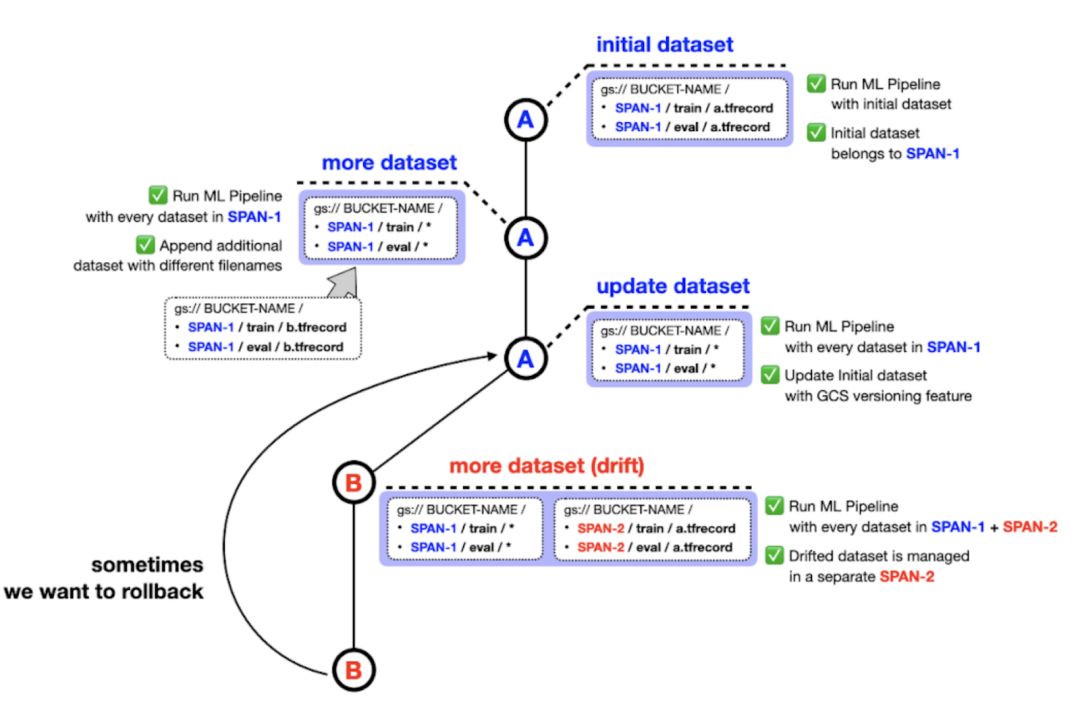
在 ImportExampleGen 处理待馈入模型数据集的方式上,有一个重要的实现细节。我们设计的项目将来自不同分布的数据集保存在不同的文件夹中,文件系统路径指示跨度编号。例如,初始训练和测试数据集可以存储在 SPAN-1/train 和 SPAN-2/test 中,漂移数据集可以分别存储在 SPAN-2/train 和 SPAN-2/test 中,如图 2 所示。
考虑到 Google Cloud Storage (GCS) 中的版本控制功能,您可能认为我们不需要以这种方式管理数据集。但是,我们认为这种方法会使数据集更易于管理。例如,您可能希望视情况从 SPAN-1 和 SPAN-2 或 SPAN-1 和 SPAN-3 中选取数据来训练模型。同时,属于同一分布的数据集仍然可以从 GCS 中的版本控制功能中受益。

图 2. 数据集的管理方式(原图)
原图
https://github.com/deep-diver/Continuous-Adaptation-for-Machine-Learning-System-to-Data-Changes/blob/main/figures/How%20datasets%20are%20managed.png?raw=true
批量评估流水线不利用任何标准 TFX 组件。它由五个自定义 TFX 组件组成:FileListGen、BatchPredictionGen、PerformanceEvaluator、SpanPreparator 和 PipelineTrigger。这些组件在此处作为独立模块提供。
此处
https://github.com/deep-diver/Continuous-Adaptation-for-Machine-Learning-System-to-Data-Changes/tree/main/custom_components

图 3. 批量评估流水线中的自定义 TFX 组件(原图)
原图
https://github.com/deep-diver/Continuous-Adaptation-for-Machine-Learning-System-to-Data-Changes/blob/main/figures/batch%20evaluation%20pipeline.png?raw=true
FileListGen 生成文本文件,供当前部署的模型在 Vertex AI 上查找,根据 Vertex Prediction 要求的格式进行批量预测。然后 BatchPredictionGen 将根据 FileListGen 中准备好的文本文件执行 Vertex Prediction,并输出一组包含批量预测结果的文件。PerformanceEvaluator 根据批量预测结果计算平均准确率,小于阈值时输出 False。如果输出为 True,则流水线将终止。如果输出为 False,SpanPreparator 将通过压缩原始数据列表准备 TFRecord 文件,然后将这些 TFRecord 放入一个新文件夹,文件夹名称包含连续的跨度编号,例如 span-2。最后,PipelineTrigger 通过传递数据(应包含在 RuntimeParameter 中用于训练模型)的跨度编号触发模型训练流水线。
Vertex Prediction 要求的格式
https://cloud.google.com/vertex-ai/docs/predictions/batch-predictions


这部分将介绍项目的关键组件,并就实现工具提供注释。
准备初始模型
我们专注于概念并希望以最简短的方式将其实现,以让其更易复现和普及。请注意,我们使用 CIFAR-10 训练集作为训练数据,并根据数据微调了 ResNet50 模型。这个笔记本演示了我们的训练流水线。
CIFAR-10 训练集
https://www.cs.toronto.edu/~kriz/cifar.html
ResNet50
https://arxiv.org/abs/1512.03385
这个笔记本
https://github.com/deep-diver/Continuous-Adaptation-for-Machine-Learning-System-to-Data-Changes/blob/main/notebooks/02_TFX_Training_Pipeline.ipynb
模拟数据漂移和标记新数据
为了模拟数据漂移场景,我们从互联网上收集了一组匹配 CIFAR-10 类的图像。为了便于理解,我们在 Colab notebook 中实现了此工作流,可在此处获取。此工作流还包括将训练好的模型作为服务上传和部署到 Vertex AI 平台。
此处
https://github.com/deep-diver/Continuous-Adaptation-for-Machine-Learning-System-to-Data-Changes/blob/main/notebooks/97_Prepare_Test_Images.ipynb
Vertex AI 平台
https://cloud.google.com/vertex-ai/docs/predictions/deploy-model-api
包含批量推断的持续评估
接下来,我们使用来自上述步骤的训练模型对这些图像做出推断。执行批量推断获取结果,而不是在线推断。我们使用 Vertex AI 的批量预测服务来实现这一点。在实践中,通常在这一步之后,模型测试图像和模型预测会被发送给领域专家进行审核。测试图像上还会获得预期的真实标签。只有在此之后,我们才能验证预测结果。但是在此项目中,我们取消了这一步,并假设真实标签已经可用。因此,在批量预测结果可用后,我们就会对其进行评估。此笔记本介绍了整个工作流。
此笔记本
https://github.com/deep-diver/Continuous-Adaptation-for-Machine-Learning-System-to-Data-Changes/blob/main/notebooks/98_Batch_Prediction_Test.ipynb
我们部署了一个 Cloud Function 来监控 Google Cloud Storage (GCS) 存储分区内的特定位置。如果该位置内有足够数量的新测试图像可用,我们就将触发批量预测流水线。我们在此笔记本中介绍了此工作流。这就是我们实现项目“持续评估”方面的过程。
Cloud Function
https://cloud.google.com/functions
Google Cloud Storage
https://cloud.google.com/storage
此笔记本
https://github.com/deep-diver/Continuous-Adaptation-for-Machine-Learning-System-to-Data-Changes/blob/main/notebooks/04_Cloud_Scheduler_Trigger.ipynb
不过,还有其他方法可以捕获数据漂移。例如,使用 JS-Divergence,我们可以比较新可用数据和训练数据之间的分布。您可以关注 Robert Crowe 的 Coursera 讲座,深入了解这些技术。
Coursera 讲座
https://www.coursera.org/lecture/machine-learning-modeling-pipelines-in-production/continuous-evaluation-and-monitoring-zmoHr
模型重新训练
在评估批量预测后,下一步是确定是否需要根据预定义的性能阈值重新训练模型,该阈值通常取决于业务环境等诸多因素。我们在项目中将此阈值设为 0.9。如果需要重新训练,那么我们会触发相同的模型训练流水线(如此笔记本中所示),但将新可用数据添加到 CIFAR-10 训练集。我们可以从之前的检查点热启动模型,或者使用所有可用的训练数据从头开始训练模型。在这个项目中,我们选择后者。
在下一部分中,我们将回顾实现中的一些重要组件,并讨论其动机和技术细节。注意,我们的实现在此处完全开源。


本部分将介绍项目一些关键方面的实现细节。请浏览项目仓库并查看所有笔记以获取更多信息。
初始 CIFAR-10 数据集分别存储在 {bucket-name}/span-1/train 和 {bucket-name}/span-1/test GCS 位置。这一步通过第一个笔记本完成。然后,我们使用 Bing Image Downloader 下载了更多与 CIFAR-10 中类别相同的图像。这些图像按 32x32 调整大小,以与 CIFAR-10 数据集兼容,并存储在独立的 GCS 存储分区中,例如 {bucket-batch-prediction}/2021-10/。
第一个笔记本
https://github.com/deep-diver/Continuous-Adaptation-for-Machine-Learning-System-to-Data-Changes/blob/main/notebooks/01_Dataset_Prep.ipynb
Bing Image Downloader
https://github.com/gurugaurav/bing_image_downloader
请注意,我们使用 YYYY-MM 作为存储图像的名称。这是因为由 Cloud Scheduler 触发的 Cloud Function 将寻找最新的 GCS 位置来启动批量评估流水线,如下所示。
def get_latest_directory(storage_client, bucket):
    blobs = storage_client.list_blobs(bucket)

    folders = list(
        set(
            [
                os.path.dirname(blob.name)
                for blob in blobs
                if bool(
                    re.match(
                        "[1-9][0-9][0-9][0-9]-[0-1][0-9]", os.path.dirname(blob.name)
                    )
                )
                is True
            ]
        )
    )

    folders.sort(key=lambda date: datetime.strptime(date, "%Y-%m"))
    return folders[0]
如您所见,它只查找与 YYYY-MM 格式完全匹配的 GCS 位置。Cloud Function 通过 RuntimeParameter 传递要查找批量预测的 GCS 位置来启动批量评估流水线。下方代码片段显示了如何将其传递到 Cloud Function 端名为 data_gcs_prefix 的流水线。
from kfp.v2.google.client import AIPlatformClient

api_client = AIPlatformClient(project_id=project, region=region)

response = api_client.create_run_from_job_spec(
     ...
     parameter_values={"data_gcs_prefix": latest_directory},
)
流水线识别 data_gcs_prefix 是一种 RuntimeParameter,它用于 FileListGen 组件,该组件准备所需格式的文本文件以执行 Vertex AI Batch Prediction。
FileListGen
https://github.com/deep-diver/Continuous-Adaptation-for-Machine-Learning-System-to-Data-Changes/blob/main/custom_components/file_list_gen.py
def _create_pipeline(
    data_gcs_prefix: data_types.RuntimeParameter,
    ...
) -> Pipeline:

   filelist_gen = FileListGen(
        ...
        gcs_source_bucket=data_gcs_bucket,
        gcs_source_prefix=data_gcs_prefix,
    ).with_id("filelist_gen")

    ....
让我们跳过 BatchPredictionGen 组件执行的批量预测。
BatchPredictionGen
https://github.com/deep-diver/Continuous-Adaptation-for-Machine-Learning-System-to-Data-Changes/blob/main/custom_components/batch_pred_evaluator.py
当 PerformanceEvaluator 组件根据 BatchPredictionGen 组件的结果确定应该执行重新训练时,SpanPreparator 准备一个包含新收集图像的 TFRecord 文件,将其移动到 {bucket-name}/span-1/train 和 {bucket-name}/span-2/test,其中训练流水线正在为模型训练提取数据,并将新收集的图像所在的 GCS 位置重命名为 {bucket-batch-prediction}/YYYY-MM_old/。
PerformanceEvaluator
https://github.com/deep-diver/Continuous-Adaptation-for-Machine-Learning-System-to-Data-Changes/blob/main/custom_components/batch_pred_evaluator.py
BatchPredictionGen
https://github.com/deep-diver/Continuous-Adaptation-for-Machine-Learning-System-to-Data-Changes/blob/main/custom_components/batch_prediction_vertex.py
SpanPreparator
https://github.com/deep-diver/Continuous-Adaptation-for-Machine-Learning-System-to-Data-Changes/blob/main/custom_components/span_preparator.py
我们添加了 _old 后缀,让 Cloud Function 忽略重命名的 GCS 位置。如果重新训练的模型没有显示出足够好的性能指标,那么您也有机会收集更多数据并将其与 _old GCS 位置中的图像合并。
批量评估流水线末尾的 PipelineTrigger 组件将通过传递要查找的跨度编号触发训练流水线,以进行模型训练。数据将由 ImportExampleGen 根据 glob 模式匹配特征使用。例如,如果来自 span-1 和 span-2 的数据应该用于模型训练,那么训练数据集的 glob 模式可能是 span-[12]/train/*.tfrecord。下方代码片段清楚地显示了这个想法的通用版本。
PipelineTrigger
https://github.com/deep-diver/Continuous-Adaptation-for-Machine-Learning-System-to-Data-Changes/blob/main/custom_components/training_pipeline_trigger.py
response = api_client.create_run_from_job_spec(
 ...
 parameter_values={
  "input-config": json.dumps(
      {
         "splits": [
             {
                "name": "train",
                "pattern": f"span-[{int(latest_span)-1}{latest_span}]/train/*.tfrecord",
             },
             {
                "name": "val",
                "pattern": f"span-[{int(latest_span)-1}{latest_span}]/test/*.tfrecord",
             },
        ]
      }
  ),
  "output-config": json.dumps({}),
 },
)
我们在 parameter_values 中以这种形式形成 RuntimeParameter 的原因是 ImportExampleGen 组件的模式匹配特征应在 input-config 和 output-config 参数中指定。我们的目标不需要 output-config 参数,但是在将 input-config 参数作为 RuntimeParameter 传递时需要。这就是 output-config 参数留空的原因。请注意,将 RuntimeParameter 用于标准 TFX 组件时,您必须以协议缓冲区格式形成参数。下方代码显示了 ImportExampleGen 组件如何使用传递的 input-config 和 output-config。
RuntimeParameter
https://www.tensorflow.org/tfx/api_docs/python/tfx/v1/dsl/experimental/RuntimeParameter
ImportExampleGen
https://tensorflow.google.cn/tfx/api_docs/python/tfx/v1/components/ImportExampleGen
example_gen = tfx.components.ImportExampleGen(
     input_base=data_root, input_config=input_config, output_config=output_config
)
值得注意的是,如果后端环境是 Kubeflow Pipeline v1,您可以将 TFX 支持的滚动窗口功能与标准组件一起使用。下方代码片段展示了如何使用 CsvExampleGen 组件和 Resolver 节点来完成这一操作。
CsvExampleGen
https://tensorflow.google.cn/tfx/api_docs/python/tfx/v1/components/CsvExampleGen?hl=zh-cn
Resolver
https://tensorflow.google.cn/tfx/api_docs/python/tfx/v1/dsl/Resolver?hl=th
examplegen_range_config = proto.RangeConfig(
     static_range=proto.StaticRange(
         start_span_number=2, end_span_number=2))

example_gen = tfx.components.CsvExampleGen(
     input_base=data_root,
     input_config=examplegen_input_config,
     range_config=examplegen_range_config)

resolver_range_config = proto.RangeConfig(
     rolling_range=proto.RollingRange(num_spans=2))

examples_resolver = tfx.dsl.Resolver(
     strategy_class=tfx.dsl.experimental.SpanRangeStrategy,
     config={
         'range_config': resolver_range_config
     },
     examples=tfx.dsl.Channel(
         type=tfx.types.standard_artifacts.Examples,
         producer_component_id=example_gen.id)).with_id('span_resolver')
这是一种更好的方法,因为它重用了之前 ExampleGens 生成的工件,并且当前流水线运行只处理新跨度中的数据。只不过,基于 Kubeflow Pipeline v2 的 Vertex AI Pipeline 不支持此功能。我们与 TFX 团队就此进行了广泛讨论,这也是为什么我们提出了一种与标准方式不同的方法。
讨论
https://github.com/tensorflow/tfx/issues/4273


Vertex AI Training 是独立于 Pipeline 的服务。我们需要单独为 Vertex AI Pipeline 付费,在撰写本文时,每次流水线运行的费用约为 0.03 美元。各 TFX 组件的计算实例类型为 e2-standard-4,每小时费用约为 0.134 美元。由于完成整个流水线的时间不到一个小时,预计 Vertex AI Pipeline 运行的总费用约为 0.164 美元。
e2-standard-4
https://cloud.google.com/compute/vm-instance-pricing
自定义模型训练的费用取决于机器类型和小时数。此外,您也要考虑为服务器和加速器分别付费。对于这个项目,我们选择了每小时 0.19 美元的 n1-standard-4 机器类型和每小时 0.45 美元的 NVIDIA_TESLA_K80 加速器类型。每个模型都是在一小时内完成训练,因此总共费用约 1.28 美元。最后,根据我们的估计,费用上限应该不超过 5 美元。
成本仅来自 Vertex AI ,因为其余组件(如 Pub/Sub、Cloud Functions 等)使用量非常少。即使再加上这些费用,项目的费用上限也不太会超过 5 美元。有关价格,可以参考官方文档了解:Vertex AI 价格参考,Cloud Build 价格参考。
Vertex AI 价格参考
https://cloud.google.com/vertex-ai/pricing
Cloud Build 价格参考
https://cloud.google.com/build/pricing
您始终都可以使用 GCP 价格计算器来更好地了解 GCP 服务的费用差异。
GCP 价格计算器
https://cloud.google.com/products/calculator


本文谈到了机器学习系统的持续评估和重新训练以及实现工具。机器学习系统还有一种更传统的 CI/CD 形式,以响应代码变更,包括超参数、模型架构之类的变更。我们另有项目演示这一用例。您可以在此了解:第一部分和第二部分。
第一部分
https://cloud.google.com/blog/topics/developers-practitioners/model-training-cicd-system-part-i
第二部分
https://cloud.google.com/blog/topics/developers-practitioners/model-training-cicd-system-part-ii


感谢 ML-GDE 计划为支持我们的实验提供 GCP 额度。我们衷心感谢 Google 的 Robert Crowe 和 Jiayi Zhao 在审核过程中提供的帮助。
ML-GDE 计划
https://developers.google.com/community/experts

点击“阅读原文”访问 TensorFlow 官网

不要忘记“一键三连”哦~

分享

点赞

在看

