实践教程 | 使用Pytorch从头实现Canny边缘检测

极市导读
Canny边缘检测器的详细介绍以及Pytorch实现。 >>加入极市CV技术交流群,走在计算机视觉的最前沿
Canny滤波器当然是最著名和最常用的边缘检测滤波器。我会逐步解释用于轮廓检测的canny滤波器。因为canny滤波器是一个多级滤波器。Canny过滤器很少被集成到深度学习模型中。所以我将描述不同的部分,同时使用Pytorch实现它。它可以几乎没有限制的进行定制,我允许自己一些偏差。
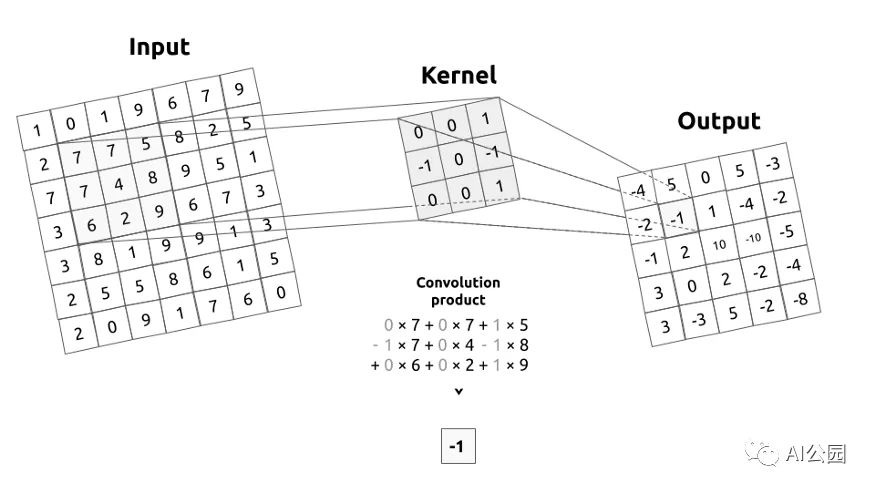
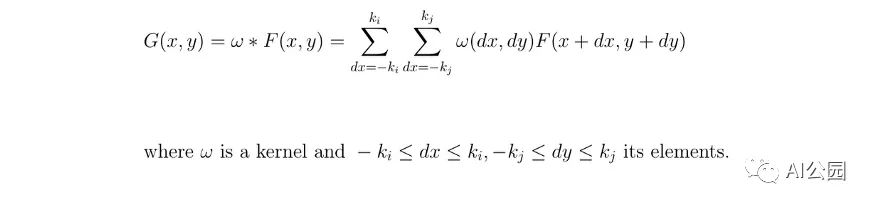
我来介绍一下什么是卷积矩阵,或者说核。卷积矩阵描述了我们要传递给输入图像的一个滤波器。为了简单起见,kernel将通过应用一个卷积,从左到右,从上到下移动整个图像。这个操作的输出称为图像滤波。
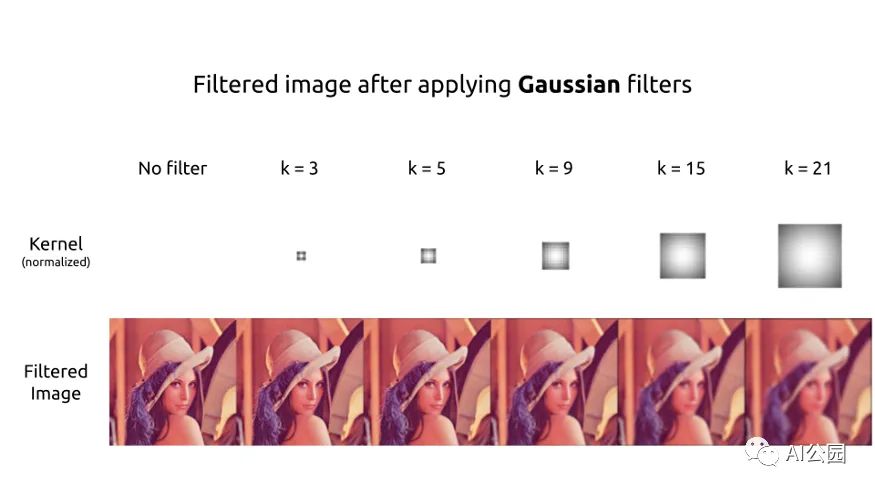
高斯滤波器
首先,我们通常通过应用一个模糊滤波器来消除输入图像中的噪声。这个滤波器的选择取决于你,但我们通常使用一个高斯滤波器。

def get_gaussian_kernel(k=3, mu=0, sigma=1, normalize=True):
    # compute 1 dimension gaussian
    gaussian_1D = np.linspace(-1, 1, k)
    # compute a grid distance from center
    x, y = np.meshgrid(gaussian_1D, gaussian_1D)
    distance = (x ** 2 + y ** 2) ** 0.5

    # compute the 2 dimension gaussian
    gaussian_2D = np.exp(-(distance - mu) ** 2 / (2 * sigma ** 2))
    gaussian_2D = gaussian_2D / (2 * np.pi *sigma **2)

    # normalize part (mathematically)
    if normalize:
        gaussian_2D = gaussian_2D / np.sum(gaussian_2D)
    return gaussian_2D
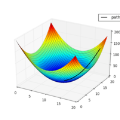
可以制作不同大小的高斯核,或多或少都是居中或扁平的。显然,kernel越大,输出的图像越容易模糊。
Sobel 滤波
为了检测边缘,必须对图像应用一个滤波器来提取梯度。

def get_sobel_kernel(k=3):
    # get range
    range = np.linspace(-(k // 2), k // 2, k)
    # compute a grid the numerator and the axis-distances
    x, y = np.meshgrid(range, range)
    sobel_2D_numerator = x
    sobel_2D_denominator = (x ** 2 + y ** 2)
    sobel_2D_denominator[:, k // 2] = 1  # avoid division by zero
    sobel_2D = sobel_2D_numerator / sobel_2D_denominator
    return sobel_2D
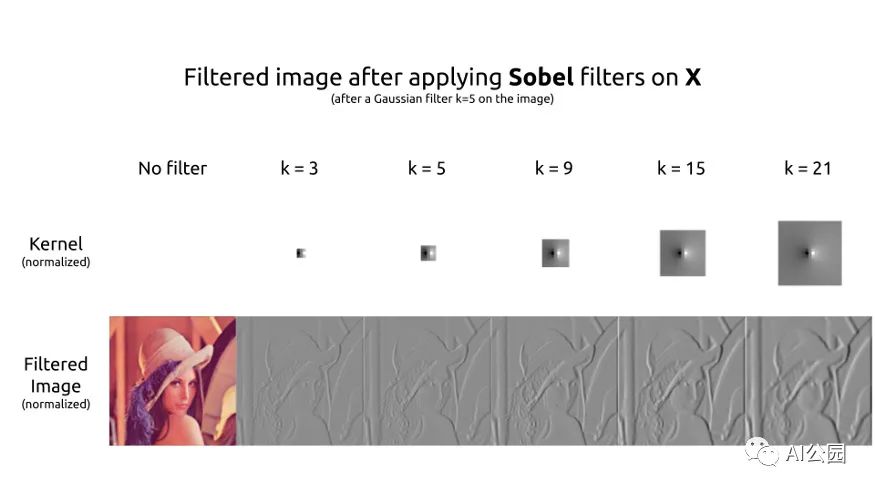
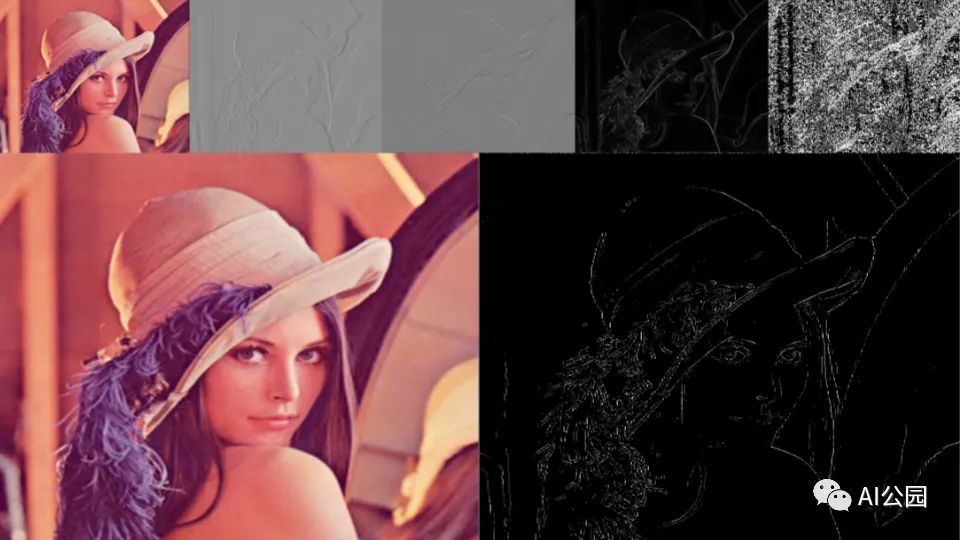
最常用的滤波器是Sobel滤波器。分解成两个滤波器,第一个核用于提取水平梯度。粗略地说,右边的像素比左边的像素越亮,过滤后的图像的结果就越高。反之亦然。这在Lena帽子的左边可以清楚地看到。
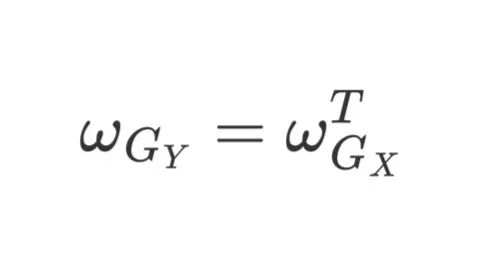
第二个核用于提取垂直的梯度。这个kernel是另一个的转置。这两个kernel具有相同的作用,但在不同的轴上。
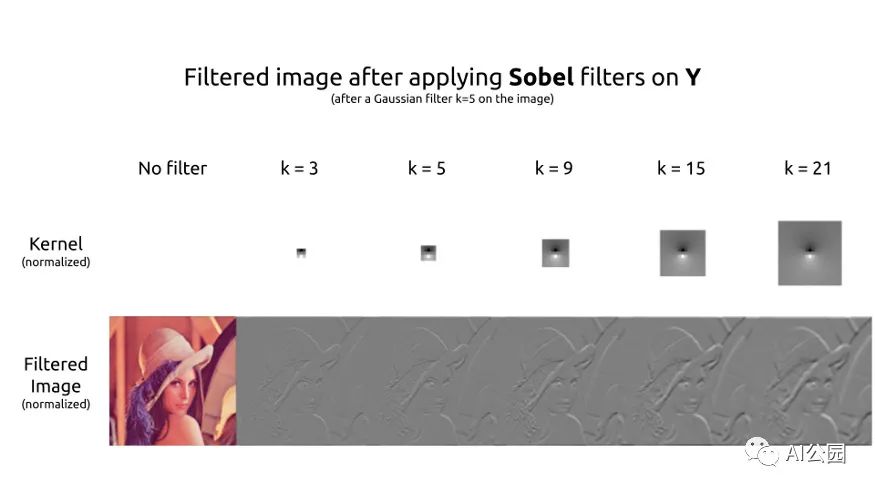
计算梯度
现在,我们在图像的两个轴上都有了梯度。为了检测轮廓,我们需要梯度的大小。我们可以使用绝对值范数或欧几里得范数。
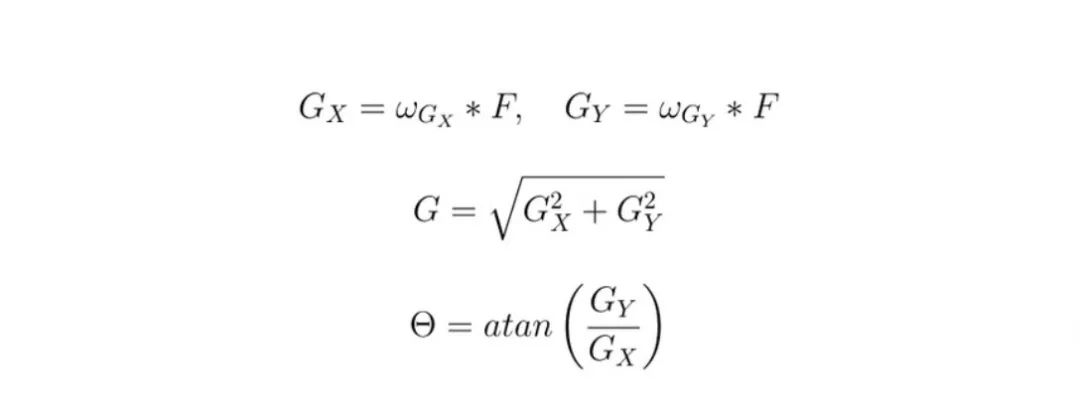
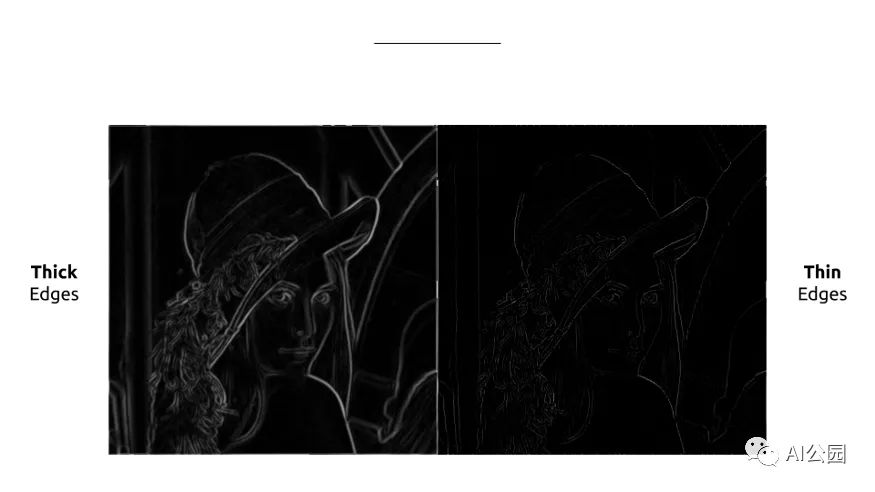
边缘现在使用我们的梯度的大小被完美地检测,但是很厚。如果我们能只保留轮廓的细线就好了。因此,我们同时计算我们的梯度的方向,这将用于保持这些细线。在Lena的图像中,梯度是由强度表示的,因为梯度的角度非常重要。
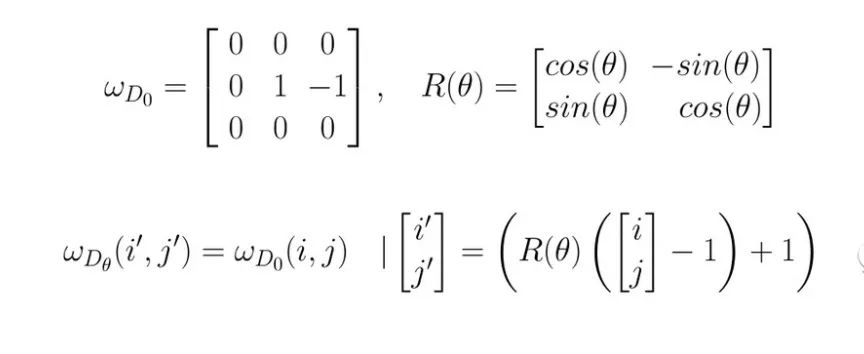
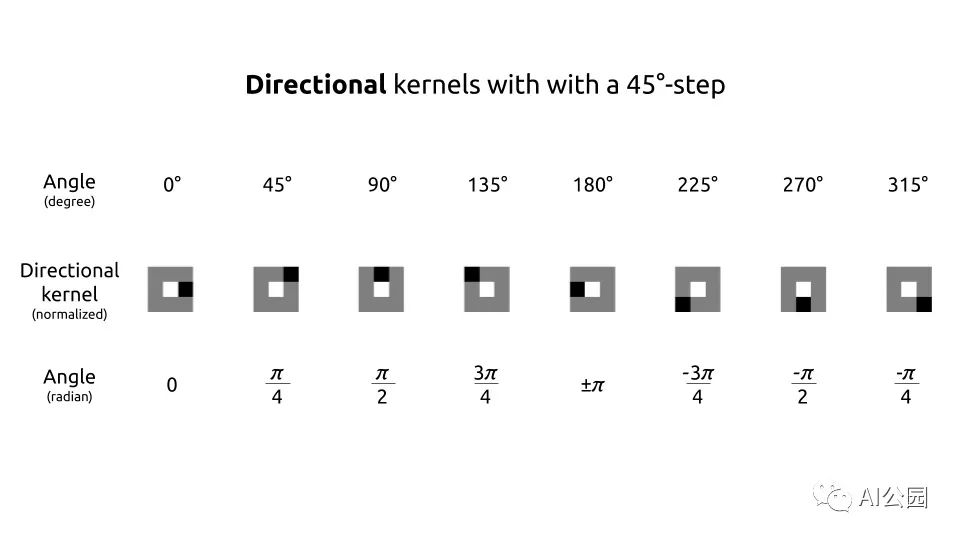
非极大值抑制
为了细化边缘,可以使用非最大抑制方法。在此之前,我们需要创建45°× 45°方向的kernel。
def get_thin_kernels(start=0, end=360, step=45):
        k_thin = 3  # actual size of the directional kernel
        # increase for a while to avoid interpolation when rotating
        k_increased = k_thin + 2

        # get 0° angle directional kernel
        thin_kernel_0 = np.zeros((k_increased, k_increased))
        thin_kernel_0[k_increased // 2, k_increased // 2] = 1
        thin_kernel_0[k_increased // 2, k_increased // 2 + 1:] = -1

        # rotate the 0° angle directional kernel to get the other ones
        thin_kernels = []
        for angle in range(start, end, step):
            (h, w) = thin_kernel_0.shape
            # get the center to not rotate around the (0, 0) coord point
            center = (w // 2, h // 2)
            # apply rotation
            rotation_matrix = cv2.getRotationMatrix2D(center, angle, 1)
            kernel_angle_increased = cv2.warpAffine(thin_kernel_0, rotation_matrix, (w, h), cv2.INTER_NEAREST)

            # get the k=3 kerne
            kernel_angle = kernel_angle_increased[1:-1, 1:-1]
            is_diag = (abs(kernel_angle) == 1)      # because of the interpolation
            kernel_angle = kernel_angle * is_diag   # because of the interpolation
            thin_kernels.append(kernel_angle)
        return thin_kernels
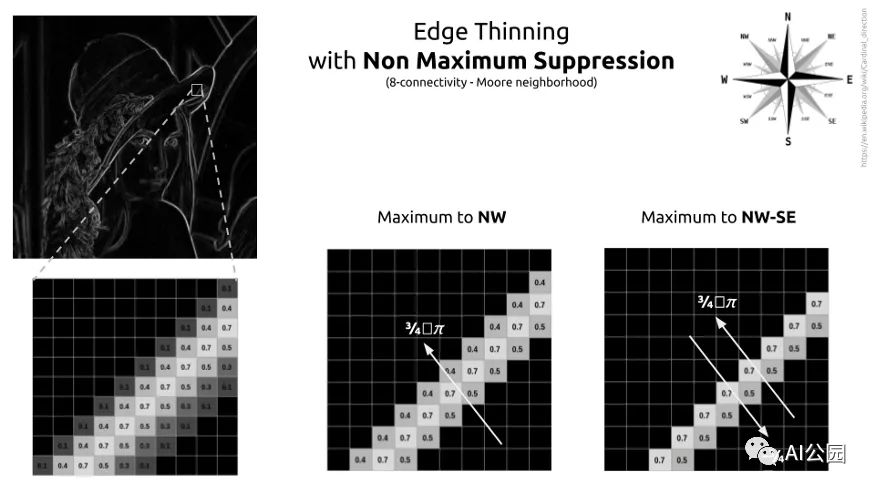
因此,该过程要求检查8邻域(或称为Moore的邻域)。这个概念很容易理解。对于每个像素,我们将检查方向。我们要看看这个像素是否比它的邻居的梯度方向更强。如果是,那么我们将其与相反方向的相邻像素进行比较。如果这个像素与它的双向邻居相比具有最大强度,那么它是局部最大。这个像素将被保存。在所有其他情况下,它不是一个局部最大值,像素被删除。
阈值和滞后
最后,只需要应用阈值。有三种方法可以做到这一点:
-
低-高阈值:将亮度高于阈值的像素设为1,其他设为0。 -
低-弱和 弱-高阈值:我们设置高强度像素为1,低强度像素为0,介于两个阈值之间,我们设置它们为0.5,并被认为是弱像素。 -
低-弱和 弱-高与 滞后:同上,弱像素滞后进行评估,并重新分配为高或低。
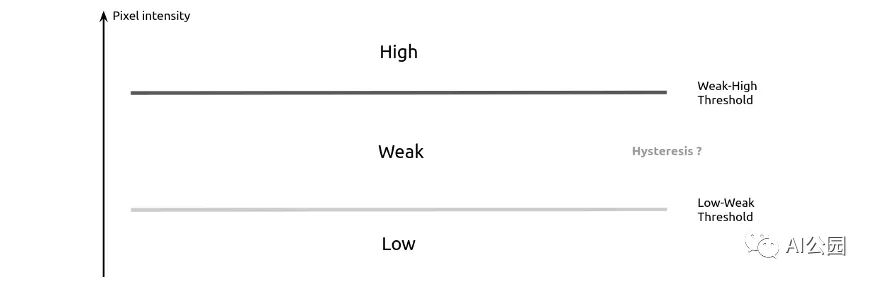
“滞后是系统状态对其历史的依赖。”—— 维基百科
在我们的例子中,滞后可以理解为一个像素对其相邻像素的依赖。在Canny滤波器的滞后步骤中,我们说如果一个弱像素在它的8个邻居中有一个高强度的邻居,那么它将被归类为高。
我喜欢使用不同的方法,我最后使用一个滤波器对弱像素进行分类。如果它的卷积乘积大于1那么我把它归为High。

你说过用PyTorch的
是的,现在可以看看Pytorch代码了。所有的东西都被组合成一个nn.Module。我不能保证实现会得到优化。使用OpenCV的特性可以加快处理速度。但是这种实现至少具有灵活、可参数化和根据需要容易修改的优点。
class CannyFilter(nn.Module):
    def __init__(self,
                 k_gaussian=3,
                 mu=0,
                 sigma=1,
                 k_sobel=3,
                 use_cuda=False):
        super(CannyFilter, self).__init__()
        # device
        self.device = 'cuda' if use_cuda else 'cpu'

        # gaussian

        gaussian_2D = get_gaussian_kernel(k_gaussian, mu, sigma)
        self.gaussian_filter = nn.Conv2d(in_channels=1,
                                         out_channels=1,
                                         kernel_size=k_gaussian,
                                         padding=k_gaussian // 2,
                                         bias=False)
        self.gaussian_filter.weight[:] = torch.from_numpy(gaussian_2D)

        # sobel

        sobel_2D = get_sobel_kernel(k_sobel)
        self.sobel_filter_x = nn.Conv2d(in_channels=1,
                                        out_channels=1,
                                        kernel_size=k_sobel,
                                        padding=k_sobel // 2,
                                        bias=False)
        self.sobel_filter_x.weight[:] = torch.from_numpy(sobel_2D)


        self.sobel_filter_y = nn.Conv2d(in_channels=1,
                                        out_channels=1,
                                        kernel_size=k_sobel,
                                        padding=k_sobel // 2,
                                        bias=False)
        self.sobel_filter_y.weight[:] = torch.from_numpy(sobel_2D.T)


        # thin

        thin_kernels = get_thin_kernels()
        directional_kernels = np.stack(thin_kernels)

        self.directional_filter = nn.Conv2d(in_channels=1,
                                            out_channels=8,
                                            kernel_size=thin_kernels[0].shape,
                                            padding=thin_kernels[0].shape[-1] // 2,
                                            bias=False)
        self.directional_filter.weight[:, 0] = torch.from_numpy(directional_kernels)

        # hysteresis

        hysteresis = np.ones((3, 3)) + 0.25
        self.hysteresis = nn.Conv2d(in_channels=1,
                                    out_channels=1,
                                    kernel_size=3,
                                    padding=1,
                                    bias=False)
        self.hysteresis.weight[:] = torch.from_numpy(hysteresis)


    def forward(self, img, low_threshold=None, high_threshold=None, hysteresis=False):
        # set the setps tensors
        B, C, H, W = img.shape
        blurred = torch.zeros((B, C, H, W)).to(self.device)
        grad_x = torch.zeros((B, 1, H, W)).to(self.device)
        grad_y = torch.zeros((B, 1, H, W)).to(self.device)
        grad_magnitude = torch.zeros((B, 1, H, W)).to(self.device)
        grad_orientation = torch.zeros((B, 1, H, W)).to(self.device)

        # gaussian

        for c in range(C):
            blurred[:, c:c+1] = self.gaussian_filter(img[:, c:c+1])

            grad_x = grad_x + self.sobel_filter_x(blurred[:, c:c+1])
            grad_y = grad_y + self.sobel_filter_y(blurred[:, c:c+1])

        # thick edges

        grad_x, grad_y = grad_x / C, grad_y / C
        grad_magnitude = (grad_x ** 2 + grad_y ** 2) ** 0.5
        grad_orientation = torch.atan(grad_y / grad_x)
        grad_orientation = grad_orientation * (360 / np.pi) + 180 # convert to degree
        grad_orientation = torch.round(grad_orientation / 45) * 45  # keep a split by 45

        # thin edges

        directional = self.directional_filter(grad_magnitude)
        # get indices of positive and negative directions
        positive_idx = (grad_orientation / 45) % 8
        negative_idx = ((grad_orientation / 45) + 4) % 8
        thin_edges = grad_magnitude.clone()
        # non maximum suppression direction by direction
        for pos_i in range(4):
            neg_i = pos_i + 4
            # get the oriented grad for the angle
            is_oriented_i = (positive_idx == pos_i) * 1
            is_oriented_i = is_oriented_i + (positive_idx == neg_i) * 1
            pos_directional = directional[:, pos_i]
            neg_directional = directional[:, neg_i]
            selected_direction = torch.stack([pos_directional, neg_directional])

            # get the local maximum pixels for the angle
            is_max = selected_direction.min(dim=0)[0] > 0.0
            is_max = torch.unsqueeze(is_max, dim=1)

            # apply non maximum suppression
            to_remove = (is_max == 0) * 1 * (is_oriented_i) > 0
            thin_edges[to_remove] = 0.0

        # thresholds

        if low_threshold is not None:
            low = thin_edges > low_threshold

            if high_threshold is not None:
                high = thin_edges > high_threshold
                # get black/gray/white only
                thin_edges = low * 0.5 + high * 0.5

                if hysteresis:
                    # get weaks and check if they are high or not
                    weak = (thin_edges == 0.5) * 1
                    weak_is_high = (self.hysteresis(thin_edges) > 1) * weak
                    thin_edges = high * 1 + weak_is_high * 1
            else:
                thin_edges = low * 1


        return blurred, grad_x, grad_y, grad_magnitude, grad_orientation, thin_edges
原链:https://towardsdatascience.com/implement-canny-edge-detection-from-scratch-with-pytorch-a1cccfa58bed
公众号后台回复“数据集”获取60+深度学习数据集下载~

# CV技术社群邀请函 #

备注:姓名-学校/公司-研究方向-城市(如:小极-北大-目标检测-深圳)
即可申请加入极市目标检测/图像分割/工业检测/人脸/医学影像/3D/SLAM/自动驾驶/超分辨率/姿态估计/ReID/GAN/图像增强/OCR/视频理解等技术交流群
每月大咖直播分享、真实项目需求对接、求职内推、算法竞赛、干货资讯汇总、与 10000+来自港科大、北大、清华、中科院、CMU、腾讯、百度等名校名企视觉开发者互动交流~