基于PyTorch/TorchText的自然语言处理库
导读
TorchNLP是NLP任务的深度学习库。TorchNLP基于PyTorch和TorchText构建,尝试提供跨任务工作的可重用组件。目前它可以用于命名实体识别(NER)和具有双向LSTM CRF模型和Transformer模型的Chunking任务。它可以支持使用CoNLL2003格式的数据集。
作者 | kolloldas
Github:https://github.com/kolloldas/torchnlp
高级工作流
定义NLP任务
拓展Model类并实现forward()和lost()方法,分别返回预测和损失
用HParams类简单定义超参
定义一个数据函数来使用TorchText API返回DataSet迭代器、词汇表等。选中conll.py作为示例
设置Evaluator和Trainer类以使用模型、数据集迭代器和度量,查看ner.py查看详情
运行trainer,获取epoch次数early stopping criteria
使用evaluator对特定数据集上训练的模型进行评估
在训练的模型上运行inference
部件
Model: 处理模型的加载和保存以及相关的超参数;HParams: 定义超参;Trainer: 在数据集上训练给定的模型。支持预定义的学习速率衰减和early stopping等功能;Evaluator: 评估模型;get_input_processor_words: 在推理期间使用它可以快速地将输入字符串转换成模型可以处理的格式。
支持的模型
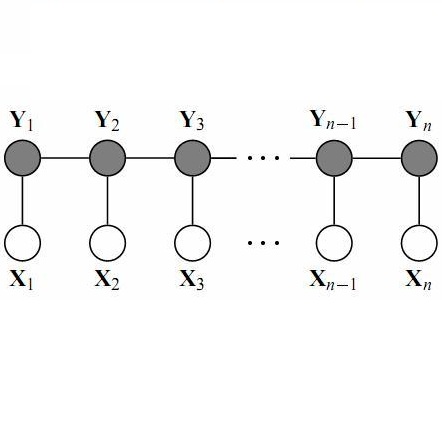
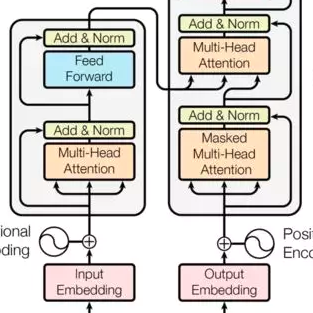
transformer.Encoder,transformer.Decoder: Transfomer network implementation from Attention is all you needCRF: Conditional Random Field layer which can be used as the final outputTransformerTagger: Sequence tagging model implemented using the Transformer network and CRFBiLSTMTagger: Sequence tagging model implemented using bidirectional LSTMs and CRF
安装
TorchNLP requires a minimum of Python 3.5 and PyTorch 0.4.0 to run. Check Pytorch for the installation steps. Clone this repository and install other dependencies like TorchText:
pip install -r requirements.txt
Go to the root of the project and check for integrity with PyTest:
pytest
Install this project:
python setup.py
使用
NER Task
The NER task can be run on any dataset that confirms to the CoNLL 2003 format. To use the CoNLL 2003 NER dataset place the dataset files in the following directory structure within your workspace root:
.data
  |
  |---conll2003
          |
          |---eng.train.txt
          |---eng.testa.txt
          |---eng.testb.txt
eng.testa.txt is used the validation dataset and eng.testb.txt is used as the test dataset.
Start the NER module in the python shell which sets up the imports:
python -i -m torchnlp.ner
Task: Named Entity Recognition

Available models:
-------------------
TransformerTagger

    Sequence tagger using the Transformer network (https://arxiv.org/pdf/1706.03762.pdf)
    Specifically it uses the Encoder module. For character embeddings (per word) it uses
    the same Encoder module above which an additive (Bahdanau) self-attention layer is added

BiLSTMTagger

    Sequence tagger using bidirectional LSTM. For character embeddings per word
    uses (unidirectional) LSTM


Available datasets:
-------------------
    conll2003: Conll 2003 (Parser only. You must place the files)

>>>
Train the Transformer model on the CoNLL 2003 dataset:
>>> train('ner-conll2003', TransformerTagger, conll2003)
The first argument is the task name. You need to use the same task name during evaluation and inference. By default the train function will use the F1 metric with a window of 5 epochs to perform early stopping. To change the early stopping criteria set the PREFS global variable as follows:
>>> PREFS.early_stopping='lowest_3_loss'
This will now use validation loss as the stopping criteria with a window of 3 epochs. The model files are saved under taskname-modelname directory. In this case it is ner-conll2003-TransformerTagger
Evaluate the trained model on the testb dataset split:
>>> evaluate('ner-conll2003', TransformerTagger, conll2003, 'test')
It will display metrics like accuracy, sequence accuracy, F1 etc
Run the trained model interactively for the ner task:
>>> interactive('ner-conll2003', TransformerTagger)
...
Ctrl+C to quit
> Tom went to New York
I-PER O O I-LOC I-LOC
You can similarly train the bidirectional LSTM CRF model by using the BiLSTMTagger class. Customizing hyperparameters is quite straight forward. Let's look at the hyperparameters for TransformerTagger:
>>> h2 = hparams_transformer_ner()
>>> h2

Hyperparameters:
 filter_size=128
 optimizer_adam_beta2=0.98
 learning_rate=0.2
 learning_rate_warmup_steps=500
 input_dropout=0.2
 embedding_size_char=16
 dropout=0.2
 hidden_size=128
 optimizer_adam_beta1=0.9
 embedding_size_word=300
 max_length=256
 attention_dropout=0.2
 relu_dropout=0.2
 batch_size=100
 num_hidden_layers=1
 attention_value_channels=0
 attention_key_channels=0
 use_crf=True
 embedding_size_tags=100
 learning_rate_decay=noam_step
 embedding_size_char_per_word=100
 num_heads=4
 filter_size_char=64
Now let's disable the CRF layer:
>>> h2.update(use_crf=False)

Hyperparameters:
filter_size=128
optimizer_adam_beta2=0.98
learning_rate=0.2
learning_rate_warmup_steps=500
input_dropout=0.2
embedding_size_char=16
dropout=0.2
hidden_size=128
optimizer_adam_beta1=0.9
embedding_size_word=300
max_length=256
attention_dropout=0.2
relu_dropout=0.2
batch_size=100
num_hidden_layers=1
attention_value_channels=0
attention_key_channels=0
use_crf=False
embedding_size_tags=100
learning_rate_decay=noam_step
embedding_size_char_per_word=100
num_heads=4
filter_size_char=64
Use it to re-train the model:
>>> train('ner-conll2003-nocrf', TransformerTagger, conll2003, hparams=h2)
Along with the model the hyperparameters are also saved so there is no need to pass the HParams object during evaluation. Also note that by default it will not overwrite any existing model directories (will rename instead). To change that behavior set the PREFS variable:
>>> PREFS.overwrite_model_dir = True
The PREFS variable is automatically persisted in prefs.json
Chunking Task
The CoNLL 2000 dataset is available for the Chunking task. The dataset is automatically downloaded from the public repository so you don't need to manually download it.
Start the Chunking task:
python -i -m torchnlp.chunk
Train the Transformer model:
>>> train('chunk-conll2000', TransformerTagger, conll2000)
There is no validation partition provided in the repository hence 10% of the training set is used for validation.
Evaluate the model on the test set:
>>> evaluate('chunk-conll2000', TransformerTagger, conll2000, 'test')
独立使用
The transformer.Encoder, transformer.Decoder and CRF modules can be independently imported as they only depend on PyTorch:
from torchnlp.modules.transformer import Encoder
from torchnlp.modules.transformer import Decoder
from torchnlp.modules.crf import CRF
-END-
专 · 知
专知,专业可信的人工智能知识分发,让认知协作更快更好!欢迎登录www.zhuanzhi.ai,注册登录专知,获取更多AI知识资料!

欢迎微信扫一扫加入专知人工智能知识星球群,获取最新AI专业干货知识教程视频资料和与专家交流咨询!

请加专知小助手微信(扫一扫如下二维码添加),加入专知人工智能主题群,咨询技术商务合作~

专知《深度学习:算法到实战》课程全部完成!530+位同学在学习,现在报名,限时优惠!网易云课堂人工智能畅销榜首位!

点击“阅读原文”,了解报名专知《深度学习:算法到实战》课程