深度学习实战(二)——基于Keras 的深度学习
本期你将学习到以下内容:
一、 Keras基于Theano和TensorFlow的深度学习库
keras概述(特点、与Theano和TensorFlow关系)
keras安装
keras的主要核心操作步骤
二、解决神经网络问题的基本步骤
三、Keras 构建多层感知器模型(MLP)——python实现
以手写数字识别为例进行分析
四、Keras 构建多层感知器模型(MLP)——R实现
keras在Rstudio的安装
以手写数字识别为例进行分析
五、运用Keras对卷积神经网络(CNN)实现
参考文档
一、 Keras:基于Theano和TensorFlow的深度学习库
keras概述(特点、与Theano和TensorFlow关系)
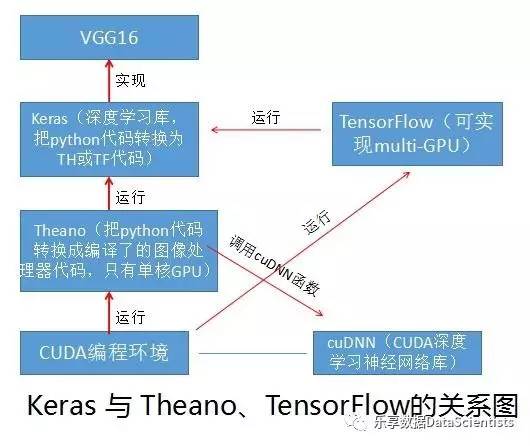
Keras是一个高层神经网络API,由纯Python编写而成并基Tensorflow或Theano。可实现CPU、GPU的无缝对接——此乃神奇。其与Theano和TensorFlow关系见下图。keras安装
keras的安装可参考“Keras中文文档”。Keras默认使用TensorFlow作为后端来进行张量操作,所以得正确安装tensorflow或Theano哦。GPU加速的话,还得有硬件支持并搭建CUDA开发环境。当然也可以按照上篇文章所言,直接在AWS上部署incident。keras的主要核心操作步骤
由于keras已经高度集成了实现深度学习模型实现,所以快速实现一个模型非常简单,只需要如下几步即可:模型搭建;运用Sequential(序贯模型)组织网络层结构。模型传递一个layer的list来构造该模型,需要指定模型的结构及输入数据的shape。
编译模型;完成模型的搭建后,我们需要使用.compile()方法来编译模型,指明损失函数和优化器。
模型拟合;完成模型编译后,使用.fit()在训练数据上按batch进行一定次数的迭代来训练网络。
模型评估;运用.evaluate()进行模型评估,查看模型好坏。
模型预测;运用.predict(), 使用我们的模型,对新的数据进行预测。
以在keras实现线性回归为例:
#构建x和y模拟数据
x = random((30,2))
y = np.dot(x, [2., 3.]) + 1.
#模型搭建;Dense()表示无激活层回归函数
lm = Sequential([ Dense(1, input_shape=(2,)) ])
#编译模型,优化器为“SGD”,损失函数为“mse”
lm.compile(optimizer=SGD(lr=0.1), loss='mse')
#模型拟合
lm.fit(x, y, nb_epoch=5, batch_size=1)
#模型评估
lm.evaluate(x, y, verbose=0)
#模型预测
model.predict(x_test, batch_size=1)
二、解决神经网络问题的基本步骤
确定问题是否适用于神经网络,是否优于传统机器学习方法;
调查是否已有合适的神经网络结构如VGG16等已经适用于已有的问题;
确定通过哪种框架实现拟建立的神经网络结构(tensorflow/theano/caffe…);
转换数据为合适的进入结构,确定batches,进行数据清洗;
倒腾数据(反转、虚化等)获得更多数据样本拟合模型;
训练模型,验证模型并进行参数优化;
测试模型进行比较和应用
三、Keras 构建多层感知器模型(MLP)——python实现
以手写数字识别为例进行分析
以经典的MNIST手写数字识别为例,通过keras.datasets中的mnist可自动获取。0.载入必要的libraries
%pylab inline
import os
import numpy as np
import pandas as pd
from scipy.mist import imread
from sklearn.metrics import accuracy_score
import tensorflow as tf
import keras
from keras.model import Sequential
from keras.datasets import mnist
1. 转换2维数组为1维形式,进行归一化
x_train = np.reshape(x_train,(x_train.shape[0], -1))/255
x_test = np.reshape(x_test,(x_test.shape[0], -1))/255
#转为目标变量为one-hot编码
y_train = pd.get_dummies(y_train)
y_test = pd.get_dummies(y_test)
y_train = np.array(y_train)
y_test = np.array(y_test)
#构建validation set,以7:3 比例构建30%数据为验证集
split_size = int(train_x.shape[0]*0.7)
train_x,val_x = train_x[:split_size], train_x[split_size:]
train_y,val_y = train_y[:split_size], train_y[split_size:]
train.label.ix[split_size:]
2. 构建keras序贯模型
model = Sequential()
from keras.layers import Dense
model.add(Dense(784, input_dim= 784, activation = 'relu'))
keras.layers.core.Dropout(rate = 0.4)
model.add(Dense(10, input_dim= 784, activation = 'softmax'))
3. 对模型进行编译
model.compile(loss='categorical_crossentropy', optimizer = 'adam', metrics=['accuracy'])4. 拟合并评估模型
model.fit(x_train,y_train,epoch = 50,batch_size=128,validation_data=(val_x, val_y))
#预测模型
pred = model.predict_classes(test_x)
四、Keras 构建多层感知器模型(MLP)——R实现
keras在Rstudio的安装
    好吧,相对于python来说,用R实现深度学习,特别是实现Keras从来不是主流,但有幸看到R一直在努力,也有大牛在实现,也是令人欣慰的。本这学习的态度,对Keras的R实现进行一个简单的梳理。
    首先是安装,要求以tensorflow为backend,因此在用R实现前,确保已经安装了64位python3.5以及tensorflow(最好是以Anocada3环境支持),然后才有以下的下载包及安装。建议还是去官网“Tensorflow for R”去学习哦!
#下载支持Keras包
install.packages("devtools")
devtools::install_github("rstudio/keras")
library(keras)
#在Rstudio中安装tensorflow
install_tensorflow()
#默认CPU运行#修改为GPU运行
install_tensorflow(gpu=TRUE)以手写数字识别为例进行分析
还是以手写数字识别数据为例进行分析,方便进行代码的比较。#载入keras内建数据集mnist dataset
data <- dataset_mnist()
#划分train 和test file
train_x <- data$train$x
train_y <- data$train$y
test_x <- data$test$x
test_y <- data$test$y
rm(data)1. 转换2维数组为1维形式,进行归一化
train_x <- array(train_x, dim = c(dim(train_x)[1],prod(dim(trian_x)[-1])))/255
test_x <- array(test_x, dim = c(dim(test_x)[1],prod(dim(test_x)[-1])))/255
#转为目标变量为one-hot编码
train_y <- to_categorical(train_y,10)
test_y <- to_categorical(test_y,10)
2. 构建keras序贯模型
model <- keras_model_sequential()
#构建只有一个隐藏层的全连接
model %>%
        layer_dense(units = 784, input_shape = 784) %>%
        layer_dropout(rate = 0.4)%>%
        layer_activation(activation = 'relu') %>%
        layer_dense(units = 10) %>%
        layer_activation(activation = 'softmax')
3. 对模型进行编译
model %>%
        compile(loss = 'categorical_crossentropy',
               optimizer = 'adam',
               metrics = c('accuracy'))
4. 拟合并评估模型
#fitting model
model %>%
        fit(train_x, train_y,epochs = 100, batch_size = 128)
#evaluating model
loss_and_metrics <- model %>%
evaluate(test_x,test_y, batch_size = 128) 通过keras分别对手写数值识别pyhon及R的实现,可以看出,二者代码并没有本质的区别,所运用的函数均为keras的固定函数。五、运用Keras对卷积神经网络(CNN)实现
当然绝不仅仅只能实现简单的MLP,我们完全可以构建更复杂的模型,训练更多的参数,提高模型的精度。在神经网络中,影响模型精度的参数类型主要有:模型结构
隐层数量
每层神经元个数
正则化参数
学习率
优化器类型
Dropout rate(随机失活率)
权值分享
为了更好拟合模型,尝试运用CNN算法,来看看keras的强大和灵活。由于运用CNN,因此需要首先对进入模型的数据结构进行转换。 可以看出,运用keras进行CNN模型模拟的基本步骤与MPL基本一致,只是Sequencial model更加复杂。
1. 转换数据为28*28的图片形式
train_x_temp = train_x.shape(-1, 28, 28, 1)
val_x_temp = val_x.shape(-1, 28, 28, 1)
2. 构建keras序贯模型
# 定义变量
input_shape = (784,)
input_reshape = (28, 28, 1)
conv_num_filters = 5conv_filter_size = 5pool_size = (2, 2)
hidden_num_units = 50
output_num_units = 10
epochs = 5
batch_size = 128

model = Sequential([
 InputLayer(input_shape=input_reshape),

 Convolution2D(25, 5, 5, activation='relu'),
 MaxPooling2D(pool_size=pool_size),

 Convolution2D(25, 5, 5, activation='relu'),
 MaxPooling2D(pool_size=pool_size),

 Convolution2D(25, 4, 4, activation='relu'),

 Flatten(),

 Dense(output_dim=hidden_num_units, activation='relu'),

 Dense(output_dim=output_num_units, input_dim=hidden_num_units, activation='softmax'),
])
3. 对模型进行编译
model.compile(loss='categorical_crossentropy', optimizer='adam', metrics=['accuracy'])4. 拟合并评估模型
trained_model_conv = model.fit(train_x_temp, train_y, nb_epoch=epochs, batch_size=batch_size, validation_data=(val_x_temp, val_y))参考文档
Keras中文文档 http://keras-cn.readthedocs.io/en/latest/#_2
TensorFlow for R https://tensorflow.rstudio.com/index.html
Tutorial: Optimizing Neural Networks using Keras (with Image recognition case study)https://www.analyticsvidhya.com/blog/2016/10/tutorial-optimizing-neural-networks-using-keras-with-image-recognition-case-study/
fast.ai http://wiki.fast.ai/index.php/Main_Page
github:fast.ai lesson 2https://github.com/Alven8816/courses/blob/master/deeplearning1/nbs/lesson2.ipynb
Getting started with Deep Learning using Keras and TensorFlow in Rhttps://www.analyticsvidhya.com/blog/2017/06/getting-started-with-deep-learning-using-keras-in-r/
An Introduction to Implementing Neural Networks using TensorFlowhttps://www.analyticsvidhya.com/blog/2016/10/an-introduction-to-implementing-neural-networks-using-tensorflow/
Deep Learning for Computer Vision – Introduction to Convolution Neural Networkshttps://www.analyticsvidhya.com/blog/2016/04/deep-learning-computer-vision-introduction-convolution-neural-networks/
”乐享数据“个人公众号,不代表任何团体利益,亦无任何商业目的。任何形式的转载、演绎必须经过公众号联系原作者获得授权,保留一切权力。欢迎关注“乐享数据”。


