百闻不如一码!手把手教你用Python搭一个Transformer
大数据文摘出品
编译:林安安、钱天培
与基于RNN的方法相比,Transformer 不需要循环,主要是由Attention 机制组成,因而可以充分利用python的高效线性代数函数库,大量节省训练时间。
可是,文摘菌却经常听到同学抱怨,Transformer学过就忘,总是不得要领。
怎么办?那就自己搭一个Transformer吧!
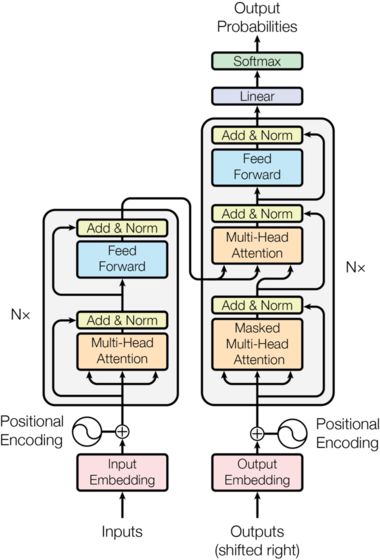
上图是谷歌提出的transformer 架构,其本质上是一个Encoder-Decoder的结构。把英文句子输入模型,模型会输出法文句子。
要搭建Transformer,我们必须要了解5个过程:
词向量层
位置编码
创建Masks
多头注意层(The Multi-Head Attention layer)
Feed Forward层
词向量
词向量是神经网络机器翻译(NMT)的标准训练方法,能够表达丰富的词义信息。
在pytorch里很容易实现词向量:
class Embedder(nn.Module):
    def __init__(self, vocab_size, d_model):
        super().__init__()
        self.embed = nn.Embedding(vocab_size, d_model)
    def forward(self, x):
        return self.embed(x)
当每个单词进入后,代码就会查询和检索词向量。模型会把这些向量当作参数进行学习,并随着梯度下降的每次迭代而调整。
给单词赋予上下文语境:位置编程
模型理解一个句子有两个要素:一是单词的含义,二是单词在句中所处的位置。
每个单词的嵌入向量会学习单词的含义,所以我们需要输入一些信息,让神经网络知道单词在句中所处的位置。
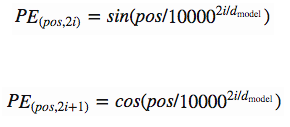
Vasmari用下面的函数创建位置特异性常量来解决这类问题:
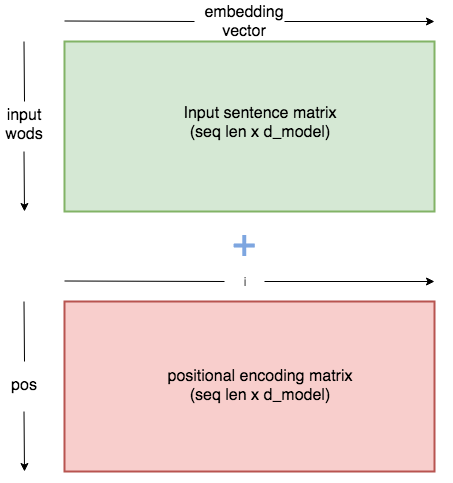
这个常量是一个2D矩阵。Pos代表了句子的顺序,i代表了嵌入向量所处的维度位置。在pos/i矩阵中的每一个值都可以通过上面的算式计算出来。
位置编码矩阵是一个常量,它的值可以用上面的算式计算出来。把常量嵌入矩阵,然后每个嵌入的单词会根据它所处的位置发生特定转变。
位置编辑器的代码如下所示:
class PositionalEncoder(nn.Module):
    def __init__(self, d_model, max_seq_len = 80):
        super().__init__()
        self.d_model = d_model

        # create constant 'pe' matrix with values dependant on
        # pos and i
        pe = torch.zeros(max_seq_len, d_model)
        for pos in range(max_seq_len):
            for i in range(0, d_model, 2):
                pe[pos, i] = \
                math.sin(pos / (10000 ** ((2 * i)/d_model)))
                pe[pos, i + 1] = \
                math.cos(pos / (10000 ** ((2 * (i + 1))/d_model)))

        pe = pe.unsqueeze(0)
        self.register_buffer('pe', pe)

    def forward(self, x):
        # make embeddings relatively larger
        x = x * math.sqrt(self.d_model)
        #add constant to embedding
        seq_len = x.size(1)
        x = x + Variable(self.pe[:,:seq_len], \
        requires_grad=False).cuda()
        return x
以上模块允许我们向嵌入向量添加位置编码(positional encoding),为模型架构提供信息。
在给词向量添加位置编码之前,我们要扩大词向量的数值,目的是让位置编码相对较小。这意味着向词向量添加位置编码时,词向量的原始含义不会丢失。
创建Masks
Masks在transformer模型中起重要作用,主要包括两个方面:
在编码器和解码器中:当输入为padding,注意力会是0。
在解码器中:预测下一个单词,避免解码器偷偷看到后面的翻译内容。
输入端生成一个mask很简单:
batch = next(iter(train_iter))
input_seq = batch.English.transpose(0,1)
input_pad = EN_TEXT.vocab.stoi['<pad>']

# creates mask with 0s wherever there is padding in the input
input_msk = (input_seq != input_pad).unsqueeze(1)
同样的,Target_seq也可以生成一个mask,但是会额外增加一个步骤:
# create mask as before
target_seq = batch.French.transpose(0,1)
target_pad = FR_TEXT.vocab.stoi['<pad>']
target_msk = (target_seq != target_pad).unsqueeze(1)
size = target_seq.size(1) # get seq_len for matrix

nopeak_mask = np.triu(np.ones(1, size, size),
k=1).astype('uint8')
nopeak_mask = Variable(torch.from_numpy(nopeak_mask) == 0)

target_msk = target_msk & nopeak_mask
目标语句(法语翻译内容)作为初始值输进解码器中。解码器通过编码器的全部输出,以及目前已翻译的单词来预测下一个单词。
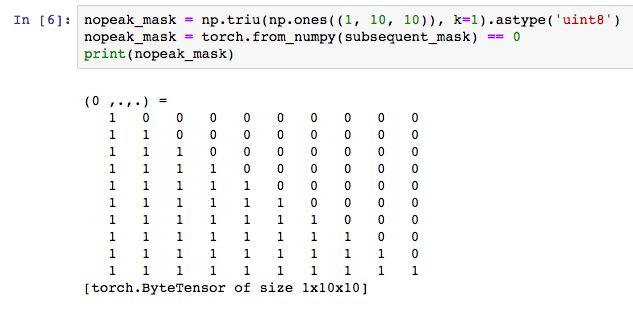
因此,我们需要防止解码器偷看到还没预测的单词。为了达成这个目的,我们用到了nopeak_mask函数:
当在注意力函数中应用mask,每一次预测都只会用到这个词之前的句子。
多头注意力
一旦我们有了词向量(带有位置编码)和masks,我们就可以开始构建模型层了。
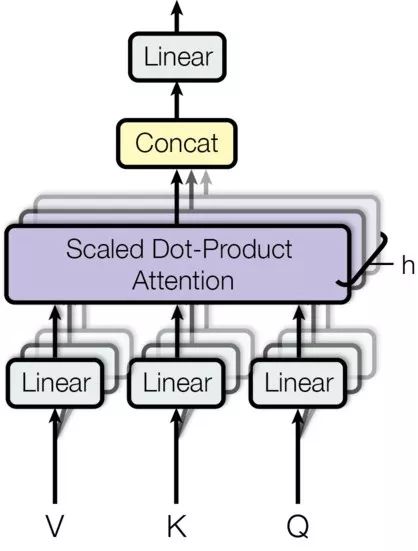
下图是多头注意力的结构:
多头注意力层,每一个输入都会分成多头(multiple heads),从而让网络同时“注意”每一个词向量的不同部分。
V,K和Q分别代表“key”、“value”和“query”,这些是注意力函数的相关术语,但我不觉得解释这些术语会对理解这个模型有任何帮助。
在编码器中,V、K和G将作为词向量(加上位置编码)的相同拷贝。它们具有维度Batch_size * seq_len * d_model.
在多头注意力中,我们把嵌入向量分进N个头中,它们就有了维度(batch_size * N * seq_len * (d_model / N).
我们定义最终维度 (d_model / N )为d_k。
让我们来看看解码器模块的代码:
class MultiHeadAttention(nn.Module):
def __init__(self, heads, d_model, dropout = 0.1):
super().__init__()
self.d_model = d_model
self.d_k = d_model // heads
self.h = heads
self.q_linear = nn.Linear(d_model, d_model)
self.v_linear = nn.Linear(d_model, d_model)
self.k_linear = nn.Linear(d_model, d_model)
self.dropout = nn.Dropout(dropout)
self.out = nn.Linear(d_model, d_model)
def forward(self, q, k, v, mask=None):
bs = q.size(0)
# perform linear operation and split into h heads
k = self.k_linear(k).view(bs, -1, self.h, self.d_k)
q = self.q_linear(q).view(bs, -1, self.h, self.d_k)
v = self.v_linear(v).view(bs, -1, self.h, self.d_k)
# transpose to get dimensions bs * h * sl * d_model
k = k.transpose(1,2)
q = q.transpose(1,2)
v = v.transpose(1,2)
# calculate attention using function we will define next
scores = attention(q, k, v, self.d_k, mask, self.dropout)
# concatenate heads and put through final linear layer
concat = scores.transpose(1,2).contiguous()\
.view(bs, -1, self.d_model)
output = self.out(concat)
return output
计算注意力
计算注意力的公式
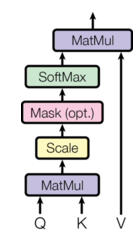
图解公式
这是另一个我们需要了解的公式,上面这幅图很好地解释了这个公式。
图中的每个箭头代表了公式的一部分。
首先,我们要用Q乘以K的转置函数(transpose),然后通过除以d_k的平方根来实现scaled函数。
方程中没有显示的一个步骤是masking。在执行Softmax之前,我们使用mask,减少输入填充(padding)的值。
另一个未显示的步骤是dropout,我们将在Softmax之后使用它。
最后一步是在目前为止的结果和V之间做点积(dot product)。
下面是注意力函数的代码:
def attention(q, k, v, d_k, mask=None, dropout=None):
    scores = torch.matmul(q, k.transpose(-2, -1)) /  math.sqrt(d_k)
if mask is not None:
        mask = mask.unsqueeze(1)
        scores = scores.masked_fill(mask == 0, -1e9)
scores = F.softmax(scores, dim=-1)

    if dropout is not None:
        scores = dropout(scores)

    output = torch.matmul(scores, v)
    return output
前馈网络
好了,如果你现在已经理解以上部分,我们就进入最后一步!
这一层由两个线性运算组成,两层中夹有relu和dropout 运算。
class FeedForward(nn.Module):
    def __init__(self, d_model, d_ff=2048, dropout = 0.1):
        super().__init__()
        # We set d_ff as a default to 2048
        self.linear_1 = nn.Linear(d_model, d_ff)
        self.dropout = nn.Dropout(dropout)
        self.linear_2 = nn.Linear(d_ff, d_model)
    def forward(self, x):
        x = self.dropout(F.relu(self.linear_1(x)))
        x = self.linear_2(x)
        return x
最后一件事:归一化
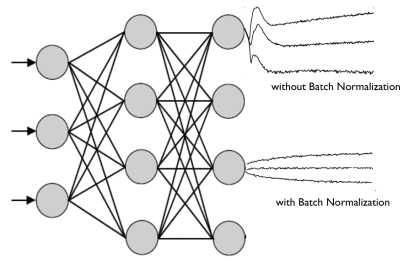
在深度神经网络中,归一化是非常重要的。它可以防止层中值变化太多,这意味着模型训练速度更快,具有更好的泛化。
我们在编码器/解码器的每一层之间归一化我们的结果,所以在构建我们的模型之前,让我们先定义这个函数:
class Norm(nn.Module):
    def __init__(self, d_model, eps = 1e-6):
        super().__init__()

        self.size = d_model
        # create two learnable parameters to calibrate normalisation
        self.alpha = nn.Parameter(torch.ones(self.size))
        self.bias = nn.Parameter(torch.zeros(self.size))
        self.eps = eps
    def forward(self, x):
        norm = self.alpha * (x - x.mean(dim=-1, keepdim=True)) \
        / (x.std(dim=-1, keepdim=True) + self.eps) + self.bias
        return norm
把所有内容结合起来!
如果你已经清楚了上述相关细节,那么你就能理解Transformer模型啦。剩下的就是把一切都组装起来。
让我们再来看看整体架构,然后开始构建:
最后一个变量:如果你仔细看图,你可以看到编码器和解码器旁边有一个“Nx”。实际上,上图中的编码器和解码器分别表示编码器的一层和解码器的一层。N是层数的变量。比如,如果N=6,数据经过6个编码器层(如上所示的结构),然后将这些输出传给解码器,解码器也由6个重复的解码器层组成。
现在,我们将使用上面模型中所示的结构构建编码器层和解码器层模块。在我们构建编码器和解码器时,我们可以决定层的数量。
# build an encoder layer with one multi-head attention layer and one # feed-forward layer

class EncoderLayer(nn.Module):
    def __init__(self, d_model, heads, dropout = 0.1):
        super().__init__()
        self.norm_1 = Norm(d_model)
        self.norm_2 = Norm(d_model)
        self.attn = MultiHeadAttention(heads, d_model)
        self.ff = FeedForward(d_model)
        self.dropout_1 = nn.Dropout(dropout)
        self.dropout_2 = nn.Dropout(dropout)

    def forward(self, x, mask):
        x2 = self.norm_1(x)
        x = x + self.dropout_1(self.attn(x2,x2,x2,mask))
        x2 = self.norm_2(x)
        x = x + self.dropout_2(self.ff(x2))
        return x

# build a decoder layer with two multi-head attention layers and
# one feed-forward layer

class DecoderLayer(nn.Module):
    def __init__(self, d_model, heads, dropout=0.1):
        super().__init__()
        self.norm_1 = Norm(d_model)
        self.norm_2 = Norm(d_model)
        self.norm_3 = Norm(d_model)

        self.dropout_1 = nn.Dropout(dropout)
        self.dropout_2 = nn.Dropout(dropout)
        self.dropout_3 = nn.Dropout(dropout)

        self.attn_1 = MultiHeadAttention(heads, d_model)
        self.attn_2 = MultiHeadAttention(heads, d_model)
        self.ff = FeedForward(d_model).cuda()

def forward(self, x, e_outputs, src_mask, trg_mask):
        x2 = self.norm_1(x)
        x = x + self.dropout_1(self.attn_1(x2, x2, x2, trg_mask))
        x2 = self.norm_2(x)
        x = x + self.dropout_2(self.attn_2(x2, e_outputs, e_outputs,
        src_mask))
        x2 = self.norm_3(x)
        x = x + self.dropout_3(self.ff(x2))
        return x

# We can then build a convenient cloning function that can generate multiple layers:

def get_clones(module, N):
    return nn.ModuleList([copy.deepcopy(module) for i in range(N)])
我们现在可以构建编码器和解码器了:
class Encoder(nn.Module):
    def __init__(self, vocab_size, d_model, N, heads):
        super().__init__()
        self.N = N
        self.embed = Embedder(vocab_size, d_model)
        self.pe = PositionalEncoder(d_model)
        self.layers = get_clones(EncoderLayer(d_model, heads), N)
        self.norm = Norm(d_model)
    def forward(self, src, mask):
        x = self.embed(src)
        x = self.pe(x)
        for i in range(N):
            x = self.layers[i](x, mask)
        return self.norm(x)

class Decoder(nn.Module):
    def __init__(self, vocab_size, d_model, N, heads):
        super().__init__()
        self.N = N
        self.embed = Embedder(vocab_size, d_model)
        self.pe = PositionalEncoder(d_model)
        self.layers = get_clones(DecoderLayer(d_model, heads), N)
        self.norm = Norm(d_model)
    def forward(self, trg, e_outputs, src_mask, trg_mask):
        x = self.embed(trg)
        x = self.pe(x)
        for i in range(self.N):
            x = self.layers[i](x, e_outputs, src_mask, trg_mask)
        return self.norm(x)
Transformer模型构建完毕!
class Transformer(nn.Module):
    def __init__(self, src_vocab, trg_vocab, d_model, N, heads):
        super().__init__()
        self.encoder = Encoder(src_vocab, d_model, N, heads)
        self.decoder = Decoder(trg_vocab, d_model, N, heads)
        self.out = nn.Linear(d_model, trg_vocab)
    def forward(self, src, trg, src_mask, trg_mask):
        e_outputs = self.encoder(src, src_mask)
        d_output = self.decoder(trg, e_outputs, src_mask, trg_mask)
        output = self.out(d_output)
        return output

# we don't perform softmax on the output as this will be handled
# automatically by our loss function
训练模型
构建完transformer,接下来要做的是用EuroParl数据集进行训练。编码部分非常简单,但是要等两天,模型才会开始converge!
让我们先来定义一些参数:
d_model = 512
heads = 8
N = 6
src_vocab = len(EN_TEXT.vocab)
trg_vocab = len(FR_TEXT.vocab)

model = Transformer(src_vocab, trg_vocab, d_model, N, heads)

for p in model.parameters():
    if p.dim() > 1:
        nn.init.xavier_uniform_(p)

# this code is very important! It initialises the parameters with a
# range of values that stops the signal fading or getting too big.
# See this blog for a mathematical explanation.

optim = torch.optim.Adam(model.parameters(), lr=0.0001, betas=(0.9, 0.98), eps=1e-9)
现在,我们可以开始训练了:
def train_model(epochs, print_every=100):
    model.train()

    start = time.time()
    temp = start

    total_loss = 0

    for epoch in range(epochs):

        for i, batch in enumerate(train_iter):

            src = batch.English.transpose(0,1)
            trg = batch.French.transpose(0,1)

            # the French sentence we input has all words except
            # the last, as it is using each word to predict the next

            trg_input = trg[:, :-1]

            # the words we are trying to predict

            targets = trg[:, 1:].contiguous().view(-1)

            # create function to make masks using mask code above

            src_mask, trg_mask = create_masks(src, trg_input)

            preds = model(src, trg_input, src_mask, trg_mask)

            optim.zero_grad()

            loss = F.cross_entropy(preds.view(-1, preds.size(-1)),
            results, ignore_index=target_pad)

            loss.backward()
            optim.step()

            total_loss += loss.data[0]
            if (i + 1) % print_every == 0:
                loss_avg = total_loss / print_every
                print("time = %dm, epoch %d, iter = %d, loss = %.3f,
                %ds per %d iters" % ((time.time() - start) // 60,
                epoch + 1, i + 1, loss_avg, time.time() - temp,
                print_every))
                total_loss = 0
                temp = time.time()
示例训练输出:经过几天的训练后,模型的损失函数收敛到了大约1.3。
测试模型
我们可以使用下面的函数来翻译句子。我们可以直接输入句子,或者输入自定义字符串。
翻译器通过运行一个循环来工作。我们对英语句子进行编码。把<sos> token输进解码器,编码器输出。然后,解码器对第一个单词进行预测,使用<sos> token将其加进解码器的输入。接着,重新运行循环,获取下一个单词预测,将其加入解码器的输入,直到<sos> token完成翻译。
def translate(model, src, max_len = 80, custom_string=False):

    model.eval()

if custom_sentence == True:
        src = tokenize_en(src)
        sentence=\
        Variable(torch.LongTensor([[EN_TEXT.vocab.stoi[tok] for tok
        in sentence]])).cuda()

src_mask = (src != input_pad).unsqueeze(-2)
    e_outputs = model.encoder(src, src_mask)

    outputs = torch.zeros(max_len).type_as(src.data)
    outputs[0] = torch.LongTensor([FR_TEXT.vocab.stoi['<sos>']])

for i in range(1, max_len):

        trg_mask = np.triu(np.ones((1, i, i),
        k=1).astype('uint8')
        trg_mask= Variable(torch.from_numpy(trg_mask) == 0).cuda()

        out = model.out(model.decoder(outputs[:i].unsqueeze(0),
        e_outputs, src_mask, trg_mask))
        out = F.softmax(out, dim=-1)
        val, ix = out[:, -1].data.topk(1)

        outputs[i] = ix[0][0]
        if ix[0][0] == FR_TEXT.vocab.stoi['<eos>']:
            break

return ' '.join(
    [FR_TEXT.vocab.itos[ix] for ix in outputs[:i]]
    )
Transformer模型的构建过程大致就是这样。想要获取完整代码,可以进入下面这个Github页面:
https://github.com/SamLynnEvans/Transformer
相关报道:
https://towardsdatascience.com/how-to-code-the-transformer-in-pytorch-24db27c8f9ec
实习/全职编辑记者招聘ing
加入我们,亲身体验一家专业科技媒体采写的每个细节,在最有前景的行业,和一群遍布全球最优秀的人一起成长。坐标北京·清华东门,在大数据文摘主页对话页回复“招聘”了解详情。简历请直接发送至zz@bigdatadigest.cn
志愿者介绍
后台回复“志愿者”加入我们

