从零开始深度学习第8讲:利用Tensorflow搭建神经网络
在第7讲中,笔者和大家一起入门了 Tensorflow 的基本语法,并举了一些实际的例子进行了说明,终于告别了使用 numpy 手动搭建的日子。所以我们将继续往下走,看看如何利用 Tensorflow搭建神经网络模型。
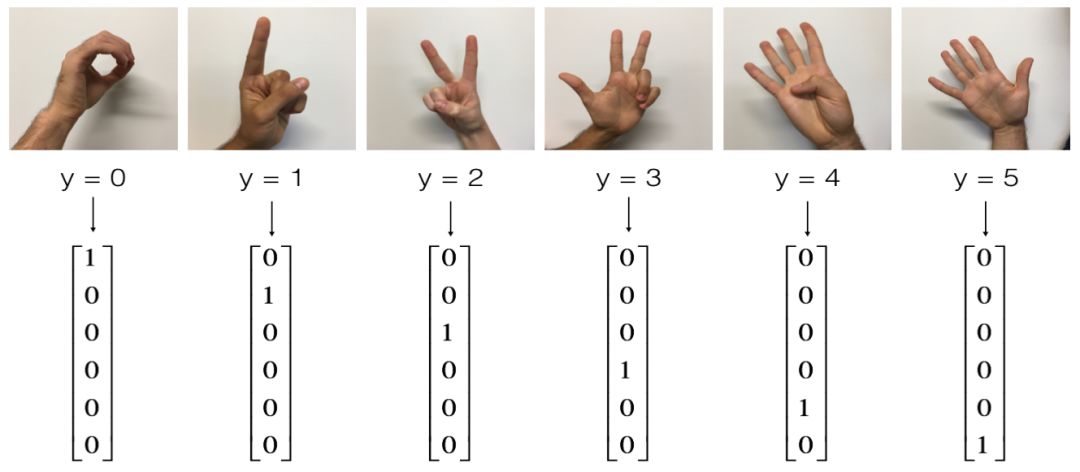
尽管对于初学者而言使用 Tensorflow 看起来并不那么习惯,需要各种步骤,但简单来说,Tensorflow 搭建模型实际就是两个过程:创建计算图和执行计算图。在 deeplearningai 课程中,NG和他的课程组给我们提供了 Signs Dataset (手势)数据集,其中训练集包括1080张64x64像素的手势图片,并给定了 6 种标注,测试集包括120张64x64的手势图片,我们需要对训练集构建神经网络模型然后对测试集给出预测。
先来简单看一下数据集:
# Loading the dataset
X_train_orig, Y_train_orig, X_test_orig, Y_test_orig, classes = load_dataset()
# Flatten the training and test images
X_train_flatten = X_train_orig.reshape(X_train_orig.shape[0], -1).T X_test_flatten = X_test_orig.reshape(X_test_orig.shape[0], -1).T
# Normalize image vectors
X_train = X_train_flatten/255.X_test = X_test_flatten/255.
# Convert training and test labels to one hot matrices
Y_train = convert_to_one_hot(Y_train_orig, 6) Y_test = convert_to_one_hot(Y_test_orig, 6)
print ("number of training examples = " + str(X_train.shape[1]))
print ("number of test examples = " + str(X_test.shape[1]))
print ("X_train shape: " + str(X_train.shape))
print ("Y_train shape: " + str(Y_train.shape))
print ("X_test shape: " + str(X_test.shape))
print ("Y_test shape: " + str(Y_test.shape))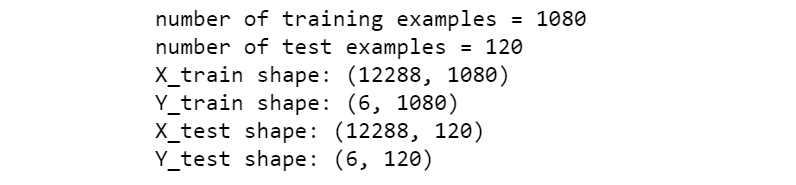
下面就根据 NG 给定的找个数据集利用 Tensorflow 搭建神经网络模型。我们选择构建一个包含 2 个隐层的神经网络,网络结构大致如下:
LINEAR -> RELU -> LINEAR -> RELU -> LINEAR -> SOFTMAX
正如我们之前利用 numpy 手动搭建一样,搭建一个神经网络的主要步骤如下:
-定义网络结构
-初始化模型参数
-执行前向计算/计算当前损失/执行反向传播/权值更新
创建 placeholder
根据 Tensorflow 的语法,我们首先创建输入X 和输出 Y 的占位符变量,这里需要注意 shape 参数的设置。
def create_placeholders(n_x, n_y):    X = tf.placeholder(tf.float32, shape=(n_x, None), name='X')    Y = tf.placeholder(tf.float32, shape=(n_y, None), name='Y')
    return X, Y
初始化模型参数
其次就是初始化神经网络的模型参数,三层网络包括六个参数,这里我们采用Xavier初始化方法:
def initialize_parameters():    tf.set_random_seed(1)                    W1 = tf.get_variable("W1", [25, 12288], initializer = tf.contrib.layers.xavier_initializer(seed = 1))    b1 = tf.get_variable("b1", [25, 1], initializer = tf.zeros_initializer())    W2 = tf.get_variable("W2", [12, 25], initializer = tf.contrib.layers.xavier_initializer(seed = 1))    b2 = tf.get_variable("b2", [12, 1], initializer = tf.zeros_initializer())    W3 = tf.get_variable("W3", [6, 12], initializer = tf.contrib.layers.xavier_initializer(seed = 1))    b3 = tf.get_variable("b3", [6,1], initializer = tf.zeros_initializer())    parameters = {"W1": W1,
                  "b1": b1,
                  "W2": W2,
                  "b2": b2,
                  "W3": W3,
                  "b3": b3}
    return parameters
执行前向传播
def forward_propagation(X, parameters):
    """    Implements the forward propagation for the model: LINEAR -> RELU -> LINEAR -> RELU -> LINEAR -> SOFTMAX    """    W1 = parameters['W1']    b1 = parameters['b1']    W2 = parameters['W2']    b2 = parameters['b2']    W3 = parameters['W3']    b3 = parameters['b3']    Z1 = tf.add(tf.matmul(W1, X), b1)                        A1 = tf.nn.relu(Z1)                                  Z2 = tf.add(tf.matmul(W2, A1), b2)                    A2 = tf.nn.relu(Z2)                                      Z3 = tf.add(tf.matmul(W3, A2), b3)                      return Z3
计算损失函数
在 Tensorflow 中损失函数的计算要比手动搭建时方便很多,一行代码即可搞定:
def compute_cost(Z3, Y):    logits = tf.transpose(Z3)    labels = tf.transpose(Y)    cost = tf.reduce_mean(tf.nn.softmax_cross_entropy_with_logits(logits = logits, labels = labels))
    return cost
代码整合:执行反向传播和权值更新
跟计算损失函数类似,Tensorflow 中执行反向传播的梯度优化非常简便,两行代码即可搞定,定义完整的神经网络模型如下:
def model(X_train, Y_train, X_test, Y_test, learning_rate = 0.0001,          num_epochs = 1500, minibatch_size = 32, print_cost = True):    ops.reset_default_graph()                        tf.set_random_seed(1)                              seed = 3                                            (n_x, m) = X_train.shape                          n_y = Y_train.shape[0]                              costs = []                                      # Create Placeholders of shape (n_x, n_y)    X, Y = create_placeholders(n_x, n_y)
    # Initialize parameters    parameters = initialize_parameters()
    # Forward propagation: Build the forward propagation in the tensorflow graph    Z3 = forward_propagation(X, parameters)
    # Cost function: Add cost function to tensorflow graph    cost = compute_cost(Z3, Y)
    # Backpropagation: Define the tensorflow optimizer. Use an AdamOptimizer.    optimizer = tf.train.GradientDescentOptimizer(learning_rate = learning_rate).minimize(cost)    # Initialize all the variables    init = tf.global_variables_initializer()
    # Start the session to compute the tensorflow graph    with tf.Session() as sess:
    # Run the initialization        sess.run(init)
        # Do the training loop        for epoch in range(num_epochs):            epoch_cost = 0.                                num_minibatches = int(m / minibatch_size)            seed = seed + 1            minibatches = random_mini_batches(X_train, Y_train, minibatch_size, seed)
            for minibatch in minibatches:
                # Select a minibatch                (minibatch_X, minibatch_Y) = minibatch                _ , minibatch_cost = sess.run([optimizer, cost], feed_dict={X: minibatch_X, Y: minibatch_Y})                epoch_cost += minibatch_cost / num_minibatches
                # Print the cost every epoch        if print_cost == True and epoch % 100 == 0:
            print ("Cost after epoch %i: %f" % (epoch, epoch_cost))
        if print_cost == True and epoch % 5 == 0:                costs.append(epoch_cost)
        # plot the cost        plt.plot(np.squeeze(costs))        plt.ylabel('cost')        plt.xlabel('iterations (per tens)')        plt.title("Learning rate =" + str(learning_rate))        plt.show()
        # lets save the parameters in a variable        parameters = sess.run(parameters)
        print ("Parameters have been trained!")
        # Calculate the correct predictions        correct_prediction = tf.equal(tf.argmax(Z3), tf.argmax(Y))
        # Calculate accuracy on the test set        accuracy = tf.reduce_mean(tf.cast(correct_prediction, "float"))
        print ("Train Accuracy:", accuracy.eval({X: X_train, Y: Y_train}))
        print ("Test Accuracy:", accuracy.eval({X: X_test, Y: Y_test}))
        return parameters
执行模型:
parameters = model(X_train, Y_train, X_test, Y_test)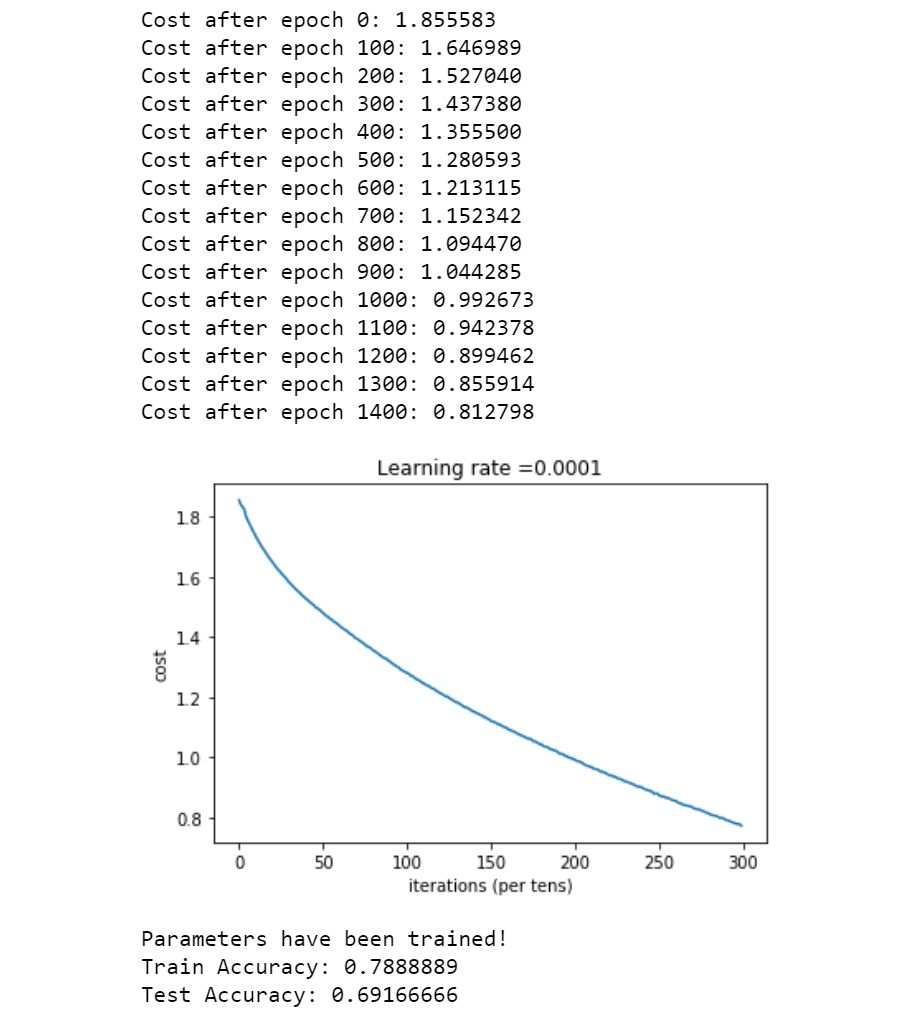
根据模型的训练误差和测试误差可以看到:模型整体效果虽然没有达到最佳,但基本也能达到预测效果。
总结
Tensorflow语法中两个基本的对象类是 Tensor 和 Operator.Tensorflow执行计算的基本步骤为创建计算图(张量、变量和占位符变量等)
创建会话
初始化会话
在计算图中执行会话
可以看到的是,在 Tensorflow 中编写神经网络要比我们手动搭建要方便的多,这也正是深度学习框架存在的意义之一。功能强大的深度学习框架能够帮助我们快速的搭建起复杂的神经网络模型,在经历了手动搭建神经网络的思维训练过程之后,这对于我们来说就不再困难了。
参考资料:
https://www.coursera.org/learn/machine-learning
https://www.deeplearning.ai/
推荐阅读
从零开始深度学习第6讲:神经网络优化算法之从SGD到Adam
谈谈大数据的那点事(4) -----《人们在“忽悠”统计学》


长按二维码关注“数萃大数据”