BERT源码分析PART I
作者:高开远
学校:上海交通大学
研究方向:自然语言处理
写在前面
BERT模型也出来很久了, 之前有看过论文和一些博客对其做了解读:NLP大杀器BERT模型解读,但是一直没有细致地去看源码具体实现。最近有用到就抽时间来仔细看看记录下来,和大家一起讨论。
注意,源码阅读系列需要提前对NLP相关知识有所了解,比如attention机制、transformer框架以及python和tensorflow基础等,关于BERT的原理不是本文的重点。
附上关于BERT的资料汇总:BERT相关论文、文章和代码资源汇总
今天要介绍的是BERT最主要的模型实现部分-----BertModel,代码位于
√modeling.py模块
如有解读不正确,请务必指出~
1、配置类(BertConfig)
这部分代码主要定义了BERT模型的一些默认参数,另外包括了一些文件处理函数。
 1class BertConfig(object):
 2  """BERT模型的配置类."""
 3
 4  def __init__(self,
 5               vocab_size,
 6               hidden_size=768,
 7               num_hidden_layers=12,
 8               num_attention_heads=12,
 9               intermediate_size=3072,
10               hidden_act="gelu",
11               hidden_dropout_prob=0.1,
12               attention_probs_dropout_prob=0.1,
13               max_position_embeddings=512,
14               type_vocab_size=16,
15               initializer_range=0.02):
16
17    self.vocab_size = vocab_size
18    self.hidden_size = hidden_size
19    self.num_hidden_layers = num_hidden_layers
20    self.num_attention_heads = num_attention_heads
21    self.hidden_act = hidden_act
22    self.intermediate_size = intermediate_size
23    self.hidden_dropout_prob = hidden_dropout_prob
24    self.attention_probs_dropout_prob = attention_probs_dropout_prob
25    self.max_position_embeddings = max_position_embeddings
26    self.type_vocab_size = type_vocab_size
27    self.initializer_range = initializer_range
28
29  @classmethod
30  def from_dict(cls, json_object):
31    """Constructs a `BertConfig` from a Python dictionary of parameters."""
32    config = BertConfig(vocab_size=None)
33    for (key, value) in six.iteritems(json_object):
34      config.__dict__[key] = value
35    return config
36
37  @classmethod
38  def from_json_file(cls, json_file):
39    """Constructs a `BertConfig` from a json file of parameters."""
40    with tf.gfile.GFile(json_file, "r") as reader:
41      text = reader.read()
42    return cls.from_dict(json.loads(text))
43
44  def to_dict(self):
45    """Serializes this instance to a Python dictionary."""
46    output = copy.deepcopy(self.__dict__)
47    return output
48
49  def to_json_string(self):
50    """Serializes this instance to a JSON string."""
51    return json.dumps(self.to_dict(), indent=2, sort_keys=True) + "\n"
参数具体含义
vocab_size:词表大小
hidden_size:隐藏层神经元数
num_hidden_layers:Transformer encoder中的隐藏层数
num_attention_heads:multi-head attention 的head数
intermediate_size:encoder的“中间”隐层神经元数(例如feed-forward layer)
hidden_act:隐藏层激活函数
hidden_dropout_prob:隐层dropout率
attention_probs_dropout_prob:注意力部分的dropout
max_position_embeddings:最大位置编码
type_vocab_size:token_type_ids的词典大小
initializer_range:truncated_normal_initializer初始化方法的stdev
这里要注意一点,可能刚看的时候对type_vocab_size这个参数会有点不理解,其实就是在next sentence prediction任务里的Segment A和 Segment B。在下载的bert_config.json文件里也有说明,默认值应该为2。参考这个Issue
2、获取词向量(Embedding_lookup)
对于输入word_ids,返回embedding table。可以选用one-hot或者tf.gather()
 1def embedding_lookup(input_ids,                        # word_id:【batch_size, seq_length】
 2                     vocab_size,
 3                     embedding_size=128,
 4                     initializer_range=0.02,
 5                     word_embedding_name="word_embeddings",
 6                     use_one_hot_embeddings=False):
 7
 8  # 该函数默认输入的形状为【batch_size, seq_length, input_num】
 9  # 如果输入为2D的【batch_size, seq_length】,则扩展到【batch_size, seq_length, 1】
10  if input_ids.shape.ndims == 2:
11    input_ids = tf.expand_dims(input_ids, axis=[-1])
12
13  embedding_table = tf.get_variable(
14      name=word_embedding_name,
15      shape=[vocab_size, embedding_size],
16      initializer=create_initializer(initializer_range))
17
18  flat_input_ids = tf.reshape(input_ids, [-1])    #【batch_size*seq_length*input_num】
19  if use_one_hot_embeddings:
20    one_hot_input_ids = tf.one_hot(flat_input_ids, depth=vocab_size)
21    output = tf.matmul(one_hot_input_ids, embedding_table)
22  else:    # 按索引取值
23    output = tf.gather(embedding_table, flat_input_ids)
24
25  input_shape = get_shape_list(input_ids)
26
27  # output:[batch_size, seq_length, num_inputs]
28  # 转成:[batch_size, seq_length, num_inputs*embedding_size]
29  output = tf.reshape(output,
30                        input_shape[0:-1] + [input_shape[-1] * embedding_size])
31  return (output, embedding_table)
参数具体含义
input_ids:word id 【batch_size, seq_length】
vocab_size:embedding词表
embedding_size:embedding维度
initializer_range:embedding初始化范围
word_embedding_name:embeddding table命名
use_one_hot_embeddings:是否使用one-hotembedding
Return:【batch_size, seq_length, embedding_size】
3、词向量的后续处理(embedding_postprocessor)
我们知道BERT模型的输入有三部分:token embedding ,segment embedding以及position embedding。上一节中我们只获得了token embedding,这部分代码对其完善信息,正则化,dropout之后输出最终embedding。
注意,在Transformer论文中的position embedding是由sin/cos函数生成的固定的值,而在这里代码实现中是跟普通word embedding一样随机生成的,可以训练的。作者这里这样选择的原因可能是BERT训练的数据比Transformer那篇大很多,完全可以让模型自己去学习。

 1def embedding_postprocessor(input_tensor,                # [batch_size, seq_length, embedding_size]
 2                            use_token_type=False,
 3                            token_type_ids=None,
 4                            token_type_vocab_size=16,        # 一般是2
 5                            token_type_embedding_name="token_type_embeddings",
 6                            use_position_embeddings=True,
 7                            position_embedding_name="position_embeddings",
 8                            initializer_range=0.02,
 9                            max_position_embeddings=512,    #最大位置编码,必须大于等于max_seq_len
10                            dropout_prob=0.1):
11
12  input_shape = get_shape_list(input_tensor, expected_rank=3)   #【batch_size,seq_length,embedding_size】
13  batch_size = input_shape[0]
14  seq_length = input_shape[1]
15  width = input_shape[2]
16
17  output = input_tensor
18
19  # Segment position信息
20  if use_token_type:
21    if token_type_ids is None:
22      raise ValueError("`token_type_ids` must be specified if"
23                       "`use_token_type` is True.")
24    token_type_table = tf.get_variable(
25        name=token_type_embedding_name,
26        shape=[token_type_vocab_size, width],
27        initializer=create_initializer(initializer_range))
28    # 由于token-type-table比较小,所以这里采用one-hot的embedding方式加速
29    flat_token_type_ids = tf.reshape(token_type_ids, [-1])
30    one_hot_ids = tf.one_hot(flat_token_type_ids, depth=token_type_vocab_size)
31    token_type_embeddings = tf.matmul(one_hot_ids, token_type_table)
32    token_type_embeddings = tf.reshape(token_type_embeddings,
33                                       [batch_size, seq_length, width])
34    output += token_type_embeddings
35
36  # Position embedding信息
37  if use_position_embeddings:
38    # 确保seq_length小于等于max_position_embeddings
39    assert_op = tf.assert_less_equal(seq_length, max_position_embeddings)
40    with tf.control_dependencies([assert_op]):
41      full_position_embeddings = tf.get_variable(
42          name=position_embedding_name,
43          shape=[max_position_embeddings, width],
44          initializer=create_initializer(initializer_range))
45
46      # 这里position embedding是可学习的参数,[max_position_embeddings, width]
47      # 但是通常实际输入序列没有达到max_position_embeddings
48      # 所以为了提高训练速度,使用tf.slice取出句子长度的embedding
49      position_embeddings = tf.slice(full_position_embeddings, [0, 0],
50                                     [seq_length, -1])
51      num_dims = len(output.shape.as_list())
52
53      # word embedding之后的tensor是[batch_size, seq_length, width]
54      # 因为位置编码是与输入内容无关,它的shape总是[seq_length, width]
55      # 我们无法把位置Embedding加到word embedding上
56      # 因此我们需要扩展位置编码为[1, seq_length, width]
57      # 然后就能通过broadcasting加上去了。
58      position_broadcast_shape = []
59      for _ in range(num_dims - 2):
60        position_broadcast_shape.append(1)
61      position_broadcast_shape.extend([seq_length, width])
62      position_embeddings = tf.reshape(position_embeddings,
63                                       position_broadcast_shape)
64      output += position_embeddings
65
66  output = layer_norm_and_dropout(output, dropout_prob)
67  return output
4、构造attention_mask
该部分代码的作用是构造attention可视域的attention_mask,因为每个样本都经过padding过程,在做self-attention的时候padding的部分不能attend到其他部分上。
输入为形状为【batch_size, from_seq_length,…】的padding好的input_ids和形状为【batch_size, to_seq_length】的mask标记向量。
 1def create_attention_mask_from_input_mask(from_tensor, to_mask):
 2  from_shape = get_shape_list(from_tensor, expected_rank=[2, 3])
 3  batch_size = from_shape[0]
 4  from_seq_length = from_shape[1]
 5
 6  to_shape = get_shape_list(to_mask, expected_rank=2)
 7  to_seq_length = to_shape[1]
 8
 9  to_mask = tf.cast(
10      tf.reshape(to_mask, [batch_size, 1, to_seq_length]), tf.float32)
11
12  broadcast_ones = tf.ones(
13      shape=[batch_size, from_seq_length, 1], dtype=tf.float32)
14
15  mask = broadcast_ones * to_mask
16
17  return mask
5、注意力层(attention layer)
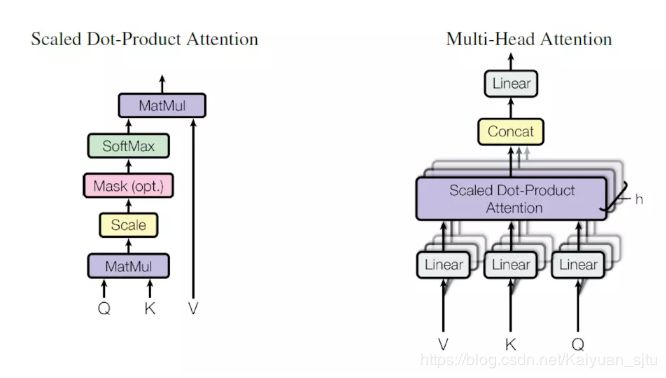
这部分代码是multi-head attention的实现,主要来自《Attention is all you need》这篇论文。考虑key-query-value形式的attention,输入的from_tensor当做是query, to_tensor当做是key和value,当两者相同的时候即为self-attention。关于attention更详细的介绍可以转到理解Attention机制原理及模型。
  1def attention_layer(from_tensor,   # 【batch_size, from_seq_length, from_width】
  2                    to_tensor,        #【batch_size, to_seq_length, to_width】
  3                    attention_mask=None,        #【batch_size,from_seq_length, to_seq_length】
  4                    num_attention_heads=1,        # attention head numbers
  5                    size_per_head=512,            # 每个head的大小
  6                    query_act=None,                # query变换的激活函数
  7                    key_act=None,                # key变换的激活函数
  8                    value_act=None,                # value变换的激活函数
  9                    attention_probs_dropout_prob=0.0,        # attention层的dropout
 10                    initializer_range=0.02,                    # 初始化取值范围
 11                    do_return_2d_tensor=False,                # 是否返回2d张量。
 12#如果True,输出形状【batch_size*from_seq_length,num_attention_heads*size_per_head】
 13#如果False,输出形状【batch_size, from_seq_length, num_attention_heads*size_per_head】
 14                    batch_size=None,                        #如果输入是3D的,
 15#那么batch就是第一维,但是可能3D的压缩成了2D的,所以需要告诉函数batch_size
 16                    from_seq_length=None,                    # 同上
 17                    to_seq_length=None):                    # 同上
 18
 19  def transpose_for_scores(input_tensor, batch_size, num_attention_heads,
 20                           seq_length, width):
 21    output_tensor = tf.reshape(
 22        input_tensor, [batch_size, seq_length, num_attention_heads, width])
 23
 24    output_tensor = tf.transpose(output_tensor, [0, 2, 1, 3])    #[batch_size,  num_attention_heads, seq_length, width]
 25    return output_tensor
 26
 27  from_shape = get_shape_list(from_tensor, expected_rank=[2, 3])
 28  to_shape = get_shape_list(to_tensor, expected_rank=[2, 3])
 29
 30  if len(from_shape) != len(to_shape):
 31    raise ValueError(
 32        "The rank of `from_tensor` must match the rank of `to_tensor`.")
 33
 34  if len(from_shape) == 3:
 35    batch_size = from_shape[0]
 36    from_seq_length = from_shape[1]
 37    to_seq_length = to_shape[1]
 38  elif len(from_shape) == 2:
 39    if (batch_size is None or from_seq_length is None or to_seq_length is None):
 40      raise ValueError(
 41          "When passing in rank 2 tensors to attention_layer, the values "
 42          "for `batch_size`, `from_seq_length`, and `to_seq_length` "
 43          "must all be specified.")
 44
 45  # 为了方便备注shape,采用以下简写:
 46  #   B = batch size (number of sequences)
 47  #   F = `from_tensor` sequence length
 48  #   T = `to_tensor` sequence length
 49  #   N = `num_attention_heads`
 50  #   H = `size_per_head`
 51
 52  # 把from_tensor和to_tensor压缩成2D张量
 53  from_tensor_2d = reshape_to_matrix(from_tensor)        # 【B*F, hidden_size】
 54  to_tensor_2d = reshape_to_matrix(to_tensor)            # 【B*T, hidden_size】
 55
 56  # 将from_tensor输入全连接层得到query_layer
 57  # `query_layer` = [B*F, N*H]
 58  query_layer = tf.layers.dense(
 59      from_tensor_2d,
 60      num_attention_heads * size_per_head,
 61      activation=query_act,
 62      name="query",
 63      kernel_initializer=create_initializer(initializer_range))
 64
 65  # 将from_tensor输入全连接层得到query_layer
 66  # `key_layer` = [B*T, N*H]
 67  key_layer = tf.layers.dense(
 68      to_tensor_2d,
 69      num_attention_heads * size_per_head,
 70      activation=key_act,
 71      name="key",
 72      kernel_initializer=create_initializer(initializer_range))
 73
 74  # 同上
 75  # `value_layer` = [B*T, N*H]
 76  value_layer = tf.layers.dense(
 77      to_tensor_2d,
 78      num_attention_heads * size_per_head,
 79      activation=value_act,
 80      name="value",
 81      kernel_initializer=create_initializer(initializer_range))
 82
 83  # query_layer转成多头:[B*F, N*H]==>[B, F, N, H]==>[B, N, F, H]
 84  query_layer = transpose_for_scores(query_layer, batch_size,
 85                                     num_attention_heads, from_seq_length,
 86                                     size_per_head)
 87
 88  # key_layer转成多头:[B*T, N*H] ==> [B, T, N, H] ==> [B, N, T, H]
 89  key_layer = transpose_for_scores(key_layer, batch_size, num_attention_heads,
 90                                   to_seq_length, size_per_head)
 91
 92  # 将query与key做点积,然后做一个scale,公式可以参见原始论文
 93  # `attention_scores` = [B, N, F, T]
 94  attention_scores = tf.matmul(query_layer, key_layer, transpose_b=True)
 95  attention_scores = tf.multiply(attention_scores,
 96                                 1.0 / math.sqrt(float(size_per_head)))
 97
 98  if attention_mask is not None:
 99    # `attention_mask` = [B, 1, F, T]
100    attention_mask = tf.expand_dims(attention_mask, axis=[1])
101
102    # 如果attention_mask里的元素为1,则通过下面运算有(1-1)*-10000,adder就是0
103    # 如果attention_mask里的元素为0,则通过下面运算有(1-0)*-10000,adder就是-10000
104    adder = (1.0 - tf.cast(attention_mask, tf.float32)) * -10000.0
105
106    # 我们最终得到的attention_score一般不会很大,
107    #所以上述操作对mask为0的地方得到的score可以认为是负无穷
108    attention_scores += adder
109
110  # 负无穷经过softmax之后为0,就相当于mask为0的位置不计算attention_score
111  # `attention_probs` = [B, N, F, T]
112  attention_probs = tf.nn.softmax(attention_scores)
113
114  # 对attention_probs进行dropout,这虽然有点奇怪,但是Transforme原始论文就是这么做的
115  attention_probs = dropout(attention_probs, attention_probs_dropout_prob)
116
117  # `value_layer` = [B, T, N, H]
118  value_layer = tf.reshape(
119      value_layer,
120      [batch_size, to_seq_length, num_attention_heads, size_per_head])
121
122  # `value_layer` = [B, N, T, H]
123  value_layer = tf.transpose(value_layer, [0, 2, 1, 3])
124
125  # `context_layer` = [B, N, F, H]
126  context_layer = tf.matmul(attention_probs, value_layer)
127
128  # `context_layer` = [B, F, N, H]
129  context_layer = tf.transpose(context_layer, [0, 2, 1, 3])
130
131  if do_return_2d_tensor:
132    # `context_layer` = [B*F, N*H]
133    context_layer = tf.reshape(
134        context_layer,
135        [batch_size * from_seq_length, num_attention_heads * size_per_head])
136  else:
137    # `context_layer` = [B, F, N*H]
138    context_layer = tf.reshape(
139        context_layer,
140        [batch_size, from_seq_length, num_attention_heads * size_per_head])
141
142  return context_layer
总结一下,attention layer的主要流程:
对输入的tensor进行形状校验,提取
batch_size、from_seq_length 、to_seq_length输入如果是3d张量则转化成2d矩阵
from_tensor作为query, to_tensor作为key和value,经过一层全连接层后得到query_layer、key_layer 、value_layer
将上述张量通过
transpose_for_scores转化成multi-head根据论文公式计算attention_score以及attention_probs(注意attention_mask的trick):
将得到的attention_probs与value相乘,返回2D或3D张量
6、Transformer
接下来的代码就是大名鼎鼎的Transformer的核心代码了,可以认为是"Attention is All You Need"原始代码重现。可以参见原始论文和原始代码。
  1def transformer_model(input_tensor,                        # 【batch_size, seq_length, hidden_size】
  2                      attention_mask=None,                # 【batch_size, seq_length, seq_length】
  3                      hidden_size=768,
  4                      num_hidden_layers=12,
  5                      num_attention_heads=12,
  6                      intermediate_size=3072,
  7                      intermediate_act_fn=gelu,            # feed-forward层的激活函数
  8                      hidden_dropout_prob=0.1,
  9                      attention_probs_dropout_prob=0.1,
 10                      initializer_range=0.02,
 11                      do_return_all_layers=False):
 12
 13  # 这里注意,因为最终要输出hidden_size, 我们有num_attention_head个区域,
 14  # 每个head区域有size_per_head多的隐层
 15  # 所以有 hidden_size = num_attention_head * size_per_head
 16  if hidden_size % num_attention_heads != 0:
 17    raise ValueError(
 18        "The hidden size (%d) is not a multiple of the number of attention "
 19        "heads (%d)" % (hidden_size, num_attention_heads))
 20
 21  attention_head_size = int(hidden_size / num_attention_heads)
 22  input_shape = get_shape_list(input_tensor, expected_rank=3)
 23  batch_size = input_shape[0]
 24  seq_length = input_shape[1]
 25  input_width = input_shape[2]
 26
 27  # 因为encoder中有残差操作,所以需要shape相同
 28  if input_width != hidden_size:
 29    raise ValueError("The width of the input tensor (%d) != hidden size (%d)" %
 30                     (input_width, hidden_size))
 31
 32  # reshape操作在CPU/GPU上很快,但是在TPU上很不友好
 33  # 所以为了避免2D和3D之间的频繁reshape,我们把所有的3D张量用2D矩阵表示
 34  prev_output = reshape_to_matrix(input_tensor)
 35
 36  all_layer_outputs = []
 37  for layer_idx in range(num_hidden_layers):
 38    with tf.variable_scope("layer_%d" % layer_idx):
 39      layer_input = prev_output
 40
 41      with tf.variable_scope("attention"):
 42      # multi-head attention
 43        attention_heads = []
 44        with tf.variable_scope("self"):
 45        # self-attention
 46          attention_head = attention_layer(
 47              from_tensor=layer_input,
 48              to_tensor=layer_input,
 49              attention_mask=attention_mask,
 50              num_attention_heads=num_attention_heads,
 51              size_per_head=attention_head_size,
 52              attention_probs_dropout_prob=attention_probs_dropout_prob,
 53              initializer_range=initializer_range,
 54              do_return_2d_tensor=True,
 55              batch_size=batch_size,
 56              from_seq_length=seq_length,
 57              to_seq_length=seq_length)
 58          attention_heads.append(attention_head)
 59
 60        attention_output = None
 61        if len(attention_heads) == 1:
 62          attention_output = attention_heads[0]
 63        else:
 64          # 如果有多个head,将他们拼接起来
 65          attention_output = tf.concat(attention_heads, axis=-1)
 66
 67        # 对attention的输出进行线性映射, 目的是将shape变成与input一致
 68        # 然后dropout+residual+norm
 69        with tf.variable_scope("output"):
 70          attention_output = tf.layers.dense(
 71              attention_output,
 72              hidden_size,
 73              kernel_initializer=create_initializer(initializer_range))
 74          attention_output = dropout(attention_output, hidden_dropout_prob)
 75          attention_output = layer_norm(attention_output + layer_input)
 76
 77      # feed-forward
 78      with tf.variable_scope("intermediate"):
 79        intermediate_output = tf.layers.dense(
 80            attention_output,
 81            intermediate_size,
 82            activation=intermediate_act_fn,
 83            kernel_initializer=create_initializer(initializer_range))
 84
 85      # 对feed-forward层的输出使用线性变换变回‘hidden_size’
 86      # 然后dropout + residual + norm
 87      with tf.variable_scope("output"):
 88        layer_output = tf.layers.dense(
 89            intermediate_output,
 90            hidden_size,
 91            kernel_initializer=create_initializer(initializer_range))
 92        layer_output = dropout(layer_output, hidden_dropout_prob)
 93        layer_output = layer_norm(layer_output + attention_output)
 94        prev_output = layer_output
 95        all_layer_outputs.append(layer_output)
 96
 97  if do_return_all_layers:
 98    final_outputs = []
 99    for layer_output in all_layer_outputs:
100      final_output = reshape_from_matrix(layer_output, input_shape)
101      final_outputs.append(final_output)
102    return final_outputs
103  else:
104    final_output = reshape_from_matrix(prev_output, input_shape)
105    return final_output
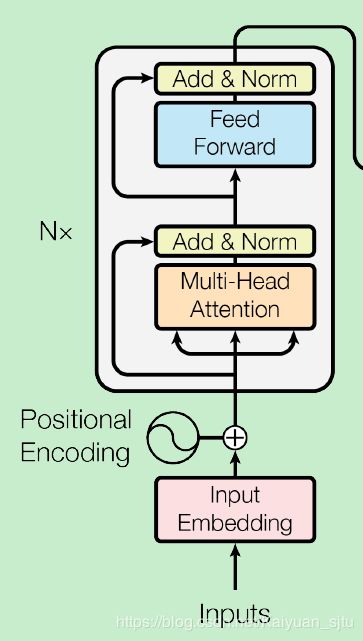
配上下图一同使用效果更佳,因为BERT里只有encoder,所有decoder没有姓名

7、函数入口(init)
BertModel类的构造函数,有了上面几节的铺垫,我们就可以来实现BERT模型了。
 1def __init__(self,
 2               config,                            # BertConfig对象
 3               is_training,
 4               input_ids,                        # 【batch_size, seq_length】
 5               input_mask=None,                    # 【batch_size, seq_length】
 6               token_type_ids=None,                # 【batch_size, seq_length】
 7               use_one_hot_embeddings=False,    # 是否使用one-hot;否则tf.gather()
 8               scope=None):
 9
10    config = copy.deepcopy(config)
11    if not is_training:
12      config.hidden_dropout_prob = 0.0
13      config.attention_probs_dropout_prob = 0.0
14
15    input_shape = get_shape_list(input_ids, expected_rank=2)
16    batch_size = input_shape[0]
17    seq_length = input_shape[1]
18    # 不做mask,即所有元素为1
19    if input_mask is None:
20      input_mask = tf.ones(shape=[batch_size, seq_length], dtype=tf.int32)
21
22    if token_type_ids is None:
23      token_type_ids = tf.zeros(shape=[batch_size, seq_length], dtype=tf.int32)
24
25    with tf.variable_scope(scope, default_name="bert"):
26      with tf.variable_scope("embeddings"):
27        # word embedding
28        (self.embedding_output, self.embedding_table) = embedding_lookup(
29            input_ids=input_ids,
30            vocab_size=config.vocab_size,
31            embedding_size=config.hidden_size,
32            initializer_range=config.initializer_range,
33            word_embedding_name="word_embeddings",
34            use_one_hot_embeddings=use_one_hot_embeddings)
35
36        # 添加position embedding和segment embedding
37        # layer norm + dropout
38        self.embedding_output = embedding_postprocessor(
39            input_tensor=self.embedding_output,
40            use_token_type=True,
41            token_type_ids=token_type_ids,
42            token_type_vocab_size=config.type_vocab_size,
43            token_type_embedding_name="token_type_embeddings",
44            use_position_embeddings=True,
45            position_embedding_name="position_embeddings",
46            initializer_range=config.initializer_range,
47            max_position_embeddings=config.max_position_embeddings,
48            dropout_prob=config.hidden_dropout_prob)
49
50      with tf.variable_scope("encoder"):
51
52        # input_ids是经过padding的word_ids: [25, 120, 34, 0, 0]
53        # input_mask是有效词标记:            [1, 1, 1, 0, 0]
54        attention_mask = create_attention_mask_from_input_mask(
55            input_ids, input_mask)
56
57        # transformer模块叠加
58        # `sequence_output` shape = [batch_size, seq_length, hidden_size].
59        self.all_encoder_layers = transformer_model(
60            input_tensor=self.embedding_output,
61            attention_mask=attention_mask,
62            hidden_size=config.hidden_size,
63            num_hidden_layers=config.num_hidden_layers,
64            num_attention_heads=config.num_attention_heads,
65            intermediate_size=config.intermediate_size,
66            intermediate_act_fn=get_activation(config.hidden_act),
67            hidden_dropout_prob=config.hidden_dropout_prob,
68            attention_probs_dropout_prob=config.attention_probs_dropout_prob,
69            initializer_range=config.initializer_range,
70            do_return_all_layers=True)
71
72      # `self.sequence_output`是最后一层的输出,shape为【batch_size, seq_length, hidden_size】
73      self.sequence_output = self.all_encoder_layers[-1]
74
75      # ‘pooler’部分将encoder输出【batch_size, seq_length, hidden_size】
76      # 转成【batch_size, hidden_size】
77      with tf.variable_scope("pooler"):
78        # 取最后一层的第一个时刻[CLS]对应的tensor, 对于分类任务很重要
79        # sequence_output[:, 0:1, :]得到的是[batch_size, 1, hidden_size]
80        # 我们需要用squeeze把第二维去掉
81        first_token_tensor = tf.squeeze(self.sequence_output[:, 0:1, :], axis=1)
82        # 然后再加一个全连接层,输出仍然是[batch_size, hidden_size]
83        self.pooled_output = tf.layers.dense(
84            first_token_tensor,
85            config.hidden_size,
86            activation=tf.tanh,
87            kernel_initializer=create_initializer(config.initializer_range))
总结一哈
有了以上对源码的深入了解之后,我们在使用BertModel的时候就会更加得心应手。举个模型使用的简单栗子:
 1# 假设输入已经经过分词变成word_ids. shape=[2, 3]
 2input_ids = tf.constant([[31, 51, 99], [15, 5, 0]])
 3input_mask = tf.constant([[1, 1, 1], [1, 1, 0]])
 4# segment_emebdding. 表示第一个样本前两个词属于句子1,后一个词属于句子2.
 5# 第二个样本的第一个词属于句子1, 第二次词属于句子2,第三个元素0表示padding
 6token_type_ids = tf.constant([[0, 0, 1], [0, 2, 0]])
 7
 8# 创建BertConfig实例
 9config = modeling.BertConfig(vocab_size=32000, hidden_size=512,
10         num_hidden_layers=8, num_attention_heads=6, intermediate_size=1024)
11
12# 创建BertModel实例
13model = modeling.BertModel(config=config, is_training=True,
14     input_ids=input_ids, input_mask=input_mask, token_type_ids=token_type_ids)
15
16
17label_embeddings = tf.get_variable(...)
18#得到最后一层的第一个Token也就是[CLS]向量表示,可以看成是一个句子的embedding
19pooled_output = model.get_pooled_output()
20logits = tf.matmul(pooled_output, label_embeddings)
在BERT模型构建这一块的主要流程:
对输入序列进行Embedding(三个),接下去就是‘Attention is all you need’的内容了
简单一点就是将embedding输入transformer得到输出结果
详细一点就是embedding --> N *【multi-head attention --> Add(Residual) &Norm--> Feed-Forward --> Add(Residual) &Norm】
哈,是不是很简单~
源码中还有一些其他的辅助函数,不是很难理解,这里就不再啰嗦。
本文由作者原创授权AINLP首发于公众号平台,点击'阅读原文'直达原文链接,欢迎投稿,AI、NLP均可。


