如何借助 Tekton 实现微服务的 Pipeline

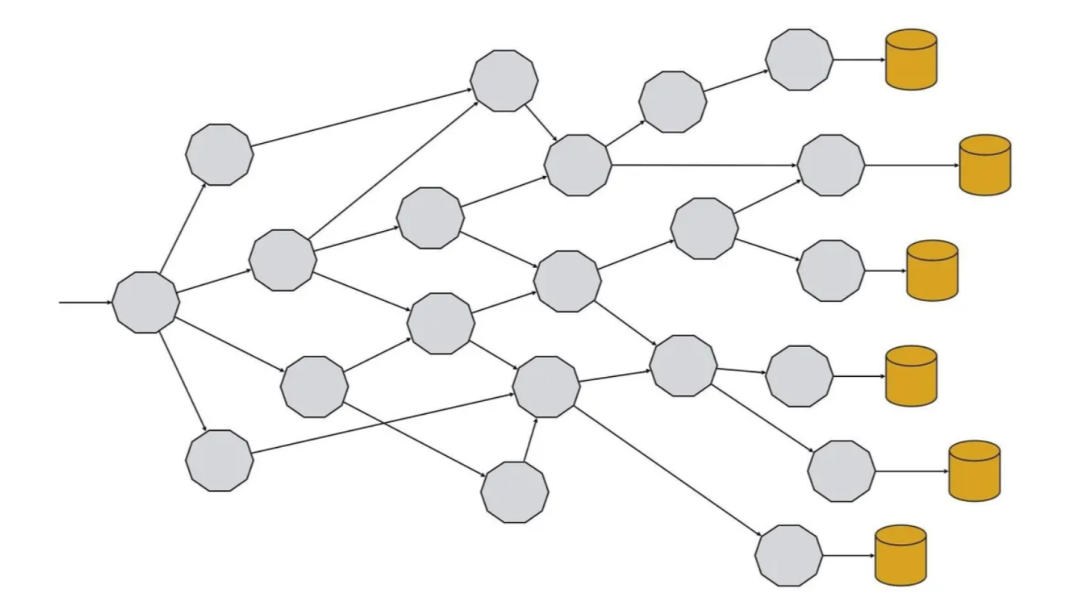
在微服务架构中,应用程序是由多个相互连接的服务组成的,这些服务协同工作以实现所需的业务功能。所以,一个典型的企业级微服务架构如下所示:
最初,我们可能认为使用微服务架构实现一个应用程序是很容易的事情。但是,要恰当地完成这一点并不容易,因为我们会面临一些新的挑战,而这些挑战是单体架构所未曾遇到的。举例来讲,这样的挑战包括容错、服务发现、扩展性、日志和跟踪等。
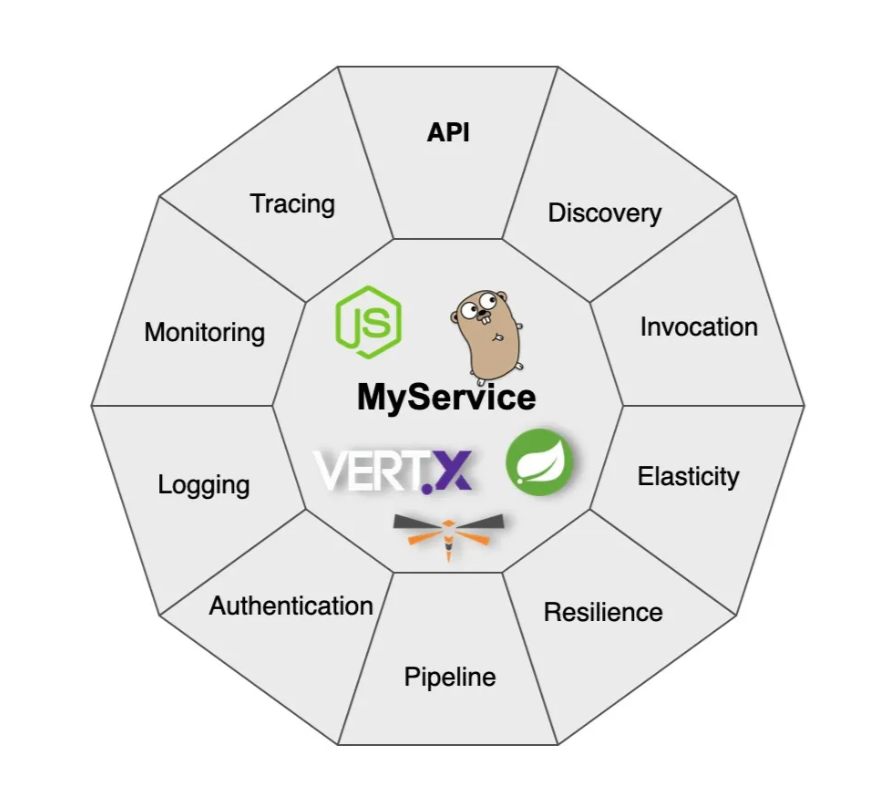
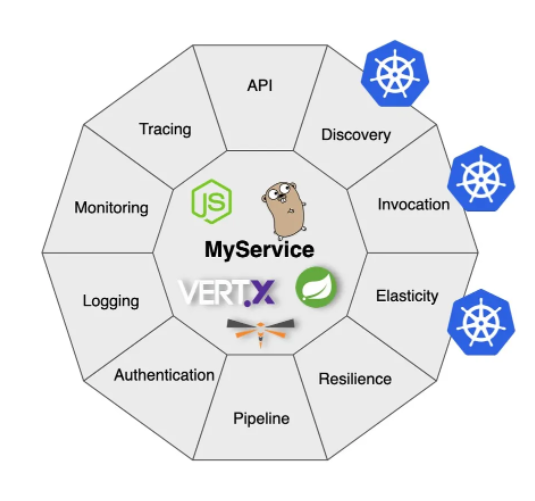
为了应对这些挑战,每个微服务都需要实现在 Red Hat 被称为“微服务特性(microservicility)”的内容。这个术语指的是除了业务逻辑之外,服务必须要实现的一个横切性关注点的列表。
这些关注点总结起来如下图所示:
在本系列的第一部分和第二部分中,我们分别讨论了如何使用 Quarkus 和 Istio 实现这些微服务特性。但是,还有一个微服务特性是我们在这两篇文章中都没有涉及到的,那就是 Pipeline。
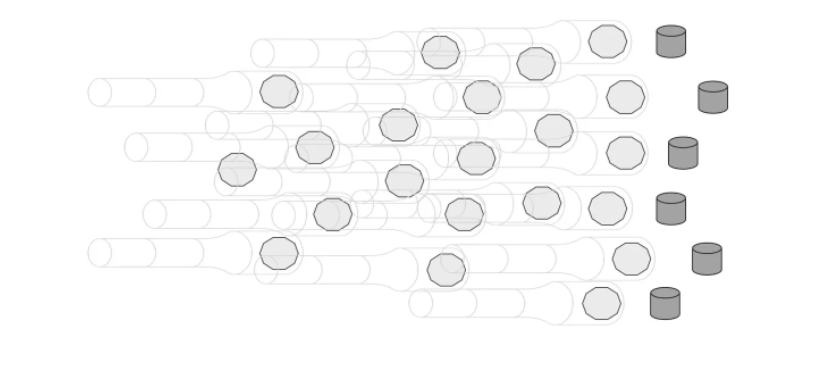
在微服务架构中,我们应该能够独立地部署服务,而不需要任何的部署编排(orchestration)。在服务间没有任何的编排意味着没有必要在每次部署的时候都部署和发布整个应用程序,只需要其中的很小一部分就可以了。
如果我们能够发布应用中各个小的组成部分的话,那么这会带来一些好处:
减少在应用中引入破坏性变更的几率。
如果出现错误的话,更容易部署和回滚。
我们可以增加部署至生产环境的频率。
出于这样的原因,每个服务应该都有自己部署 Pipeline,这样的话,我们就可以随时部署它,只需要遵循它自己的规则或流程即可。
但是,为每个服务都创建一个部署 Pipeline 会带来一些挑战,这是我们需要解决的:
如何实现和管理多个 Pipeline。
如何为所有的服务实现自动部署。
如何跨服务共享 Pipeline 中的某些组成部分,同时又保持这些 Pipeline 的独立性。
如何在云环境中执行它们。
大多数问题的答案就是 Pipeline 即代码(pipeline-as-code)。这种技术能够允许我们以代码或可视为代码的文件(YAML)的形式创建持续交付 Pipeline。
因为 Pipeline 是以代码的形式定义的,所以它们应该置于源码控制之下,这意味着它们是可以重用、可以建立分支也可以创建 tag。更重要的是,我们能够将服务代码和交付 Pipeline 添加到相同的仓库中。
Kubernetes 正在成为部署微服务的事实标准工具。它是一个开源的系统,用来自动化、编排、扩展和管理容器。
正如我们在前面的两篇文章中所讲到的那样,在我们提到的十个微服务特性中,通过使用 Kubernetes 能够覆盖其中的三个。
如果我们使用 Istio,可以实现另外五个微服务特性,即服务发现、回弹性、认证、监控和跟踪。
使用 Kubernetes 和 Istio 是个好主意,但是 Pipeline 该怎么实现呢?我们该如何实现一个 Kubernetes 原生的持续交付 Pipeline 呢?引入 Tekton 是一个可行的解决方案。
Tekton 是一个 Kubernetes 原生的构建 CI/CD Pipeline 的解决方案,能够以 Kubernetes 扩展的方式安装和运行。它提供了一组 Kubernetes 自定义资源(custom resource),借助这些自定义资源,我们可以为 Pipeline 创建和重用构建块。
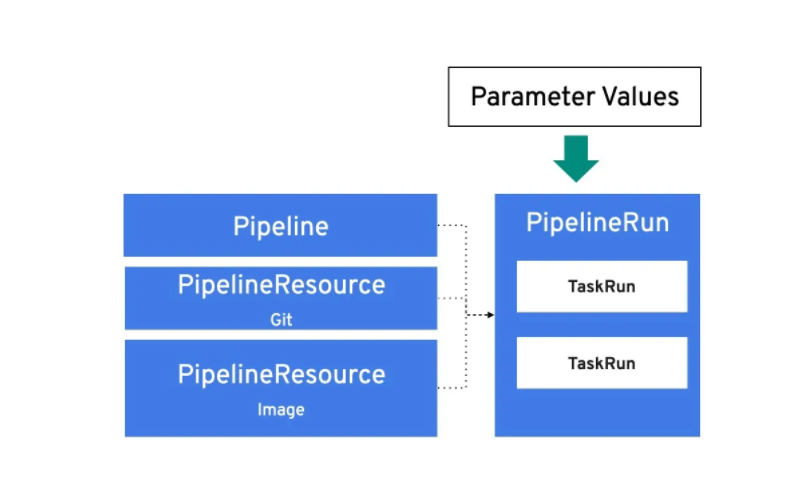
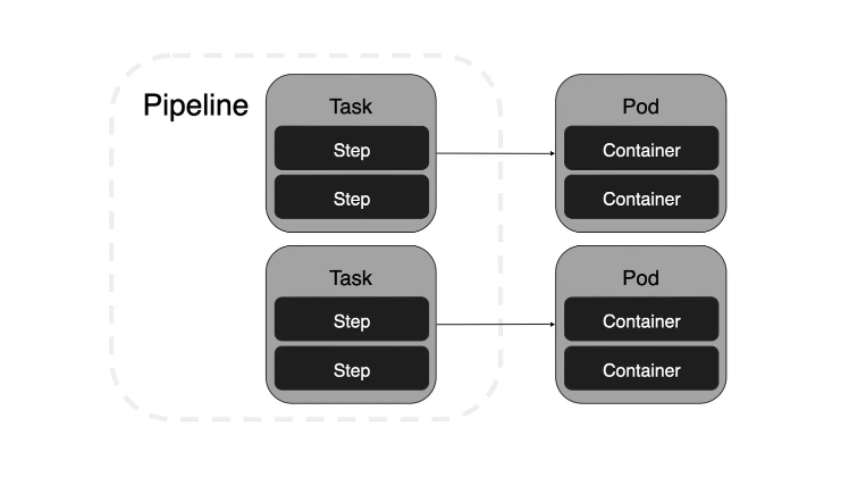
Tekton 定义了如下的基本 Kubernetes 自定义资源定义(Kubernetes Custom Resource Definition,CRD)来构建 Pipeline:
PipelineResource能够定义可引用的资源,比如源码仓库或容器镜像。
Task定义了一个按顺序执行的 step 列表。每个 step 会在容器中执行命令。每个 task 都是一个 Kubernetes Pod,Pod 中包含了与 step 同等数量的容器。
TaskRun会实例化一个要执行的Task,并且会带有具体的输入、输出和参数。
Pipeline会定义一个 task 的列表,这些 task 会按照特定的顺序来执行。
PipelineRun会实例化一个要执行的Pipeline,并且会带有具体的输入、输出和参数。它会自动为每个Task创建TaskRun实例。
Task可以通过创建TaskRun对象单独运行,也可以作为Pipeline的一部分运行。
执行如下的命令来启动集群:
minikube start -p tekton --kubernetes-version='v1.19.0' --vm-driver='virtualbox' --memory=4096[istio] minikube v1.17.1 on Darwin 11.3Kubernetes 1.20.2 is now available. If you would like to upgrade, specify: --kubernetes-version=v1.20.2minikube 1.19.0 is available! Download it: https://github.com/kubernetes/minikube/releases/tag/v1.19.0To disable this notice, run: 'minikube config set WantUpdateNotification false'Using the virtualbox driver based on existing profileYou cannot change the memory size for an exiting minikube cluster. Please first delete the cluster.Starting control plane node istio in cluster istioRestarting existing virtualbox VM for "istio" ...Preparing Kubernetes v1.19.0 on Docker 19.03.12 ...Verifying Kubernetes components...Enabled addons: storage-provisioner, default-storageclassDone! kubectl is now configured to use "tekton" cluster and "" namespace by default
Kubernetes 启动就绪之后,我们可以下载tkn CLI 工具来与 Tekton Pipeline 进行交互。在本例中,我们从发布页面下载tkn 0.18.0。
现在,我们通过执行如下的命令安装 Tekton 控制器:
kubectl apply -fhttps://storage.googleapis.com/tekton-releases/pipeline/previous/v0.24.0/release.yamlnamespace/tekton-pipelines createdpodsecuritypolicy.policy/tekton-pipelines createdclusterrole.rbac.authorization.k8s.io/tekton-pipelines-controller-cluster-access createdclusterrole.rbac.authorization.k8s.io/tekton-pipelines-controller-tenant-access createdclusterrole.rbac.authorization.k8s.io/tekton-pipelines-webhook-cluster-access createdrole.rbac.authorization.k8s.io/tekton-pipelines-controller created…deployment.apps/tekton-pipelines-controller createdservice/tekton-pipelines-controller createdhorizontalpodautoscaler.autoscaling/tekton-pipelines-webhook createddeployment.apps/tekton-pipelines-webhook createdservice/tekton-pipelines-webhook created
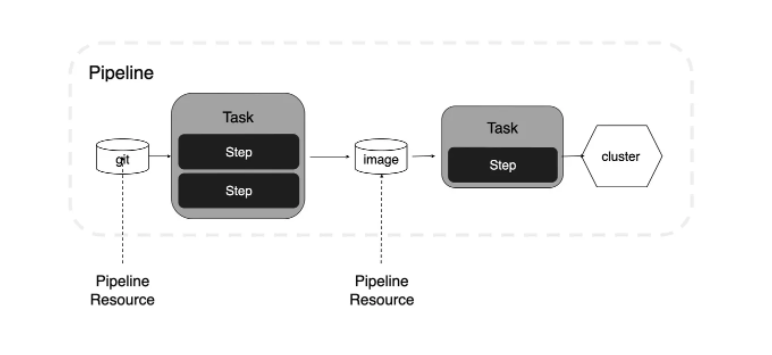
接下来,我们看一下该如何在 Tekton 中定义持续交付的 Pipeline。这个 pipeline 由两个 task 组成。第一个 task 从 GitHub 上 clone 项目,使用 Maven(可以是其他任意的构建工具甚至是不同的语言)构建 Java 项目,创建容器镜像并将其推送至一个容器 registry。第二个任务会将服务部署至一个 Kubernetes 集群。
但是,在开发 pipeline 之前,我们先通过一个简单的“Hello World”来理解 Tekton 的概念。
我们创建一个只包含单个 step 的 task,该 task 会启动一个busybox容器并在容器中执行echo命令。创建名为hello-world-task.yml的文件:
apiVersion: tekton.dev/v1beta1kind: Taskmetadata:name: helloworldspec:steps:name: sayhelloimage: busyboxcommand:echoargs: ['Hello World']kubectl apply -f src/main/tekton/hello-world-task.yml -n defaultcreated
使用tkn列出当前注册的所有 task:
tkn task listNAME DESCRIPTION AGEhelloworld 1 minute ago
此时只是注册了这个 task,现在我们需要初始化一个 task 来执行它。我们可以通过使用tkn CLI 或应用一个TaskRun来实现这一点。在这里,我们创建一个名为 hello-world-taskrun.yml的TaskRun文件,它会在name字段中注册前文所述的task。
apiVersion: tekton.dev/v1beta1kind: TaskRunmetadata:name: helloworld-runspec:taskRef:name: helloworld
然后,我们应用这个文件,task 就会被触发。
kubectl apply -f src/main/tekton/hello-world-taskrun.ymltaskrun.tekton.dev/helloworld-run created
我们可以使用tkn列出当前所有的 task:
tkn tr listNAME STARTED DURATION STATUS8 seconds ago --- Running(Pending)
归根到底,Task只是运行在 Kubernetes 集群中的一个 Kubernetes Pod,而每个 step 则是 Pod 中的一个容器。执行如下的命令获取当前的 Pod:
kubectl get podsNAME READY STATUS RESTARTS AGE0/1 Completed 0 45s
Pod 的状态是已完成,因为 task 已经执行完毕了。它会运行一个容器,容器的名字会符合TaskRun中metadata部分 name 字段所定义的值。
我们可以描述一下 Pod,请关注containers区域,以获取 task 启动的容器的概况:
kubectl describe pod helloworld-run-pod-75dwt…Containers::Container ID: docker://e3bb6b747e6cbb76829e7658b7bf2976f3f09861775a4584eccfba0c143996a6Image: busybox...
最后,我们可以使用tkn的 logs 命令查看 TaskRun 的日志:
tkn tr logs helloworld-run[] Hello World
现在,我们对 Tekton 的 task 已经有了基本的了解,接下来我们更进一步,实现一个具备了所需 step 的真正 pipeline。
PipelineResource定义了输入 / 输出资源的位置,这些资源会被 Task 中的 step 所用到。这些参数通常会遵循 Git URL 或者容器镜像全限定名的形式。
我们创建一个新的PipelineResource文件来配置项目的仓库:
apiVersion: tekton.dev/v1alpha1kind: PipelineResourcemetadata:name: git-sourcespec:type: gitparams:name: urlvalue: https://github.com/lordofthejars/hello-world-tekton.gitkubectl apply -f src/main/tekton/git-pipeline-resource.yml -n defaultcreated
然后,创建另外一个PipelineResource来设置容器镜像:
apiVersion: tekton.dev/v1alpha1kind: PipelineResourcemetadata:name: hello-world-imagespec:type: imageparams:name: urlvalue: quay.io/lordofthejars/hello-world-quarkus-tekton:1.0.0kubectl apply -f src/main/tekton/container-image-resource.ymlcreatedtkn resource listNAME TYPE DETAILSgit url: https://github.com/lordofthejars/hello-world-tekton.gitimage url: quay.io/lordofthejars/hello-world-quarkus-tekton:1.0.0
在创建 task 之前,我们先创建一个 Kubernetes Secret,它包含了两个用于 Quay 访问凭证的键 / 值对,分别是 Quay 的用户名和 Quay 的密码。请将 username 和 password 的值替换成正确的值。
kubectl create secret generic quay-credentials --from-literal=quay-username='yyy' --from-literal=quay-password='xxx'secret/quay-credentials created
接下来,我们创建一个Task来构建项目,创建 Linux 容器镜像并将其推送至容器 registry 上(在本例中,我们使用 Quay,但是可以切换成任意的其他方案)。
因为这是一个使用 Quarkus 实现的 Java 项目,所以我们会通过集成 Jib 实现以 Dockerless 的方式创建容器镜像。在一个容器运行时(Tekton 就是这种情况)中构建容器镜像时,我们可能会遇到一些在容器中运行 task 容器的问题(构建新的容器)。这也是为何采用 Dockerless 技术创建容器的重要原因。对于 Java 项目来说,Jib 是一个可行的方案,但是也有其他通用的、不针对特定语言的方案,比如 Buildah 或 Kaniko。
我们创建一个task,它会执行执行 Maven package goal,设置构建所需的 Quarkus 选项并将容器镜像推送至 Quay。当然,我们还需要以输入和输出(PipelineResource)的方式设置 Git 仓库和容器镜像名,并以参数(Kubernetes Secrets)的形式设置 Quay 的用户名和密码。
apiVersion: tekton.dev/v1beta1kind: Taskmetadata:name: build-appspec:params:name: quay-credentials-secrettype: stringdescription: name of the secret holding the quay credentialsdefault: quay-credentialsresources:inputs:name: sourcetype: gitoutputs:name: builtImagetype: imagesteps:name: maven-buildimage: docker.io/maven:3.6-jdk-11-slimcommand:mvnargs:cleanpackage-Dquarkus.container-image.push=trueenv:name: QUARKUS_CONTAINER_IMAGE_IMAGEvalue: $(outputs.resources.builtImage.url)name: QUARKUS_CONTAINER_IMAGE_USERNAMEvalueFrom:secretKeyRef:name: $(params.quay-credentials-secret)key: quay-usernamename: QUARKUS_CONTAINER_IMAGE_PASSWORDvalueFrom:secretKeyRef:name: $(params.quay-credentials-secret)key: quay-passwordworkingDir: "/workspace/source/"
在前面的文件中,我们看到 Quay 凭证的 secret 名被设置为参数。参数quay-credentials有一个默认值,它的值与kubectl creates secret命令中所用的值是相同的。
输入参数被命名为source,类型为git。
输出参数是容器镜像的名称。
在env部分中,我们定义了一些环境变量,用来配置 Quarkus 容器镜像扩展如何构建和推送容器镜像:
容器镜像名是在输出资源中定义的。
Quay 凭证会从 Kubernetes
Secret中注入进来。
在 Kubernetes 集群中注册 task:
kubectl apply -f src/main/tekton/build-push-task.ymltkn task listNAME DESCRIPTION AGE3 hours ago
最后我们通过创建一个TaskRun来初始化这个 task,此时我们需要链接在前文中通过PipelineResource创建的输入 / 输出资源并将 secret 名称设置为参数。
apiVersion: tekton.dev/v1beta1kind: TaskRunmetadata:name: build-app-runspec:params:name: quay-credentials-secretvalue: quay-credentialsresources:inputs:name: sourceresourceRef:name: git-sourceoutputs:name: builtImageresourceRef:name: hello-world-imagetaskRef:name: build-app
注意,resourceRef字段指向了在前文中定义的PipelineResource的名称。
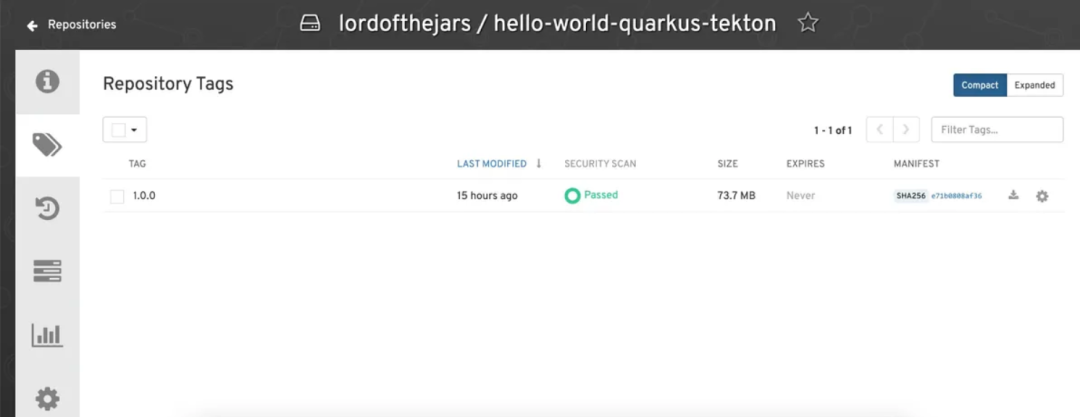
当TaskRun被应用的时候,构建过程就开始执行了,它会 clone 项目,使用 Maven 进行构建,然后创建并推送镜像。通过使用tkn CLI,我们可以看到当前 task 的实时日志:
tkn tr logs -f? Select taskrun: [Use arrows to move, type to filter]> build-app-run started 38 minutes agohelloworld-run started 1 day ago[] {"level":"info","ts":1620922474.2565205,"caller":"git/git.go:169","msg":"Successfully cloned https://github.com/lordofthejars/hello-world-tekton.git @ ee3edc414c47f2bdeda9cc7c47ac54427d35a9dc (grafted, HEAD) in path /workspace/source"}[] {"level":"info","ts":1620922474.276228,"caller":"git/git.go:207","msg":"Successfully initialized and updated submodules in path /workspace/source"}...[] Downloading from central: https://repo.maven.apache.org/maven2/org/apache/maven/maven-plugin-parameter-documenter/2.0.6/maven-plugin-parameter-documenter-2.0.6.pomDownloaded from central: https://repo.maven.apache.org/maven2/org/apache/maven/maven-plugin-parameter-documenter/2.0.6/maven-plugin-parameter-documenter-2.0.6.pom (1.9 kB at 58 kB/s)[] Downloading from central: https://repo.maven.apache.org/maven2/org/apache/maven/reporting/maven-reporting-api/2.0.6/maven-reporting-api-2.0.6.pom…[] [INFO] [io.quarkus.container.image.jib.deployment.JibProcessor] Pushed container image quay.io/lordofthejars/hello-world-quarkus-tekton:1.0.0 (sha256:e71b0808af36ce3b9b980b2fb83886be2e06439ee454813052a115829e1e727c)[] [INFO] [io.quarkus.deployment.QuarkusAugmentor] Quarkus augmentation completed in 24202ms[] [INFO] ------------------------------------------------------------------------[] [INFO] BUILD SUCCESS[] [INFO] ------------------------------------------------------------------------[] [INFO] Total time: 01:16 min[] [INFO] Finished at: 2021-05-13T16:15:52Z[] [INFO] ------------------------------------------------------------------------[] {"severity":"INFO","timestamp":"2021-05-13T16:15:53.025263494Z","caller":"logging/config.go:116","message":"Successfully created the logger."}[] {"severity":"INFO","timestamp":"2021-05-13T16:15:53.025374882Z","caller":"logging/config.go:117","message":"Logging level set to: info"}[] {"severity":"INFO","timestamp":"2021-05-13T16:15:53.025508459Z","caller":"imagedigestexporter/main.go:59","message":"No index.json found for: builtImage","commit":"b86a9a2"}
现在,我们已经创建了一个简单的 task。但是,实际的持续交付 / 部署 pipeline 应该是由多个 task 组成的:构建并推送容器镜像,然后将其部署到 Kubernetes 集群中。
接下来我们创建具有两个 step 的 task:
第一个 step 是使用
PipelineResource所设置的容器镜像更新 KubernetesDeployment。在编辑 deployment YAML 文件时,我们可以使用 yq 工具。同时,我们使用script代替command来展示在容器中运行命令的另外一种方式。第二个 step 执行
kubectl命令以部署服务。对于这个 task 来讲,我们需要三个参数:deployment 文件、存储 deployment 文件的 Git 仓库以及前面 task 中所构建的容器镜像的名称。
创建名为deploy-task.yml的文件,内容如下所示:
apiVersion: tekton.dev/v1beta1kind: Taskmetadata:name: kubectl-deployspec:params:name: deploymentFiletype: stringdescription: deployment file locationresources:inputs:name: sourcetype: gitname: builtImagetype: imagesteps:name: update-deployment-fileimage: quay.io/lordofthejars/image-updater:1.0.0script: |#!/usr/bin/env ashyq eval -i '.spec.template.spec.containers[0].image = env(DESTINATION_IMAGE)' $DEPLOYMENT_FILEenv:name: DESTINATION_IMAGEvalue: "$(inputs.resources.builtImage.url)"name: DEPLOYMENT_FILEvalue: "/workspace/source/$(inputs.params.deploymentFile)"name: kubeconfigimage: quay.io/rhdevelopers/tutorial-tools:0.0.3command: ["kubectl"]args:apply-f/workspace/source/$(inputs.params.deploymentFile)
注意,在第一个 step 中,我们使用script来代替command。要传递 Tekton 参数到script区域,我们需要通过环境变量来实现。
kubectl apply -f src/main/tekton/deploy-task.ymlcreatedtkn task lsNAME DESCRIPTION AGE18 hours agohelloworld 1 day ago11 minutes ago
要部署服务,我们需要在 Kubernetes 集群中执行kubectl命令。为了实现这一点,我们需要设置一个 Kubernetes Role以允许default服务账号(因为这是在我们的样例中运行 Tekton Pipeline 所使用的服务账号)具备相应的权限。这个角色必须要允许在运行的容器中应用 Kubernetes 资源。
创建名为pipeline-sa-role.yml的文件,内容如下:
apiVersion: rbac.authorization.k8s.io/v1kind: Rolemetadata:name: pipeline-extra-rolerules:apiGroups:""resources:podsservicesendpointsconfigmapssecretsverbs:"*"apiGroups:appsresources:deploymentsdaemonsetsreplicasetsstatefulsetsverbs:"*"apiGroups:""resources:podsverbs:getapiGroups:appsresources:replicasetsverbs:get---apiVersion: rbac.authorization.k8s.io/v1kind: RoleBindingmetadata:name: pipeline-exta-role-bindingroleRef:kind: Rolename: pipeline-extra-roleapiGroup: rbac.authorization.k8s.iosubjects:kind: ServiceAccountname: default
注册角色:
kubectl apply -f src/main/tekton/pipeline-sa-role.ymlrole.rbac.authorization.k8s.io/pipeline-extra-role createdrolebinding.rbac.authorization.k8s.io/pipeline-exta-role-binding created
现在,我们已经可以创建 Tekton Pipeline 将这两个 task 组合在一起了。在这里,定义 pipeline 参数至关重要,因为在 pipeline 定义中引用 Tekton Task 的时候,要设置这些参数。在这两个 task 中,我们都定义了params值(quay-credentials-secret和deploymentFile),并引用pipelineresource作为输入 / 输出。
创建pipeline.yml文件:
apiVersion: tekton.dev/v1beta1kind: Pipelinemetadata:name: hello-world-pipelinespec:resources:name: appSourcetype: gitname: containerImagetype: imagetasks:name: build-apptaskRef:name: build-appparams:name: quay-credentials-secretvalue: quay-credentialsresources:inputs:name: sourceresource: appSourceoutputs:name: builtImageresource: containerImagename: kube-deploytaskRef:name: kubectl-deployparams:name: deploymentFilevalue: src/main/kubernetes/kubernetes.ymlrunAfter:build-appresources:inputs:name: sourceresource: appSourcename: builtImageresource: containerImagekubectl apply -f src/main/tekton/pipeline.ymlcreated
我们可以使用tkn CLI 列出 pipeline:
tkn pipeline listNAME AGE LAST RUN STARTED DURATION STATUS5 seconds ago --- --- --- ---
通过命令描述 pipeline,能够让我们看到 pipeline 的概述以及在运行它的时候,必须要定义哪些内容:
tkn pipeline describe hello-world-pipelineName: hello-world-pipelineNamespace: defaultResourcesNAME TYPE∙ appSource git∙ containerImage imageParamsNo paramsResultsNo resultsWorkspacesNo workspacesTasksNAME TASKREF RUNAFTER TIMEOUT CONDITIONS PARAMS∙ build-app build-app --- --- quay-credentials-secret: quay-credentials∙ kube-deploy kubectl-deploy build-app --- --- deploymentFile: src/main/kubernetes/deployment.ymlPipelineRunsNo pipelineruns
现在,我们不需要任何的TaskRun了,因为它们会在应用PipelineRun的时候自动创建:
apiVersion: tekton.dev/v1beta1kind: PipelineRunmetadata:name: hello-world-pipeline-runspec:resources:name: appSourceresourceRef:name: git-sourcename: containerImageresourceRef:name: hello-world-imagepipelineRef:name: hello-world-pipeline
在PipelineRun中,我们设置了PipelineResources和Pipeline之间的链接,因为它是由TaskRun执行的。
kubectl apply -f src/main/tekton/pipeline-run.ymlpipelinerun.tekton.dev/hello-world-pipeline-run created
与 TaskRun 类似,我们可以通过如下的命令将一个 pipeline 的日志以流的方式链接起来:
tkn pipeline logs -f…[] {"level":"info","ts":1620978300.0659564,"caller":"git/git.go:169","msg":"Successfully cloned https://github.com/lordofthejars/hello-world-tekton.git @ b954dbc68e0aa7e4cfb6defeff00b1e4ded2889c (grafted, HEAD) in path /workspace/source"}[] {"level":"info","ts":1620978300.0972755,"caller":"git/git.go:207","msg":"Successfully initialized and updated submodules in path /workspace/source"}[] deployment.apps/hello-world created
如果构建成功的话,服务将会部署到当前的 Kubernetes 集群中。我们可以获取所有的 Pod 以查看集群中发生了什么:
kubectl get podsNAME READY STATUS RESTARTS AGE1/1 Running 0 36m0/4 Completed 0 37m0/3 Completed 0 36m
我们可以看到有两个已完成的 Pod。hello-world-pipeline-run-build-app Pod 对应的是build-app task,它会 clone、构建和测试服务,并且最终会创建和推送容器镜像。hello-world-pipeline-run-kube-deploy Pod 对应kube-deploy task,它负责部署应用。
除了 task 之外,这里还有一个正在运行的 Pod。这就是 pipeline 执行期间所部署的应用 Pod。
开发和实现微服务架构要比开发单体应用更具挑战性。我们相信,微服务特性能够促使你在应用基础设施方面正确地开发服务。
在本系列的第一篇和第二篇文章中,我们分别学习了如何使用 Quarkus 或 Istio 实现微服务特性,但是我们还没有介绍 Pipeline 这项微服务特性。本文阐述了如何使用 Tekton 实现一个基本的持续交付 pipeline,Tekton 是一个 Kubernetes 原生的解决方案,用于构建 CI/CD pipeline。
Tekton 一个很重要的优势是能够在容器最终要部署的同一个集群中创建容器镜像。这减少了容器在某些机器上构建而在其他机器上部署时可能出现的差异。另一个优势是使用 YAML 文件来定义 pipeline 的方式。通过这种方式,pipeline 能够与源代码一起存储,使其可创建分支、可创建 tag 或版本化。
有时候,没有必要从头开始定义 task,在 Tekton Catalog 上,我们可以看到很多可以直接使用的 task。除此之外,如果你需要开发自定义的 task 的话,要借助参数和输入 / 输出资源将它们设计的尽可能比较开放。通过这种方式,task 有可能实现在你的组织内的重用,从而解决类似的问题。
本文只是 Tekton 的一个简介。我们可以看到当一个PipelineRun对象在集群中创建的时候,pipeline 就会运行,但是触发器 / 事件也可以触发 Pipeline。举例来讲,事件可能是对 GitHub 仓库中特性分支的推送。触发器是一个更高级的话题,你可以通过该地址学习关于触发器的更多知识。
用于阐述本文的源码可以在 GitHub仓库中找到。第一篇和第二篇文章的源码也分别可以在这里和这里获取。
作者简介:
Alex Soto 是红帽公司的开发者体验总监。他对 Java 领域、软件自动化充满热情,他相信开源软件模式。Soto 是 Manning 的《Testing Java Microservices》 和 O’Reilly 的《Quarkus Cookbook》 两本书的共同作者,他还是多个开源项目的贡献者。自 2017 年以来,他一直是 Java Champion,是国际演讲者和 Salle URL 大学的教师。你可以在 Twitter 上关注他(Alex Soto ⚛️),随时了解 Kubernetes 和 Java 领域的动态。
原文链接:
https://www.infoq.com/articles/microservicilities-tekton/
点击底部阅读原文访问 InfoQ 官网,获取更多精彩内容!
花7.5亿都做不好的项目,被三位程序员爸爸重写并开源了
比起35岁程序员,无知犯错的年轻一代是否更应该被原谅?
50名工程师支撑着一个10亿用户量的产品:成功因素之一是几乎不开会
腾讯推出员工退休待遇方案;传字节、阿里将试行新工作制;马斯克社交平台发曹植七步诗 | Q资讯
汇集全网最深度技术内容,聚齐各领域最优秀创作者
InfoQ 引航计划正式启动,下一个引导技术领域共建发展的 Pioneer 就是你!
扫描下方二维码获取更多活动信息!

点个在看少个 bug 👇