流星花园的字幕还能这样玩,语音识别数据集搜集超简单

本文为 AI 研习社编译的技术博客,原标题 :
Automatic Speech Recognition Data Collection with Youtube V3 API, Mask-RCNN and Google Vision API
翻译 | 吴桐、乐高小积木、rainbow 校对 | 付腾 整理 | 志豪
原文链接:
https://towardsdatascience.com/automatic-speech-recognition-data-collection-with-youtube-v3-api-mask-rcnn-and-google-vision-api-2370d6776109
巧用YouTube V3 API, Mask-RCNN 和Google Vision API自动收集带标识的语音识别数据
图片来源:Pixabay
背景
随着机器学习,尤其是深度学习的高速发展,语音识别技术得到了显著的提高。这种技术依赖于大量的高质量数据。然而,相比于如英语这种广泛使用的语言来说,一些建立在不那么流行的语种上的模型表现效果却不那么好。这是因为在这些语种上人们只能找到少量的训练数据集,而高效地搜集高质量的数据又不那么容易。这篇博客将向你展示的是,如何基于任意语种高效率地搜集语音识别数据集。
虽然在去年,Mozilla 发布了一个称作 Common Voice 的开源项目,鼓励人们贡献出自己的声音数据,然而大多数人或者并不知道这个项目的存在,或者并不愿意参与其中。下面这张图展示了不同语种上 Common Voice 并不景气的收集进度。
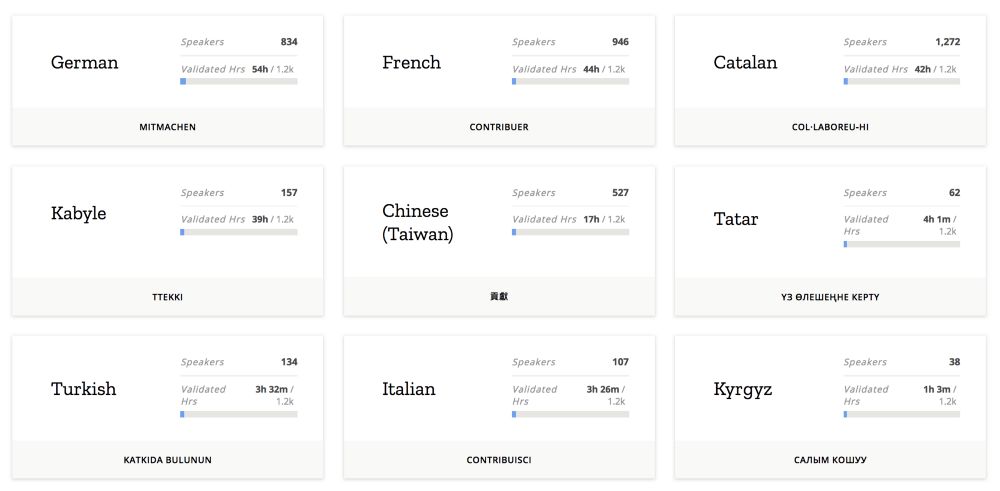
Common Voice 并不景气的收集进度(https://voice.mozilla.org/en/languages)
多亏了 YouTube 上丰富的电视节目和戏剧资源,使得一种几乎不需要人工参与的高效语音识别数据收集成为可能。
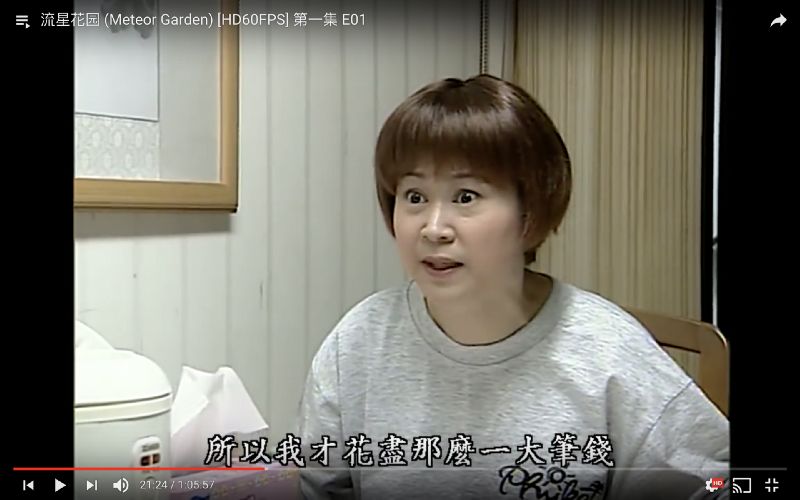
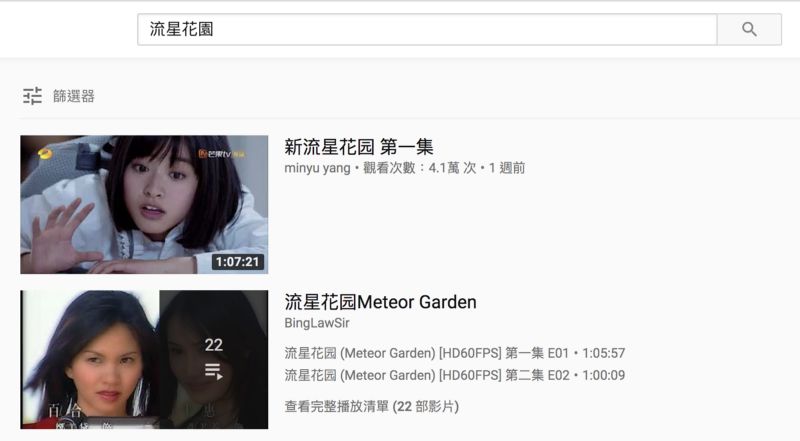
流星花园 (https://www.youtube.com/watch?v=DsuN185H58I)
如上图所示,一些戏剧或节目的视频已经配备有字幕,而后者可以由 OCR 技术提取出来。提取出的文本和剪切出来的视频片段就可以形成一个语音识别样本了。
概述
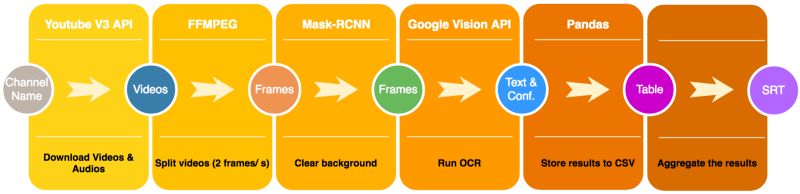
下图展示了包括几个模块的整个数据收集流程的概览。首先我们使用youtube v3 API来搜索下载与指定的电视节目相关的视频,并使用FFMPEG将视频分帧,每一帧用自训练的Mask-RCNN(后面细讲)进行处理以只保留图片的字幕区域。然后将这些处理之后的图片发送给google 视觉API以获取预测的文本和置信度。利用Pandas库,我们将这些结果按照时间戳排序,整合它们为每个视频生成srt文件。下面将向你展示如何实现每一个模块。
前提条件:
Python==3.6
FFMPEG
joblib==0.12.0
numpy==1.13.3
pandas==0.23.3
tensorflow-gpu==1.4.0
keras==2.1.3
google-cloud-vision==0.32.0
pafy==0.5.4
youtube-dl==2017.12.2
tqdm==4.23.4
editdistance==0.4
实现
这部分按照数据收集流程图中的模块进行划分,每个子区域对应一个模块。
下载视频&提取音频
去youtube搜索一个你感兴趣的的喜剧。确保您能找到那个节目的播放列表。因为播放列表中的视频的质量是统一的。检查第一个视频是否包含内嵌的字幕,我们就可以判断整个播放列表是内嵌有字幕的。
youtube播放列表中的视频
from googleapiclient.discovery import build

# developer keys for Youtube V3 API
DEVELOPER_KEY = 'YOUR_API_KEY'
YOUTUBE_API_SERVICE_NAME = "youtube"
YOUTUBE_API_VERSION = "v3"

# creating youtube resource object for interacting with api
youtube = build(YOUTUBE_API_SERVICE_NAME,
                YOUTUBE_API_VERSION,
                developerKey=DEVELOPER_KEY)

def get_playlist_id(name):
    """
    Search for the playlist id given a drama name.
    Parameters
    ----------
    name : str
        The name of the drama
    Returns
    -------
    playlist_id: str
        Resulted playlist id returned by Youtube API
    """

    #search for the first playlist result given a drama name
    search_response = youtube.search().list(q=name,type="playlist",part="id",maxResults=1).execute()
    result = search_response.get("items", [])
    playlist_id = result[0]['id']['playlistId']
    return playlist_id
以上代码向你展示了如何去搜索一个youtube播放列表。
为了使用youtube V3 API你需要申请一个API 键。
youtube.search().list(q=name,
type="playlist",part="id",maxResults=1).execute
第27行执行了利用喜剧名字查询的搜索并返回第一个结果的播放列表id。有了这个id,我们就可以得到这个播放列表里面所有视频的id。
def get_video_ids(playlist_id):
    """
    Get the video ids given a playlist id.
    Parameters
    ----------
    playlist_id : str
        A Youtube playlist id. (up to 50 results)
    Returns
    -------
    video_ids: list(str)
        The video ids associated with the input playlist
    """

    #search for all the videos given a playlist id
    search_response = youtube.playlistItems().list(part='contentDetails',maxResults=50,playlistId=playlist_id).execute()
    all_videos = search_response['items']
    video_ids = []
    for vid in all_videos:
        video_id = vid['contentDetails']['videoId']
        video_ids.append(video_id)

    return video_ids
类似的,第15行,
youtube.playlistItems().list(part='contentDetails',maxResults=50, playlistId=playlist_id).execute()
给定播放列表id搜索前50个视频。
然后我们就开始下载视频。
def download_video(video_id, path="videos", verbose=True):

    """
    Download the videos
    Parameters
    ----------
    video_id : str
        A Youtube video id.
    path: str
        The directory which stores videos.
    verbose: bool
        Whether to log the intermediate results.

    Returns
    -------
    True/False
        Successfully downloaded the video or not.
    """

    try:
        # get video url
        video_url = "https://www.youtube.com/watch?v=" + video_id

        try:
            video = pafy.new(video_url)
            # get best video format
            best = video.getbest(preftype="mp4")
            # download video
            best.download(filepath=path + "/" + video_id + "." + best.extension,
                          quiet=False)
            # log
            if verbose == True:
                print("- {id} video downloaded.".format(id=video_id))

            return True
        except Exception as e:
            print("- {exception}".format(exception=e))
            print("- {id} video cannot be downloaded.".format(id=video_id))
            return False
    except Exception as e:
        print('Failed to download video: {}'.format(e))
        return False
使用Pafy包来下载可获得的高分辨率的视频。在下载视频之后,
我们利用FFMPEG从每一个视频中提取音频。
def extract_audio(video_id,videos_dir, audios_dir):
    """
    Download the videos
    Parameters
    ----------
    video_id : str
        A Youtube video id.
    videos_dir: str
        The directory which stores videos.
    audios_dir: str
        The directory which stores audios.

    """

    video_path = f'{videos_dir}/{video_id}.mp4'
    audio_path = f'{audios_dir}/{video_id}.mp3'

    #-i: it is the path to the input file. The second option -f mp3 tells ffmpeg that the ouput is in mp3 format.
    #-ab 192000: we want the output to be encoded at 192Kbps
    #-vn :we dont want video.

    # execute the command
    cmd = f'ffmpeg -i {video_path} -f mp3 -ab 192000 -vn -y {audio_path}'.split(" ")
    subprocess.call(cmd, shell=False)
因为FFMPEG并不支持python SDK,我们需要在shell中调用它。
通过调用subprocess.call()函数,我们可以执行参数中指定的
命令。现在,你已经成功的下载了你指定节目的视频和音频了。
视频切分
然后我们将下载的视频切分成帧并在这些视频上运行OCR。
def video2frames(video_id, video_path, processed_videos_dir, frame_path, sample_rate):
    """
    Execute shell command which calls ffmpeg to split video into frames.
    Parameters
    ----------
    video_id : str
        The video id of a video
    video_path: str
        The directory storing the videos
    processed_video_path: str
        The directory storing videos that have been split.
    sample_rate: int
        The sample rate for splitting the video.

    """

    #concat path and video id
    path_video = video_path + video_id + '.mp4'
    video_duration = get_duration(path_video)

    # split only the main part of the video
    starting_time = 0.2 * video_duration
    split_duration = 0.6 * video_duration

    try:
        #-loglevel panic: slience
        #-hwaccel vdpau: hardware acceleration with GPU
        # -ss starting time
        # -t duration
        cmd = f'ffmpeg -ss {starting_time} -t {split_duration} -i {path_video} -r {sample_rate} {frame_path}/{video_id}-%07d-{sample_rate}.png'.split(" ")
        subprocess.run(cmd)
        shutil.move(path_video, f"{processed_videos_dir}/{video_id}.mp4")
    except Exception as e:
        print(f'Failed to cut videos {video_id}: {e}')
只有中间60%的视频被切分成帧因为前20%和后20%或许包含片头曲和片尾曲,而这两部分不能用于语音识别。
同样的,在shell中使用subprocess来调用FFMPEG。视频切分的参数描述如下:
ss:开始时间(单位为秒)
t: 视频切分的长度(单位为秒)
r: 采样率
采样率越高,预测的字幕越精确。然而,时间和精确度有一个折中。这里设置为2.
训练&评估Mask-RCNN
现在你已经有了每个视频的帧。如果你使用Google视觉 OCR官网API来测试一些图片(文档文本检测,因为字幕是键入的字符),你会发现结果不是那么让人满意,因为这些图片的背景都非常复杂。
这个时候Mask-RCNN可以大显身手了。Mask-RCNN是2017年发布的
物体检测和实例分割的RCNN家族的一部分。它能够在像素级别上进行分类.

Mask-RCNN demo(https://github.com/matterport/Mask_RCNN)
我们的目标变成训练Mask-RCNN来帮助我们识别哪些像素是字幕。
训练
为了确保训练的模型能够泛化到适应各种类型的视频,我从十多部喜剧和动画片下载视频。不同的字体大小、字体类型以及字体垂直位置都被用于丰富训练数据集。图片下部的40%被剪裁以确保手动加载的字幕不会与原始的字幕重合。这也同时确保非字幕部分来自高度相似的颜色空间分布。
def get_multi_masks(img):
    '''
    Get connected components (multi-masks)
    args:
        img: np.ndarray
    return:
        np.ndarray with same dimension as the input
    '''

    # Threshold the image to make it become either 0 or 1
    _, thresh = cv2.threshold(img, 10, 255, cv2.THRESH_BINARY)
    # The skimage label function find the connected component.
    # The pixels of the first component is marked as 1,
    # the pixels of the second one is marked as 2, and so on and so forth.

    return label(thresh)
以上代码使用python PIL库来向图片添加文本。在某些语言中,因为Mask-RCNN将彼此相连的组件看作实例,一个字符由不同的组件组成。例如,‘把’由左右两部分组成。
为了找到相连的部分,我们可以利用skimage库中的label()函数,如下列代码所示。
def get_multi_masks(img):
    '''
    Get connected components (multi-masks)
    args:
        img: np.ndarray
    return:
        np.ndarray with same dimension as the input
    '''

    # Threshold the image to make it become either 0 or 1
    _, thresh = cv2.threshold(img, 10, 255, cv2.THRESH_BINARY)
    # The skimage label function find the connected component.
    # The pixels of the first component is marked as 1,
    # the pixels of the second one is marked as 2, and so on and so forth.

    return label(thresh)
生成的训练数据显示在下列图片中。左边是输入图片,而右边显示的是真值(目标文本)
正如你在右边可以看到的一些字符颜色的差异,单个字符可以由几个部分组成。
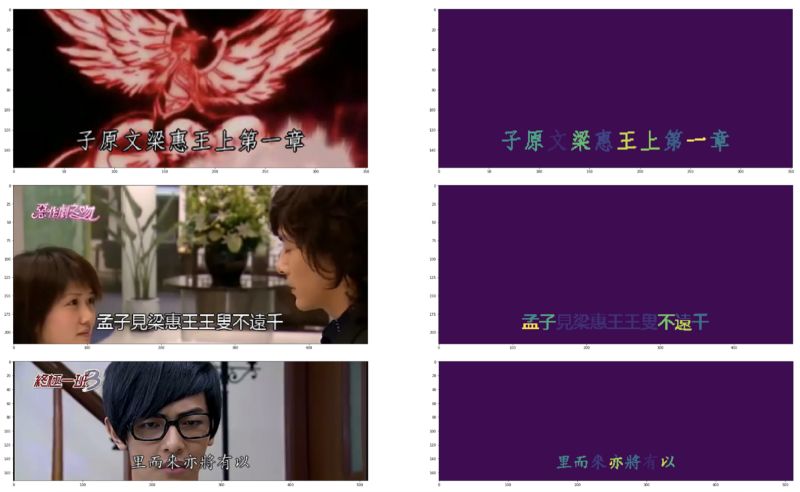
生成的Mask-RCNN训练数据
为了训练Mask-RCNN,我使用了一个巧妙的实现,这个实现用到了keras和tensorflow,参见Github Repo。我们需要做的就是指定我们训练模型的配置,如下所示。
class SubtitleConfig(Config):
    """Configuration for training on the nucleus segmentation dataset."""
    # Give the configuration a recognizable name
    NAME = "subtitle"

    # Adjust depending on your GPU memory
    IMAGES_PER_GPU = 4

    # Number of classes (including background)
    NUM_CLASSES = 1 + 1  # Background + subtitle

    # Number of training and validation steps per epoch
    STEPS_PER_EPOCH = (len(TRAIN_IMAGE_IDS)) // IMAGES_PER_GPU
    VALIDATION_STEPS = max(1, len(VAL_IMAGE_IDS) // IMAGES_PER_GPU)

    # Don't exclude based on confidence. Since we have two classes
    # then 0.5 is the minimum anyway as it picks between nucleus and BG
    DETECTION_MIN_CONFIDENCE = 0

    # Backbone network architecture
    # Supported values are: resnet50, resnet101
    BACKBONE = "resnet101"

    # Input image resizing
    # Random crops of size 512x512
    IMAGE_RESIZE_MODE = "crop"
    IMAGE_MIN_DIM = 512
    IMAGE_MAX_DIM = 512
    IMAGE_MIN_SCALE = 2.0

    # Length of square anchor side in pixels
    RPN_ANCHOR_SCALES = (8, 16, 32, 64, 128)

    # ROIs kept after non-maximum supression (training and inference)
    POST_NMS_ROIS_TRAINING = 1000
    POST_NMS_ROIS_INFERENCE = 2000

    # Non-max suppression threshold to filter RPN proposals.
    # You can increase this during training to generate more propsals.
    RPN_NMS_THRESHOLD = 0.9

    # How many anchors per image to use for RPN training
    RPN_TRAIN_ANCHORS_PER_IMAGE = 64

    # Image mean (RGB)
    MEAN_PIXEL = np.array([43.53, 39.56, 48.22])

    # If enabled, resizes instance masks to a smaller size to reduce
    # memory load. Recommended when using high-resolution images.
    USE_MINI_MASK = False
    MINI_MASK_SHAPE = (56, 56)  # (height, width) of the mini-mask

    # Number of ROIs per image to feed to classifier/mask heads
    # The Mask RCNN paper uses 512 but often the RPN doesn't generate
    # enough positive proposals to fill this and keep a positive:negative
    # ratio of 1:3. You can increase the number of proposals by adjusting
    # the RPN NMS threshold.
    TRAIN_ROIS_PER_IMAGE = 128

    # Maximum number of ground truth instances to use in one image
    MAX_GT_INSTANCES = 30

    # Max number of final detections per image
    DETECTION_MAX_INSTANCES = 50
你只需要设置NUM_CLASSES = 1 + 1(字幕+背景),指定取决于训练数据分辨率的IMAGE_MIN_DIM和IMAGE_MAX_DIM,
为了预处理阶段的标准化,MEAN_PIXEL需要手工计算。然后,你就可以开始加载数据和训练了。
评估
在训练100epoch之后,让我们开始在一些图片上跑训练模型
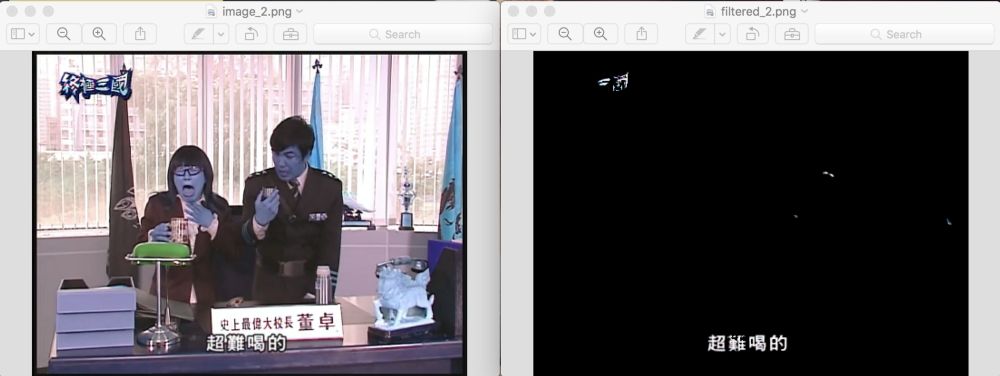
在不同的电视节目上评估结果
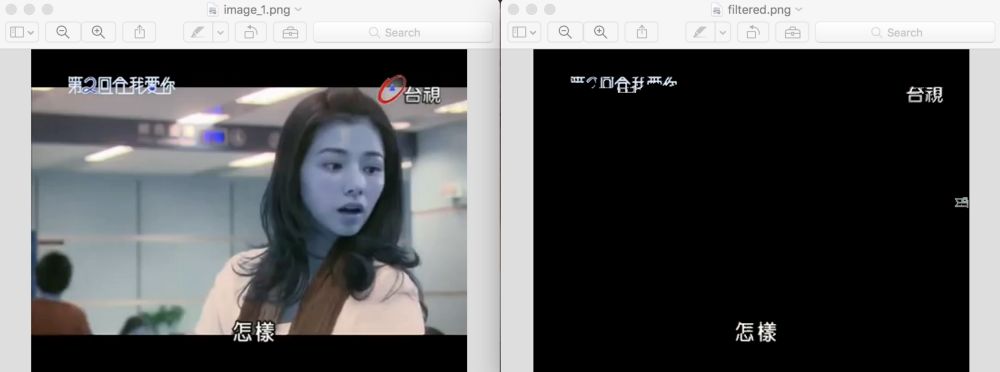
上方左边显示的是输入图片,而右边显示输出结果。你可以看到字幕已经被清楚的识别出来了。
运行OCR时,尽管上方有些噪音然后还是没有对下方的字母预测产生干扰。
主要的问题是有时Mask-RCNN太严格以至于会移除一部分文本。在上面的第二个例子中,第二个字符‘難’被部分擦除掉了,这会削弱OCR的性能。为了弥补这个错误,我决定使用Ensemble(集成)。
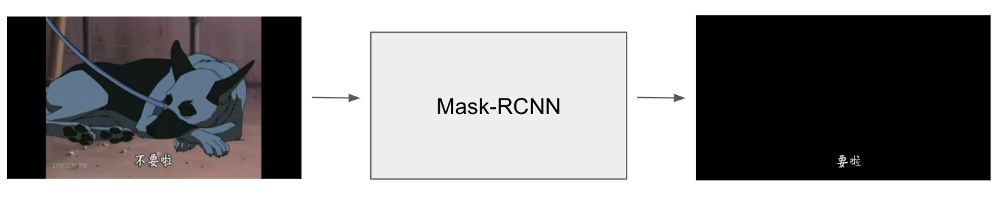
单个模型预测
Ensemble借助多个模型进行预测。并非采用如上图所示的单个模型,我使用不同的配置训练了另外一个模型。图片被输入到这两个模型中,最终的结果将是这两个模型预测的组合。
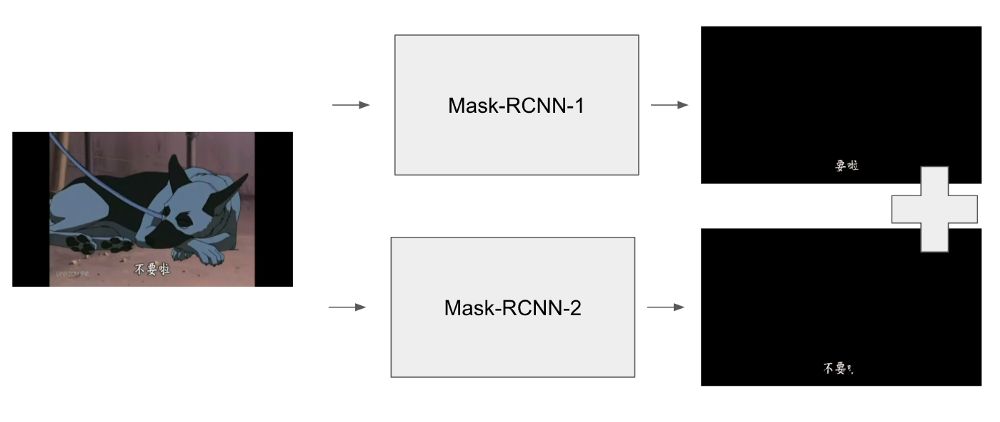
集成预测
Mask-RCNN处理的结果帧展示如下。下方左侧是原始输入图片,右侧是仅用一个模型的输出
上方左侧是集成结果(上方右侧是当前流程中被集成取代的测试时间增强结果)
Mask-RCNN处理的图片。左下:原始图片,右下:单个模型。
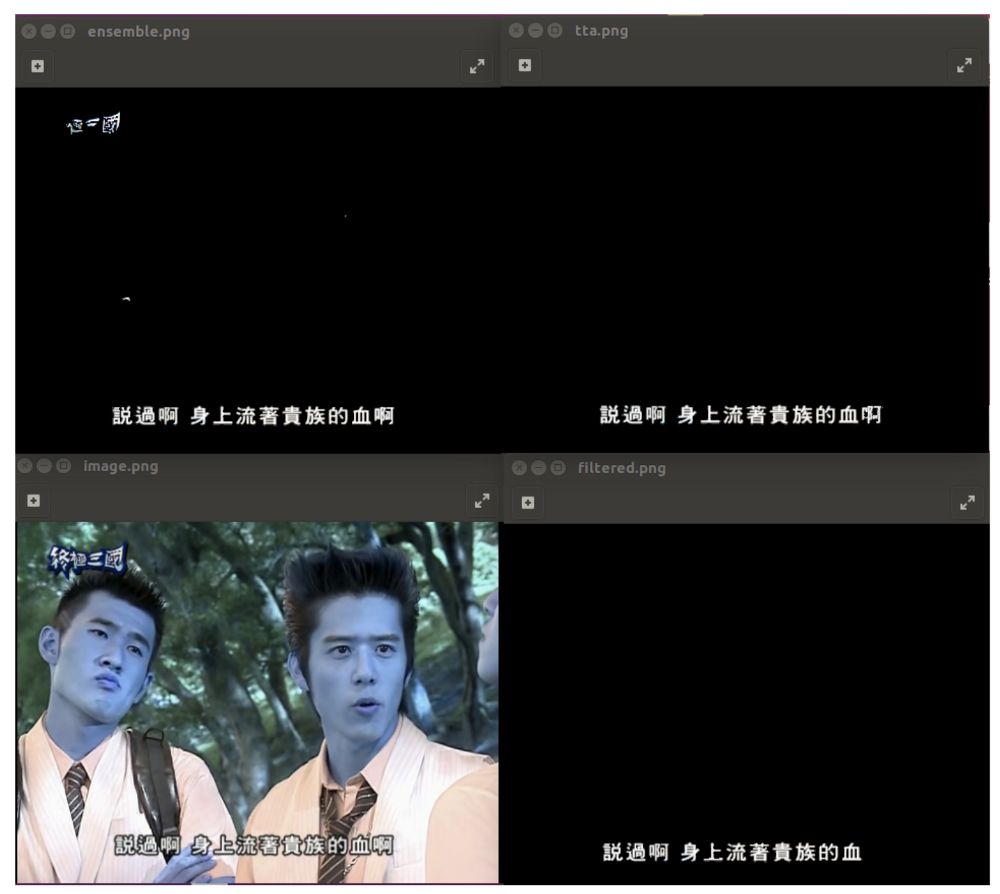
左上:集成;右上:测试时间增强(没有讨论)
运行 OCR
在对图像使用MASK-RCXX模型处理之后,我们就可以对这些有图像进行OCR处理。与Youtube API KEY不同的是,你需要在谷歌云平台上应用Vision API凭证并把它存储到本地磁盘。
# the endpoint of the api
ENDPOINT_URL = 'https://vision.googleapis.com/v1p1beta1/images:annotate'
# the api key
os.environ['GOOGLE_APPLICATION_CREDENTIALS']='your/path/to/credentials.json'
# init api client
client = vision.ImageAnnotatorClient()

with io.open(YOUR_IMAGE_PATH, 'rb') as f:
        content = f.read()
image = vision.types.Image(content=content)
image_context = vision.types.ImageContext(language_hints=['zh-TW'])

response = client.document_text_detection(image=image,image_context=image_context)
上面这段代码是编码你的图像文件,发送到OCR API并接收相应的响应。这些响应包括了字符预测,每个属性的bounding box坐标,以及每个字符的置信度。你可以自己设置一定的阈值来过滤掉置信度较低的属性结果。最后的结果会存储到CSV文件里面,该文件的每一列代表了每帧数据。
df = pd.DataFrame(columns=['id', 'prediction', 'confidence'])
df['id'] = image_ids
df['prediction'] = predictions
df['confidence'] = confidences
df.to_csv(f'{args.results_dir}/{video_id}.csv', index=None)
Generate SRT Final Result
最后,就来到了最后的管道模型!通常情况下,每一段字幕会时许2-3秒,这就意味着有大约4-6个连续的帧数据会包含相同的字幕。我们面临的问题就是如何将不同的帧数据整合成一个,这决定了视频的开始时间,结束时间以及对于语音的字幕显示问题。简单做法就是,我们需要不断检测当前的字幕是否匹配最新的一段字幕。其中一个难点就是有时候两段帧数据是可以有相同的字幕的,但是利用OCR预测就会储量这两段字幕不同的问题。那么你设计的如何来决定这两段字幕是否相同的算法可以解决该问题。
def same_subtitle(current_subtitle, next_subtitle):
    '''Return true if the two given subtitles are the same (but can tolerate a bit difference)'''
    # convert the two subtitle into set e.g. '我很乖' -> {'我','很','乖'}
    current_set = set(current_subtitle)
    next_set = set(next_subtitle)
    current_set_len = len(current_set)
    next_set_len = len(next_set)
    intersect_set = current_set & next_set
    intersect_set_len = len(intersect_set)

    # if any of the two subtitle are of 70% the same with the intersected set return True
    if intersect_set_len >= 0.7 * current_set_len or intersect_set_len >= 0.7 * next_set_len:
        return True
    else:
        return False
上面这段代码是基于启发式的算法。该算法会在以下情况返回true:就是当当前视频帧与上一个视频帧中两段字符串中字符相似率超过70%(不关心字符的顺序)。
总结
如果你正确遵循上述讲的步骤,那么你就已经能够成功编译出自动语音辨认数据集的应用。利用上述方法可以轻易地从基于时间特征的FFMPEG文件中剥离出语音数据,当然这工作会留给你去做。但是这里还存在一个小小的瑕疵(语音与文本会偶尔出现误匹配的情况),这是由于文本出现的时间与有些视频帧的时间不一样(有些时候视频帧会有时间调整的情况)。这个问题可以使用语言模型来解决(针对语音对字幕的时间进行调整)。更多信息与实现细节请参考Github Repo。更多问题请联系huangkh19951228@gmail.com。
想要继续查看该篇文章更多代码、链接和参考文献?
戳链接:
http://www.gair.link/page/TextTranslation/939
AI研习社每日更新精彩内容,点击文末【阅读原文】即可观看更多精彩内容:
利用 Doc2Vec 对 Quora 问题标签聚类
基于 NLTK 和 SpaCy 的命名实体识别功能实现
初学者必须要了解的术语盘点
从 App 描述介绍文字中发掘 Python 文本数据预处理实例
等你来译:
自动文本提取
基于Python的自动文本提取:抽象法和生成法的比较
如何用Anchors来为你的模型可解释性立足
如何用机器学习来处理假新闻