实时单人姿态估计,在自己手机上就能实现 : ) 安卓和iOS都可以哦~
选自GitHub
作者:edvardHua
参与:路
本文介绍了如何使用 TensorFlow 在智能机上(包括安卓和 iOS 设备)执行实时单人姿态估计。
GitHub 地址:https://github.com/edvardHua/PoseEstimationForMobile
该 repo 使用 TensorFlow 实现 CPM 和 Hourglass 模型。这里未使用常规的卷积,而是在模型内部使用了反向卷积(又叫 Mobilenet V2),以便执行实时推断。
注:你可以修改网络架构,来训练更高 PCKh 的模型。架构地址:https://github.com/edvardHua/PoseEstimationForMobile/tree/master/training/src
该库包含:
训练 CPM 和 Hourglass 模型的代码;
安卓 demo 的源代码;
IOS demo 的源代码。
下面的 gif 是在 Mi Mix2s 上截取的(~60 FPS)
你可以下载以下 apk,在自己的设备上进行测试。
PoseEstimation-Mace.apk:https://raw.githubusercontent.com/edvardHua/PoseEstimationForMobile/master/release/PoseEstimation-Mace.apk
PoseEstimation-TFlite.apk:https://raw.githubusercontent.com/edvardHua/PoseEstimationForMobile/master/release/PoseEstimation-TFlite.apk
训练
依赖项
Python3
TensorFlow >= 1.4
Mace
数据集
训练数据集:https://drive.google.com/open?id=1zahjQWhuKIYWRRI2ZlHzn65Ug_jIiC4l
将其解压缩,获取以下文件结构:
# root @ ubuntu in ~/hdd/ai_challenger
$ tree -L 1 ..
├── ai_challenger_train.json
├── ai_challenger_valid.json
├── train
└── valid
该训练数据集仅包含单人图像,数据来源是 AI Challenger 竞赛。共包含 22446 个训练样本和 1500 个测试样本。
该 repo 作者使用 tf-pose-estimation 库中的数据增强代码将标注迁移为 COCO 格式。tf-pose-estimation 库:https://github.com/ildoonet/tf-pose-estimation
超参数
训练步骤中,使用 experiments 文件夹中的 cfg 文件传输超参数。
以下是 mv2_cpm.cfg 文件的内容:
[Train]
model: 'mv2_cpm'
checkpoint: False
datapath: '/root/hdd/ai_challenger'
imgpath: '/root/hdd/'
visible_devices: '0, 1, 2'
multiprocessing_num: 8
max_epoch: 1000
lr: '0.001'
batchsize: 5
decay_rate: 0.95
input_width: 192
input_height: 192
n_kpoints: 14
scale: 2
modelpath: '/root/hdd/trained/mv2_cpm/models'
logpath: '/root/hdd/trained/mv2_cpm/log'
num_train_samples: 20000
per_update_tensorboard_step: 500
per_saved_model_step: 2000
pred_image_on_tensorboard: True
该 cfg 文件覆盖模型的所有参数,在 network_mv2_cpm.py 中仍有一些参数。
使用 nvidia-docker 训练
通过以下命令构建 docker:
cd training/docker
docker build -t single-pose .
或者
docker pull edvardhua/single-pose然后运行以下命令,训练模型:
nvidia-docker run -it -d \
-v <dataset_path>:/data5 -v <training_code_path>/training:/workspace \
-p 6006:6006 -e LOG_PATH=/root/hdd/trained/mv2_cpm/log \
-e PARAMETERS_FILE=experiments/mv2_cpm.cfg edvardhua/single-pose
此外,它还在 port 6006 上创建了 tensorboard。确保安装了 nvidia-docker。
按一般方法训练
1. 安装依赖项:
cd training
pip3 install -r requirements.txt
还需要安装 cocoapi (https://github.com/cocodataset/cocoapi)。
2. 编辑 experiments 文件夹中的参数文件,它包含几乎所有超参数和训练中需要定义的其他配置。之后,传输参数文件,开始训练:
cd training
python3 src/train.py experiments/mv2_cpm.cfg
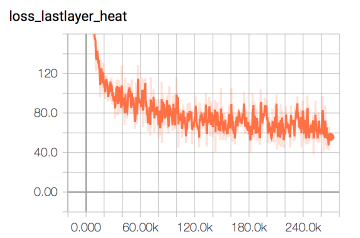
在 3 张英伟达 1080Ti 显卡上经过 12 个小时的训练后,该模型几乎收敛。以下是对应的 tensorboard 图。
基准(PCKh)
运行以下命令,评估 PCKh 值。
python3 src/benchmark.py --frozen_pb_path=hourglass/model-360000.pb \
--anno_json_path=/root/hdd/ai_challenger/ai_challenger_valid.json \
--img_path=/root/hdd \
--output_node_name=hourglass_out_3
预训练模型
CPM:https://github.com/edvardHua/PoseEstimationForMobile/tree/master/release/cpm_model
Hourglass:https://github.com/edvardHua/PoseEstimationForMobile/tree/master/release/hourglass_model
安卓 demo
由于 mace 框架,你可以使用 GPU 在安卓智能机上运行该模型。
按照以下命令将模型转换为 mace 格式:
cd <your-mace-path># You transer hourglass or cpm model by changing `yml` file.
python tools/converter.py convert --config=<PoseEstimationForMobilePath>/release/mace_ymls/cpm.yml
然后根据 mace 文档的说明,将模型集成到安卓设备中。
至于如何调用模型、解析输出,可以参见安卓源代码:https://github.com/edvardHua/PoseEstimationForMobile/tree/master/android_demo。
一些芯片的平均推断时间基准如下所示:
以下是该 repo 作者构建该 demo 的环境:
操作系统:macOS 10.13.6(mace 目前不支持 windows)
Android Studio:3.0.1
NDK 版本:r16
在构建 mace-demo 时,不同环境可能会遇到不同的错误。为避免这种情况,作者建议使用 docker。
docker pull registry.cn-hangzhou.aliyuncs.com/xiaomimace/mace-dev-lite

docker run -it
 --privileged -d --name mace-dev
 --net=host
 -v to/you/path/PoseEstimationForMobile/android_demo/demo_mace:/demo_mace
 registry.cn-hangzhou.aliyuncs.com/xiaomimace/mace-dev-lite

docker run -it --privileged -d --name mace-dev --net=host \
 -v to/you/path/PoseEstimationForMobile/android_demo/demo_mace:/demo_mace \
 registry.cn-hangzhou.aliyuncs.com/xiaomimace/mace-dev-lite
# Enter to docker
docker exec -it mace-dev bash
# Exec command inside the dockercd /demo_mace && ./gradlew build
或者将模型转换为 tflite:
# Convert to frozen pb.cd training
python3 src/gen_frozen_pb.py \
--checkpoint=<you_training_model_path>/model-xxx --output_graph=<you_output_model_path>/model-xxx.pb \
--size=192 --model=mv2_cpm_2
# If you update tensorflow to 1.9, run following command.
python3 src/gen_tflite_coreml.py \
--frozen_pb=forzen_graph.pb \
--input_node_name='image' \
--output_node_name='Convolutional_Pose_Machine/stage_5_out' \
--output_path='./' \
--type=tflite
 # Convert to tflite.# See https://github.com/tensorflow/tensorflow/blob/master/tensorflow/docs_src/mobile/tflite/devguide.md for more information.
bazel-bin/tensorflow/contrib/lite/toco/toco \
--input_file=<you_output_model_path>/model-xxx.pb \
--output_file=<you_output_tflite_model_path>/mv2-cpm.tflite \
--input_format=TENSORFLOW_GRAPHDEF --output_format=TFLITE \
--inference_type=FLOAT \
--input_shape="1,192,192,3" \
--input_array='image' \
--output_array='Convolutional_Pose_Machine/stage_5_out'
然后,将 tflite 文件放在 android_demo/app/src/main/assets 中,修改 ImageClassifierFloatInception.kt 中的参数。
............// parameters need to modify in ImageClassifierFloatInception.kt/**     * Create ImageClassifierFloatInception instance     *     * @param imageSizeX Get the image size along the x axis.     * @param imageSizeY Get the image size along the y axis.     * @param outputW The output width of model     * @param outputH The output height of model     * @param modelPath Get the name of the model file stored in Assets.     * @param numBytesPerChannel Get the number of bytes that is used to store a single     * color channel value.     */
    fun create(
      activity: Activity,
      imageSizeX: Int = 192,
      imageSizeY: Int = 192,
      outputW: Int = 96,
      outputH: Int = 96,
      modelPath: String = "mv2-cpm.tflite",
      numBytesPerChannel: Int = 4
    ): ImageClassifierFloatInception =
      ImageClassifierFloatInception(
          activity,
          imageSizeX,
          imageSizeY,
          outputW,
          outputH,
          modelPath,
          numBytesPerChannel)............
最后,将该项目导入 Android Studio,在智能机设备上运行。
iOS Demo
首先,将模型转换为 CoreML 模型:
# Convert to frozen pb.cd training
python3 src/gen_frozen_pb.py \
--checkpoint=<you_training_model_path>/model-xxx --output_graph=<you_output_model_path>/model-xxx.pb \
--size=192 --model=mv2_cpm_2
# Run the following command to get mlmodel
python3 src/gen_tflite_coreml.py \
--frozen_pb=forzen_graph.pb \
--input_node_name='image' \
--output_node_name='Convolutional_Pose_Machine/stage_5_out' \
--output_path='./' \
--type=coreml
然后,按照 PoseEstimation-CoreML 中的说明来操作(https://github.com/tucan9389/PoseEstimation-CoreML)。
本文为机器之心编译,转载请联系本公众号获得授权。
✄------------------------------------------------
加入机器之心(全职记者 / 实习生):hr@jiqizhixin.com
投稿或寻求报道:content@jiqizhixin.com
广告 & 商务合作:bd@jiqizhixin.com


