教你用OpenCV人脸检测自动给头像戴圣诞帽(附代码)
来源:老王和他的IT界朋友们
作者:流川疯
本文长度为3400字,建议阅读7分钟
跟着代码走,教你自动给头像带上圣诞帽。
原图:
效果:
原理其实很简单:
采用一张圣诞帽的png图像作为素材
利用png图像背景是透明的,贴在背景图片上就是戴帽子的效果了。
人脸检测的目的主要是为了确定贴帽子的位置,类似ps中自由变换的功能,检测到人脸中间的位置(两眼中间),resize圣诞帽子和人脸大小匹配,确定位置,贴上去,ok!
代码:非常简洁,根据参考博客给出的代码,由OpenCV自带的人脸检测代码经过简单修改即可。
// getheader.cpp : 定义控制台应用程序的入口点。
//
#include "stdafx.h"
#include "opencv2/objdetect/objdetect.hpp"
#include "opencv2/highgui/highgui.hpp"
#include "opencv2/imgproc/imgproc.hpp"
#include <iostream>
#include <stdio.h>
using namespace std;
using namespace cv;
#pragma comment(lib,"opencv_core2410d.lib")
#pragma comment(lib,"opencv_highgui2410d.lib")
#pragma comment(lib,"opencv_objdetect2410d.lib")
#pragma comment(lib,"opencv_imgproc2410d.lib")
/** Function Headers */
void detectAndDisplay( Mat frame );
/** Global variables */
//-- Note, either copy these two files from opencv/data/haarscascades to your current folder, or change these locations
String face_cascade_name = "D:\\Program Files\\opencv\\sources\\data\\haarcascades\\haarcascade_frontalface_alt.xml";
String eyes_cascade_name = "D:\\Program Files\\opencv\\sources\\data\\haarcascades\\haarcascade_eye_tree_eyeglasses.xml";
CascadeClassifier face_cascade;
CascadeClassifier eyes_cascade;
string window_name = "Capture - Face detection";
RNG rng(12345);
const int FRAME_WIDTH = 1280;
const int FRAME_HEIGHT = 240;
/**
* @function main
*/
int main( void )
{
CvCapture* capture;
//VideoCapture capture;
Mat frame;
//-- 1. Load the cascades
if( !face_cascade.load( face_cascade_name ) ){ printf("--(!)Error loading\n"); return -1; };
if( !eyes_cascade.load( eyes_cascade_name ) ){ printf("--(!)Error loading\n"); return -1; };
frame = imread("19.jpg");//背景图片
//-- 3. Apply the classifier to the frame
if( !frame.empty() )
{ detectAndDisplay( frame ); }
waitKey(0);
return 0;
}
void mapToMat(const cv::Mat &srcAlpha, cv::Mat &dest, int x, int y)
{
int nc = 3;
int alpha = 0;
for (int j = 0; j < srcAlpha.rows; j++)
{
for (int i = 0; i < srcAlpha.cols*3; i += 3)
{
alpha = srcAlpha.ptr<uchar>(j)[i / 3*4 + 3];
//alpha = 255-alpha;
if(alpha != 0) //4通道图像的alpha判断
{
for (int k = 0; k < 3; k++)
{
// if (src1.ptr<uchar>(j)[i / nc*nc + k] != 0)
if( (j+y < dest.rows) && (j+y>=0) &&
((i+x*3) / 3*3 + k < dest.cols*3) && ((i+x*3) / 3*3 + k >= 0) &&
(i/nc*4 + k < srcAlpha.cols*4) && (i/nc*4 + k >=0) )
{
dest.ptr<uchar>(j+y)[(i+x*nc) / nc*nc + k] = srcAlpha.ptr<uchar>(j)[(i) / nc*4 + k];
}
}
}
}
}
}
/**
* @function detectAndDisplay
*/
void detectAndDisplay( Mat frame )
{
std::vector<Rect> faces;
Mat frame_gray;
Mat hatAlpha;
hatAlpha = imread("2.png",-1);//圣诞帽的图片
cvtColor( frame, frame_gray, COLOR_BGR2GRAY );
equalizeHist( frame_gray, frame_gray );
//-- Detect faces
face_cascade.detectMultiScale( frame_gray, faces, 1.1, 2, 0|CV_HAAR_SCALE_IMAGE, Size(30, 30) );
for( size_t i = 0; i < faces.size(); i++ )
{
Point center( faces[i].x + faces[i].width/2, faces[i].y + faces[i].height/2 );
// ellipse( frame, center, Size( faces[i].width/2, faces[i].height/2), 0, 0, 360, Scalar( 255, 0, 255 ), 2, 8, 0 );
// line(frame,Point(faces[i].x,faces[i].y),center,Scalar(255,0,0),5);
Mat faceROI = frame_gray( faces[i] );
std::vector<Rect> eyes;
//-- In each face, detect eyes
eyes_cascade.detectMultiScale( faceROI, eyes, 1.1, 2, 0 |CV_HAAR_SCALE_IMAGE, Size(30, 30) );
for( size_t j = 0; j < eyes.size(); j++ )
{
Point eye_center( faces[i].x + eyes[j].x + eyes[j].width/2, faces[i].y + eyes[j].y + eyes[j].height/2 );
int radius = cvRound( (eyes[j].width + eyes[j].height)*0.25 );
// circle( frame, eye_center, radius, Scalar( 255, 0, 0 ), 3, 8, 0 );
}
// if(eyes.size())
{
resize(hatAlpha,hatAlpha,Size(faces[i].width, faces[i].height),0,0,INTER_LANCZOS4);
// mapToMat(hatAlpha,frame,center.x+2.5*faces[i].width,center.y-1.3*faces[i].height);
mapToMat(hatAlpha,frame,faces[i].x,faces[i].y-0.8*faces[i].height);
}
}
//-- Show what you got
imshow( window_name, frame );
imwrite("merry christmas.jpg",frame);
}
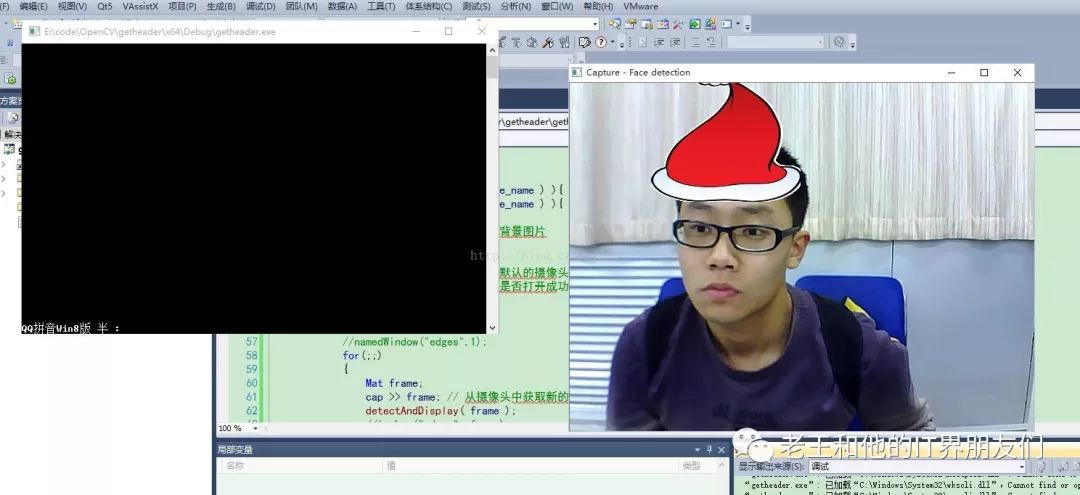
下面是摄像头实时戴帽子,改下主函数就好了:
int main( void )
{
CvCapture* capture;
//VideoCapture capture;
Mat frame;
//-- 1. Load the cascades
if( !face_cascade.load( face_cascade_name ) ){ printf("--(!)Error loading\n"); return -1; };
if( !eyes_cascade.load( eyes_cascade_name ) ){ printf("--(!)Error loading\n"); return -1; };
// frame = imread("19.jpg");//背景图片
VideoCapture cap(0); //打开默认的摄像头号
if(!cap.isOpened()) //检测是否打开成功
return -1;
Mat edges;
//namedWindow("edges",1);
for(;;)
{
Mat frame;
cap >> frame; // 从摄像头中获取新的一帧
detectAndDisplay( frame );
//imshow("edges", frame);
if(waitKey(30) >= 0) break;
}
//摄像头会在VideoCapture的析构函数中释放
waitKey(0);
return 0;
}
我的系统的是win10 64位的系统,之前摄像头出来都是黑的,发现需要用vs2010配置一下x64版本方可使用,查了半天还是自己之前写的博客靠谱:
就是按照win7 x64来配置,完美运行:
http://blog.csdn.net/wangyaninglm/article/details/16325283
效果:
参考文献:
http://blog.csdn.net/lonelyrains/article/details/50388999
http://docs.opencv.org/doc/tutorials/objdetect/cascade_classifier/cascade_classifier.html
我调试好的工程:
http://download.csdn.net/download/wangyaninglm/9389344


