两万字长文详解:如何用C++从零实现神经网络

极市导读
本文通过介绍神经网络基础和分步解释代码详细讲述了如何用C++编写神经网络,并且在最后给出实战手写数字识别的全过程指导。 >>加入极市CV技术交流群,走在计算机视觉的最前沿
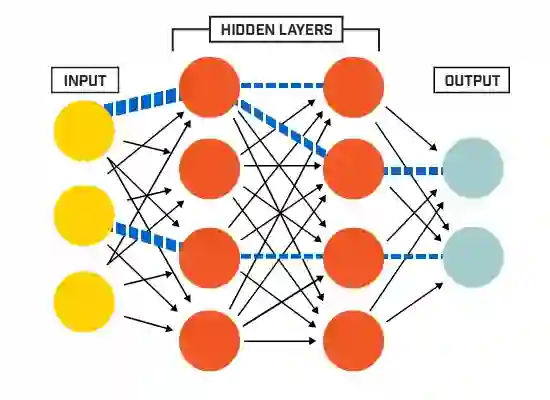
一、Net类的设计与神经网络初始化
-
神经元节点
-
层(layer)
-
权值(weights)
-
偏置项(bias)
Net类的设计
     #ifndef NET\_H


     #define NET\_H


     #endif // NET\_H


     #pragma once


     #include \<iostream>


     #include\<opencv2\\core\\core.hpp>


     #include\<opencv2\\highgui\\highgui.hpp>


     //#include\<iomanip>


     #include"Function.h"


     namespace liu


\{


     class Net
    \{


     public:


     std::


     vector\<


     int\> layer\_neuron\_num;


     std::


     vector\<cv::Mat> layer;


     std::


     vector\<cv::Mat> weights;


     std::


     vector\<cv::Mat> bias;


     public:


        Net\(\) \{\};


        \~Net\(\) \{\};


     //Initialize net:genetate weights matrices、layer matrices and bias matrices


     // bias default all zero


     void initNet\(


     std::


     vector\<


     int\> layer\_neuron\_num\_\);


     //Initialise the weights matrices.


     void initWeights\(


     int type =


     0,


     double a =


     0.,


     double b =


     0.1\);


     //Initialise the bias matrices.


     void initBias\(cv::Scalar\& bias\);


     //Forward


     void forward\(\);


     //Forward


     void backward\(\);


     protected:


     //initialise the weight matrix.if type =0,Gaussian.else uniform.


     void initWeight\(cv::Mat \&dst,


     int type,


     double a,


     double b\);


     //Activation function


        cv::Mat activationFunction\(cv::Mat \&x,


     std::


     string func\_type\);


     //Compute delta error


     void deltaError\(\);


     //Update weights


     void updateWeights\(\);


    \};


\}
成员变量与成员函数
-
每一层神经元数目(layer__neuron__num)
-
层(layer)
-
权值矩阵(weights)
-
偏置项(bias)
-
initNet():用来初始化神经网络
-
initWeights():初始化权值矩阵,调用initWeight()函数
-
initBias():初始化偏置项
-
forward():执行前向运算,包括线性运算和非线性激活,同时计算误差
-
backward():执行反向传播,调用updateWeights()函数更新权值。
神经网络初始化
     //Initialize net


     void Net::initNet(std::vector<int> layer_neuron_num_)
    {


        layer_neuron_num = layer_neuron_num_;


     //Generate every layer.


        layer.resize(layer_neuron_num.size());


     for (


     int i =


     0; i < layer.size(); i++)


        {


            layer[i].create(layer_neuron_num[i],


     1, CV_32FC1);


        }


     std::


     cout <<


     "Generate layers, successfully!" <<


     std::


     endl;


     //Generate every weights matrix and bias


        weights.resize(layer.size() -


     1);


        bias.resize(layer.size() -


     1);


     for (


     int i =


     0; i < (layer.size() -


     1); ++i)


        {


            weights[i].create(layer[i +


     1].rows, layer[i].rows, CV_32FC1);


     //bias[i].create(layer[i + 1].rows, 1, CV_32FC1);


            bias[i] = cv::Mat::zeros(layer[i +


     1].rows,


     1, CV_32FC1);


        }


     std::


     cout <<


     "Generate weights matrices and bias, successfully!" <<


     std::


     endl;


     std::


     cout <<


     "Initialise Net, done!" <<


     std::


     endl;


    }
权值初始化
     //initialise the weights matrix.if type =0,Gaussian.else uniform.


     void Net::initWeight(cv::Mat &dst, int type, double a, double b)
    {


     if (type ==


     0)


        {


            randn(dst, a, b);


        }


     else


        {


            randu(dst, a, b);


        }


    }


     //initialise the weights matrix.


     void Net::initWeights(int type, double a, double b)
    {


     //Initialise weights cv::Matrices and bias


     for (


     int i =


     0; i < weights.size(); ++i)


        {


            initWeight(weights[i],


     0,


     0.,


     0.1);


        }


    }
     //Initialise the bias matrices.


     void Net::initBias(cv::Scalar& bias_)
    {


     for (


     int i =


     0; i < bias.size(); i++)


        {


            bias[i] = bias_;


        }


    }
初始化测试
     #include"../include/Net.h"


     //<opencv2\opencv.hpp>


     using


     namespace


     std;


     using


     namespace cv;


     using


     namespace liu;


     int main(int argc, char *argv[])
{


     //Set neuron number of every layer


     vector<


     int> layer_neuron_num = {


     784,


     100,


     10 };


     // Initialise Net and weights


    Net net;


    net.initNet(layer_neuron_num);


    net.initWeights(


     0,


     0.,


     0.01);


    net.initBias(Scalar(


     0.05));


    getchar();


     return


     0;


}
二、前向传播与反向传播
前言
前向过程
Y = WX+b来表示,其中X是输入样本,这里即是第N层的单列矩阵,W是权值矩阵,Y是加权求和之后的结果矩阵,大小与N+1层的单列矩阵相同。b是偏置,默认初始化全部为0。不难推知,W的大小是
(N+1).rows * N.rows。正如上一篇中生成weights矩阵的代码实现一样:
   weights[i].create(layer[i +


     1].rows, layer[i].rows, CV_32FC1);
O=f(Y)来表示。Y就是上面得到的Y。O就是第N+1层的输出。f就是我们一直说的激活函数。激活函数一般都是非线性函数。它存在的价值就是给神经网络提供非线性建模能力。激活函数的种类有很多,比如sigmoid函数,tanh函数,ReLU函数等。各种函数的优缺点可以参考更为专业的论文和其他更为专业的资料。我们可以先来看一下前向函数forward()的代码:
     //Forward


     void Net::forward()
    {


     for (


     int i =


     0; i < layer_neuron_num.size() -


     1; ++i)


        {


            cv::Mat product = weights[i] * layer[i] + bias[i];


            layer[i +


     1] = activationFunction(product, activation_function);


        }


    }
activationFunction()里面实现了不同种类的激活函数,可以通过第二个参数来选取用哪一种。代码如下:
     //Activation function


    cv::Mat Net::activationFunction\(cv::Mat \&x,


     std::


     string func\_type\)


    \{


        activation\_function = func\_type;


        cv::Mat fx;


     if \(func\_type ==


     "sigmoid"\)


        \{


            fx = sigmoid\(x\);


        \}


     if \(func\_type ==


     "tanh"\)


        \{


            fx =


     tanh\(x\);


        \}


     if \(func\_type ==


     "ReLU"\)


        \{


            fx = ReLU\(x\);


        \}


     return fx;


    \}
Function.h和
Function.cpp文件中。在此略去不表,感兴趣的请君移步Github。
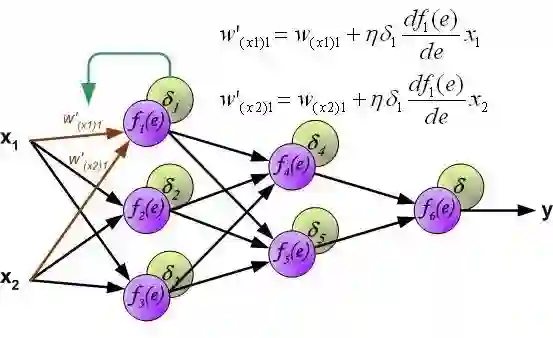
反向传播过程
     //Backward


     void Net::backward()
    {


        calcLoss(layer[layer.size() -


     1], target, output_error, loss);


        deltaError();


        updateWeights();


    }
-
第一个函数
calcLoss()计算输出误差和目标函数,所有输出误差平方和的均值作为需要最小化的目标函数。 -
第二个函数
deltaError()计算delta误差,也就是下图中delta1*df()那部分。 -
第三个函数
updateWeights()更新权值,也就是用下图中的公式更新权值。
     //Update weights


     void Net::updateWeights()
    {


     for (


     int i =


     0; i < weights.size(); ++i)


        {


            cv::Mat delta_weights = learning_rate * (delta_err[i] * layer[i].t());


            weights[i] = weights[i] + delta_weights;


        }


    }
calcLoss()函数在
Function.cpp文件中:
     //Objective function


     void calcLoss(cv::Mat &output, cv::Mat &target, cv::Mat &output_error, float &loss)
    {


     if (target.empty())


        {


     std::


     cout <<


     "Can't find the target cv::Matrix" <<


     std::


     endl;


     return;


        }


        output_error = target - output;


        cv::Mat err_sqrare;


     pow(output_error,


     2., err_sqrare);


        cv::Scalar err_sqr_sum = sum(err_sqrare);


        loss = err_sqr_sum[


     0] / (


     float)(output.rows);


    }
deltaError()在
Net.cpp中:
     //Compute delta error


     void Net::deltaError()
    {


        delta_err.resize(layer.size() -


     1);


     for (


     int i = delta_err.size() -


     1; i >=


     0; i--)


        {


            delta_err[i].create(layer[i +


     1].size(), layer[i +


     1].type());


     //cv::Mat dx = layer[i+1].mul(1 - layer[i+1]);


            cv::Mat dx = derivativeFunction(layer[i +


     1], activation_function);


     //Output layer delta error


     if (i == delta_err.size() -


     1)


            {


                delta_err[i] = dx.mul(output_error);


            }


     else


     //Hidden layer delta error


            {


                cv::Mat weight = weights[i];


                cv::Mat


     weight_t = weights[i].t();


                cv::Mat delta_err_1 = delta_err[i];


                delta_err[i] = dx.mul((weights[i +


     1]).t() * delta_err[i +


     1]);


            }


        }


    }
注意
三、神经网络的训练和测试
前言
完善后的Net类
     class Net
    {


     public:


     //Integer vector specifying the number of neurons in each layer including the input and output layers.


     std::


     vector<


     int> layer_neuron_num;


     std::


     string activation_function =


     "sigmoid";


     double learning_rate;


     double accuracy =


     0.;


     std::


     vector<


     double> loss_vec;


     float fine_tune_factor =


     1.01;


     protected:


     std::


     vector<cv::Mat> layer;


     std::


     vector<cv::Mat> weights;


     std::


     vector<cv::Mat> bias;


     std::


     vector<cv::Mat> delta_err;


        cv::Mat output_error;


        cv::Mat target;


     float loss;


     public:


        Net() {};


        ~Net() {};


     //Initialize net:genetate weights matrices、layer matrices and bias matrices


     // bias default all zero


     void initNet(std::vector<int> layer_neuron_num_);


     //Initialise the weights matrices.


     void initWeights(int type = 0, double a = 0., double b = 0.1);


     //Initialise the bias matrices.


     void initBias(cv::Scalar& bias);


     //Forward


     void forward();


     //Forward


     void backward();


     //Train,use loss_threshold


     void train(cv::Mat input, cv::Mat target_, float loss_threshold, bool draw_loss_curve = false);


     //Test


     void test(cv::Mat &input, cv::Mat &target_);


     //Predict,just one sample


     int predict_one(cv::Mat &input);


     //Predict,more  than one samples


     std::vector<int> predict(cv::Mat &input);


     //Save model;


     void save(std::string filename);


     //Load model;


     void load(std::string filename);


     protected:


     //initialise the weight matrix.if type =0,Gaussian.else uniform.


     void initWeight(cv::Mat &dst, int type, double a, double b);


     //Activation function


     cv::Mat activationFunction(cv::Mat &x, std::string func_type);


     //Compute delta error


     void deltaError();


     //Update weights


     void updateWeights();


    };
训练
-
接受一个样本(即一个单列矩阵)作为输入,也即神经网络的第一层;
-
进行前向传播,也即forward()函数做的事情。然后计算loss;
-
如果loss值小于设定的阈值loss_threshold,则进行反向传播更新阈值;
-
重复以上过程直到loss小于等于设定的阈值。
     //Train,use loss_threshold


     void Net::train(cv::Mat input, cv::Mat target_, float loss_threshold, bool draw_loss_curve)
    {


     if (input.empty())


        {


     std::


     cout <<


     "Input is empty!" <<


     std::


     endl;


     return;


        }


     std::


     cout <<


     "Train,begain!" <<


     std::


     endl;


        cv::Mat sample;


     if (input.rows == (layer[


     0].rows) && input.cols ==


     1)


        {


            target = target_;


            sample = input;


            layer[


     0] = sample;


            forward();


     //backward();


     int num_of_train =


     0;


     while (loss > loss_threshold)


            {


                backward();


                forward();


                num_of_train++;


     if (num_of_train %


     500 ==


     0)


                {


     std::


     cout <<


     "Train " << num_of_train <<


     " times" <<


     std::


     endl;


     std::


     cout <<


     "Loss: " << loss <<


     std::


     endl;


                }


            }


     std::


     cout <<


     std::


     endl <<


     "Train " << num_of_train <<


     " times" <<


     std::


     endl;


     std::


     cout <<


     "Loss: " << loss <<


     std::


     endl;


     std::


     cout <<


     "Train sucessfully!" <<


     std::


     endl;


        }


     else


     if (input.rows == (layer[


     0].rows) && input.cols >


     1)


        {


     double batch_loss = loss_threshold +


     0.01;


     int epoch =


     0;


     while (batch_loss > loss_threshold)


            {


                batch_loss =


     0.;


     for (


     int i =


     0; i < input.cols; ++i)


                {


                    target = target_.col(i);


                    sample = input.col(i);


                    layer[


     0] = sample;


                    farward();


                    backward();


                    batch_loss += loss;


                }


                loss_vec.push_back(batch_loss);


     if (loss_vec.size() >=


     2 && draw_loss_curve)


                {


                    draw_curve(board, loss_vec);


                }


                epoch++;


     if (epoch % output_interval ==


     0)


                {


     std::


     cout <<


     "Number of epoch: " << epoch <<


     std::


     endl;


     std::


     cout <<


     "Loss sum: " << batch_loss <<


     std::


     endl;


                }


     if (epoch %


     100 ==


     0)


                {


                    learning_rate *= fine_tune_factor;


                }


            }


     std::


     cout <<


     std::


     endl <<


     "Number of epoch: " << epoch <<


     std::


     endl;


     std::


     cout <<


     "Loss sum: " << batch_loss <<


     std::


     endl;


     std::


     cout <<


     "Train sucessfully!" <<


     std::


     endl;


        }


     else


        {


     std::


     cout <<


     "Rows of input don't cv::Match the number of input!" <<


     std::


     endl;


        }


    }
测试
-
用一组样本逐个输入神经网络;
-
通过前向传播得到一个输出值;
-
比较实际输出与理想输出,计算正确率。
     //Test


     void Net::test(cv::Mat &input, cv::Mat &target_)
    {


     if (input.empty())


        {


     std::


     cout <<


     "Input is empty!" <<


     std::


     endl;


     return;


        }


     std::


     cout <<


     std::


     endl <<


     "Predict,begain!" <<


     std::


     endl;


     if (input.rows == (layer[


     0].rows) && input.cols ==


     1)


        {


     int predict_number = predict_one(input);


            cv::Point target_maxLoc;


            minMaxLoc(target_,


     NULL,


     NULL,


     NULL, &target_maxLoc, cv::noArray());


     int target_number = target_maxLoc.y;


     std::


     cout <<


     "Predict: " << predict_number <<


     std::


     endl;


     std::


     cout <<


     "Target:  " << target_number <<


     std::


     endl;


     std::


     cout <<


     "Loss: " << loss <<


     std::


     endl;


        }


     else


     if (input.rows == (layer[


     0].rows) && input.cols >


     1)


        {


     double loss_sum =


     0;


     int right_num =


     0;


            cv::Mat sample;


     for (


     int i =


     0; i < input.cols; ++i)


            {


                sample = input.col(i);


     int predict_number = predict_one(sample);


                loss_sum += loss;


                target = target_.col(i);


                cv::Point target_maxLoc;


                minMaxLoc(target,


     NULL,


     NULL,


     NULL, &target_maxLoc, cv::noArray());


     int target_number = target_maxLoc.y;


     std::


     cout <<


     "Test sample: " << i <<


     "   " <<


     "Predict: " << predict_number <<


     std::


     endl;


     std::


     cout <<


     "Test sample: " << i <<


     "   " <<


     "Target:  " << target_number <<


     std::


     endl <<


     std::


     endl;


     if (predict_number == target_number)


                {


                    right_num++;


                }


            }


            accuracy = (


     double)right_num / input.cols;


     std::


     cout <<


     "Loss sum: " << loss_sum <<


     std::


     endl;


     std::


     cout <<


     "accuracy: " << accuracy <<


     std::


     endl;


        }


     else


        {


     std::


     cout <<


     "Rows of input don't cv::Match the number of input!" <<


     std::


     endl;


     return;


        }


    }
四、神经网络的预测和输出输出解析
神经网络的预测
predict()函数和
predict_one()函数的区别相信很容易从名字看出来,那就是输入一个样本得到一个输出和输出一组样本得到一组输出的区别,显然
predict()应该是循环调用
predict_one()实现的。所以我们先看一下
predict_one()的代码:
     int Net::predict_one(cv::Mat &input)
    {


     if (input.empty())


        {


     std::


     cout <<


     "Input is empty!" <<


     std::


     endl;


     return


     -1;


        }


     if (input.rows == (layer[


     0].rows) && input.cols ==


     1)


        {


            layer[


     0] = input;


            forward();


            cv::Mat layer_out = layer[layer.size() -


     1];


            cv::Point predict_maxLoc;


            minMaxLoc(layer_out,


     NULL,


     NULL,


     NULL, &predict_maxLoc, cv::noArray());


     return predict_maxLoc.y;


        }


     else


        {


     std::


     cout <<


     "Please give one sample alone and ensure input.rows = layer[0].rows" <<


     std::


     endl;


     return


     -1;


        }


    }            forward();


            ...


            ...


            minMaxLoc(layer_out,


     NULL,


     NULL,


     NULL, &predict_maxLoc, cv::noArray());            forward();


            ...


            ...


            minMaxLoc(layer_out,


     NULL,


     NULL,


     NULL, &predict_maxLoc, cv::noArray());
               forward();


            ...


            ...


            minMaxLoc(layer_out,


     NULL,


     NULL,


     NULL, &predict_maxLoc, cv::noArray());
输出的组织方式和解析
minMaxLoc()函数来寻找矩阵中最大值的位置。
输入的组织方式和读取方法
float类型保存的,这种数值的矩阵Mat不能直接保存为图片格式,所以这里我选择了把预处理之后的样本矩阵和标签矩阵保存到xml文档中。在源码中可以找到把原始的csv文件转换成xml文件的代码。在
csv2xml.cpp中。而我转换完成的MNIST的部分数据保存在data文件夹中,可以在Github上找到。
     string filename =


     "input_label.xml";


     FileStorage fs(filename, FileStorage::WRITE);


    fs <<


     "input" << input_normalized;


    fs <<


     "target" << target_;


     // Write cv::Mat


    fs.release();
           cv::FileStorage fs;


        fs.open(filename, cv::FileStorage::READ);


        cv::Mat input_, target_;


        fs[


     "input"] >> input_;


        fs[


     "target"] >> target_;


        fs.release();
读取样本和标签
get_input_label()从xml文件中从指定的列开始提取一定数目的样本和标签。默认从第0列开始读取,只是上面函数的简单封装:
     //Get sample_number samples in XML file,from the start column.


     void get_input_label(std::string filename, cv::Mat& input, cv::Mat& label, int sample_num, int start)
    {


        cv::FileStorage fs;


        fs.open(filename, cv::FileStorage::READ);


        cv::Mat input_, target_;


        fs[


     "input"] >> input_;


        fs[


     "target"] >> target_;


        fs.release();


        input = input_(cv::Rect(start,


     0, sample_num, input_.rows));


        label = target_(cv::Rect(start,


     0, sample_num, target_.rows));


    }
五、模型的保存和加载及实时画出输出曲线
模型的保存和加载
-
layer_neuron_num,各层神经元数目,这是生成神经网络需要的唯一参数。 -
weights,神经网络初始化之后需要用训练好的权值矩阵去初始化权值。 -
activation_function,使用神经网络的过程其实就是前向计算的过程,显然需要知道激活函数是什么。 -
learning_rate,如果要在现有模型的基础上继续训练以得到更好的模型,更新权值的时候需要用到这个函数。
xml格式,上一篇已经提到了保存和加载
xml是多么的方便:
     //Save model;


     void Net::save(std::string filename)
    {


     cv::FileStorage model(filename, cv::FileStorage::WRITE);


        model <<


     "layer_neuron_num" << layer_neuron_num;


        model <<


     "learning_rate" << learning_rate;


        model <<


     "activation_function" << activation_function;


     for (


     int i =


     0; i < weights.size(); i++)


        {


     std::


     string weight_name =


     "weight_" +


     std::to_string(i);


            model << weight_name << weights[i];


        }


        model.release();


    }


     //Load model;


     void Net::load(std::string filename)
    {


        cv::FileStorage fs;


        fs.open(filename, cv::FileStorage::READ);


        cv::Mat input_, target_;


        fs[


     "layer_neuron_num"] >> layer_neuron_num;


        initNet(layer_neuron_num);


     for (


     int i =


     0; i < weights.size(); i++)


        {


     std::


     string weight_name =


     "weight_" +


     std::to_string(i);


            fs[weight_name] >> weights[i];


        }


        fs[


     "learning_rate"] >> learning_rate;


        fs[


     "activation_function"] >> activation_function;


        fs.release();


    }
实时画出输出曲线
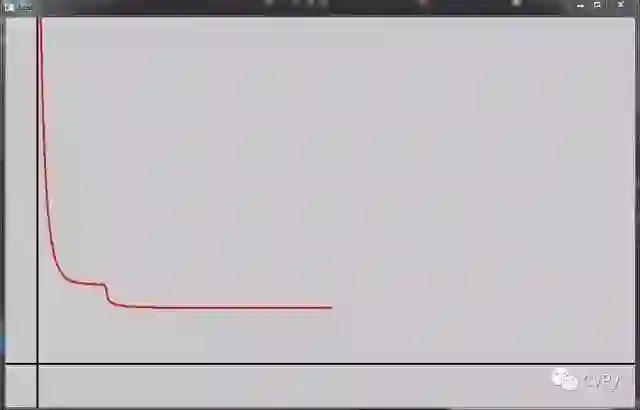
     //Draw loss curve


     void draw_curve(cv::Mat& board, std::vector<double> points)
    {


     cv::Mat board_(620, 1000, CV_8UC3, cv::Scalar::all(200));


        board = board_;


        cv::line(board, cv::Point(


     0,


     550), cv::Point(


     1000,


     550), cv::Scalar(


     0,


     0,


     0),


     2);


        cv::line(board, cv::Point(


     50,


     0), cv::Point(


     50,


     1000), cv::Scalar(


     0,


     0,


     0),


     2);


     for (


     size_t i =


     0; i < points.size() -


     1; i++)


        {


     cv::Point pt1(50 + i * 2, (int)(548 - points[i]));


     cv::Point pt2(50 + i * 2 + 1, (int)(548 - points[i + 1]));


            cv::line(board, pt1, pt2, cv::Scalar(


     0,


     0,


     255),


     2);


     if (i >=


     1000)


            {


     return;


            }


        }


        cv::imshow(


     "Loss", board);


        cv::waitKey(


     10);


    }
六、实战手写数字识别
数据准备
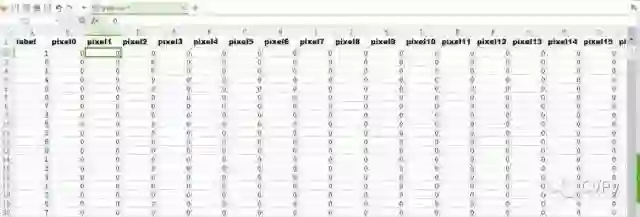
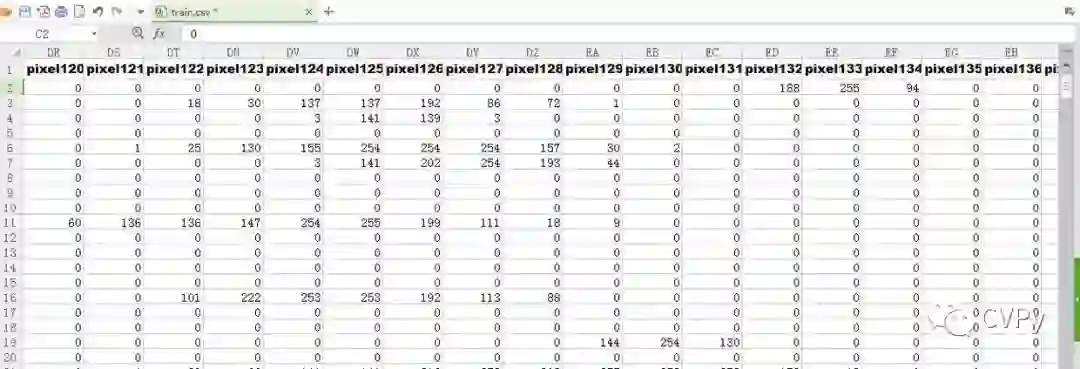
既然说到了输出的组织方式,那就顺便也提一句输入的组织方式。生成神经网络的时候,每一层都是用一个单列矩阵来表示的。显然第一层输入层就是一个单列矩阵。所以在对数据进行预处理的过程中,我就是把输入样本和标签一列一列地排列起来,作为矩阵存储。标签矩阵的第一列即是第一列样本的标签。以此类推。把输出层设置为一个单列十行的矩阵,标签是几就把第几行的元素设置为1,其余都设为0。由于编程中一般都是从0开始作为第一位的,所以位置与0-9的数字正好一一对应。我们到时候只需要找到输出最大值所在的位置,也就知道了输出是几。”
csv2xml.cpp中:
     #include<opencv2\opencv.hpp>


     #include<iostream>


     using


     namespace


     std;


     using


     namespace cv;


     //int csv2xml()


     int main()
{


    CvMLData mlData;


    mlData.read_csv(


     "train.csv");


     //读取csv文件


    Mat data = cv::Mat(mlData.get_values(),


     true);


     cout <<


     "Data have been read successfully!" <<


     endl;


     //Mat double_data;


     //data.convertTo(double_data, CV_64F);


    Mat input_ = data(Rect(


     1,


     1,


     784, data.rows -


     1)).t();


    Mat label_ = data(Rect(


     0,


     1,


     1, data.rows -


     1));


     Mat target_(10, input_.cols, CV_32F, Scalar::all(0.));


     Mat digit(28, 28, CV_32FC1);


    Mat col_0 = input_.col(


     3);


     float label0 = label_.at<


     float>(


     3,


     0);


     cout << label0;


     for (


     int i =


     0; i <


     28; i++)


    {


     for (


     int j =


     0; j <


     28; j++)


        {


            digit.at<


     float>(i, j) = col_0.at<


     float>(i *


     28 + j);


        }


    }


     for (


     int i =


     0; i < label_.rows; ++i)


    {


     float label_num = label_.at<


     float>(i,


     0);


     //target_.at<float>(label_num, i) = 1.;


        target_.at<


     float>(label_num, i) = label_num;


    }


     Mat input_normalized(input_.size(), input_.type());


     for (


     int i =


     0; i < input_.rows; ++i)


    {


     for (


     int j =


     0; j < input_.cols; ++j)


        {


     //if (input_.at<double>(i, j) >= 1.)


     //{


            input_normalized.at<


     float>(i, j) = input_.at<


     float>(i, j) /


     255.;


     //}


        }


    }


     string filename =


     "input_label_0-9.xml";


     FileStorage fs(filename, FileStorage::WRITE);


    fs <<


     "input" << input_normalized;


    fs <<


     "target" << target_;


     // Write cv::Mat


    fs.release();


    Mat input_1000 = input_normalized(Rect(


     0,


     0,


     10000, input_normalized.rows));


    Mat target_1000 = target_(Rect(


     0,


     0,


     10000, target_.rows));


     string filename2 =


     "input_label_0-9_10000.xml";


     FileStorage fs2(filename2, FileStorage::WRITE);


    fs2 <<


     "input" << input_1000;


    fs2 <<


     "target" << target_1000;


     // Write cv::Mat


    fs2.release();


     return


     0;


}
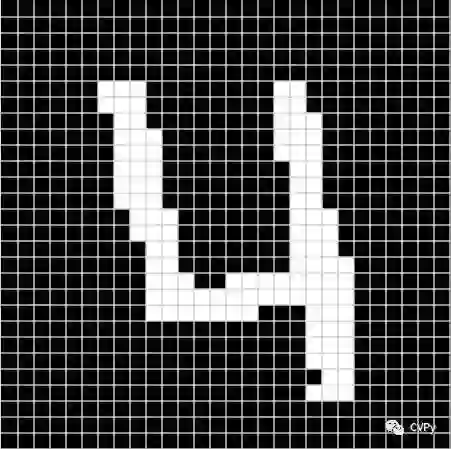
Mat digit的作用是,检验下转换后的矩阵和标签是否对应正确这里是把col(3),也就是第四个样本从一行重新变成28x28的图像,看上面的第一张图的第一列可以看到,第四个样本的标签是4。那么它转换回来的图像时什么样呢?是下面这样:
实战数字识别
-
给定每层的神经元数目,初始化神经网络和权值矩阵
-
从input_label_1000.xml文件中取前800个样本作为训练样本,后200作为测试样本。
-
这是神经网络的一些参数:训练时候的终止条件,学习率,激活函数类型
-
前800样本训练神经网络,直到满足loss小于阈值loss_threshold,停止。
-
后200样本测试神经网络,输出正确率。
-
保存训练得到的模型。
#include"../include/Net.h"
//<opencv2\opencv.hpp>
using
namespace
std;
using
namespace cv;
using
namespace liu;
int main(int argc, char *argv[])
{
//Set neuron number of every layer
vector<
int> layer_neuron_num = {
784,
100,
10 };
// Initialise Net and weights
Net net;
net.initNet(layer_neuron_num);
net.initWeights(
0,
0.,
0.01);
net.initBias(Scalar(
0.5));
//Get test samples and test samples
Mat input, label, test_input, test_label;
int sample_number =
800;
get_input_label(
"data/input_label_1000.xml", input, label, sample_number);
get_input_label(
"data/input_label_1000.xml", test_input, test_label,
200,
800);
//Set loss threshold,learning rate and activation function
float loss_threshold =
0.5;
net.learning_rate =
0.3;
net.output_interval =
2;
net.activation_function =
"sigmoid";
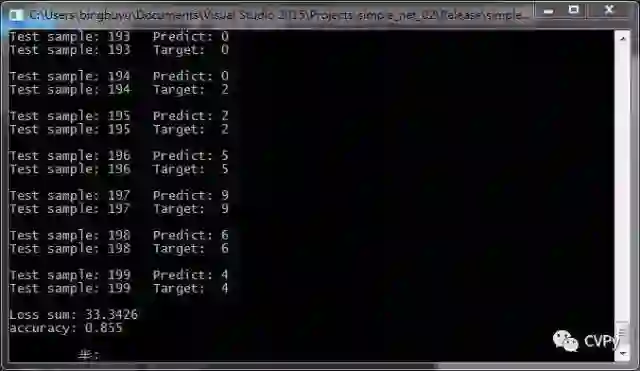
//Train,and draw the loss curve(cause the last parameter is ture) and test the trained net
net.train(input, label, loss_threshold,
true);
net.test(test_input, test_label);
//Save the model
net.save(
"models/model_sigmoid_800_200.xml");
getchar();
return
0;
}
     //Get test samples and the label is 0--1


    Mat test_input, test_label;


     int sample_number =


     200;


     int start_position =


     800;


    get_input_label(


     "data/input_label_1000.xml", test_input, test_label, sample_number, start_position);


     //Load the trained net and test.


    Net net;


    net.load(


     "models/model_sigmoid_800_200.xml");


    net.test(test_input, test_label);


    getchar();


     return


     0;
     //Set loss threshold,learning rate and activation function


     float loss_threshold =


     0.2;


    net.learning_rate =


     0.02;


    net.output_interval =


     2;


    net.activation_function =


     "tanh";


     //convert label from 0---1 to -1---1,cause tanh function range is [-1,1]


    label =


     2 * label -


     1;


    test_label =


     2 * test_label -


     1;

完整的代码可以在Github上找到,源码链接如下:
公众号后台回复“ECCV2022”获取论文分类资源下载~

“
点击阅读原文进入CV社区
收获更多技术干货