【推荐】用Python/OpenCV实现增强现实
转自:爱可可-爱生活
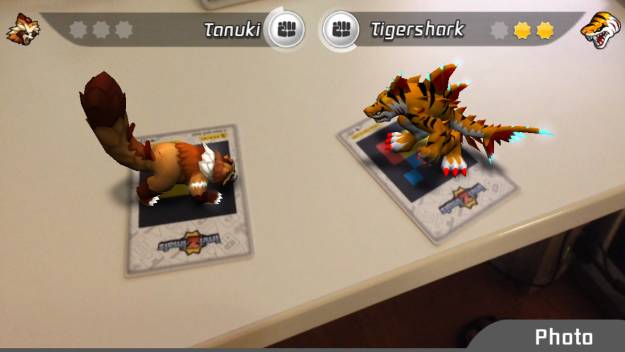
You may (or may not) have heard of or seen the augmented reality Invizimals video game or theTopps 3D baseball cards. The main idea is to render in the screen of a tablet, PC or smartphone a 3D model of a specific figure on top of a card according to the position and orientation of the card.
Figure 1: Invizimal augmented reality cards. Source:
Well, this past semester I took a course in Computer Vision where we studied some aspects of projective geometry and thought it would be an entertaining project to develop my own implementation of a card based augmented reality application. I warn you that we will need a bit of algebra to make it work but I’ll try to keep it as light as possible. To make the most out of it you should be comfortable working with different coordinate systems and transformation matrices.
First, this post does not pretend to be a tutorial, a comprehensive guide or an explanation of the Computer Vision techniques involved and I will just mention the essentials required to follow the post. However, I encourage you to dig deeper in the concepts that will appear along the way.
Secondly, do not expect some professional looking results. I did this just for fun and there are plenty of decisions I made that could have been done better. The main idea is to develop a proof of concept application.
With that said, here it goes my take on it.
Where do we start?
Looking at the project as a whole may make it seem more difficult than it really is. Luckily for us, we will be able to divide it into smaller parts that, when combined one on top of another, will allow us to have our augmented reality application working. The question now is, which are these smaller chunks that we need?
Let’s take a closer look into what we want to achieve. As stated before, we want to project in a screen a 3D model of a figure whose position and orientation matches the position and orientation of some predefined flat surface. Furthermore, we want to do it in real time, so that if the surface changes its position or orientation the projected model does so accordingly.
To achieve this we first have to be able to identify the flat surface of reference in an image or video frame. Once identified, we can easily determine the transformation from the reference surface image (2D) to the target image (2D). This transformation is called homography. However, if what we want is to project a 3D model placed on top of the reference surface to the target image we need to extend the previous transformation to handle cases were the height of the point to project in the reference surface coordinate system is different than zero. This can be achieved with a bit of algebra. Finally, we should apply this transformation to our 3D model and draw it on the screen. Bearing the previous points in mind our project can be divided into:
1. Recognize the reference flat surface.
2. Estimate the homography.
3. Derive from the homography the transformation from the reference surface coordinate system to the target image coordinate system.
4. Project our 3D model in the image (pixel space) and draw it.
链接:
https://bitesofcode.wordpress.com/2017/09/12/augmented-reality-with-python-and-opencv-part-1/
原文链接:
https://m.weibo.cn/status/4174455095988780


