TensorFlow实例: 手写汉字识别
向AI转型的程序员都关注了这个号👇👇👇
大数据挖掘DT数据分析 公众号: datadw
本文github源码地址:
在公众号 datadw 里 回复 汉字识别 即可获取。
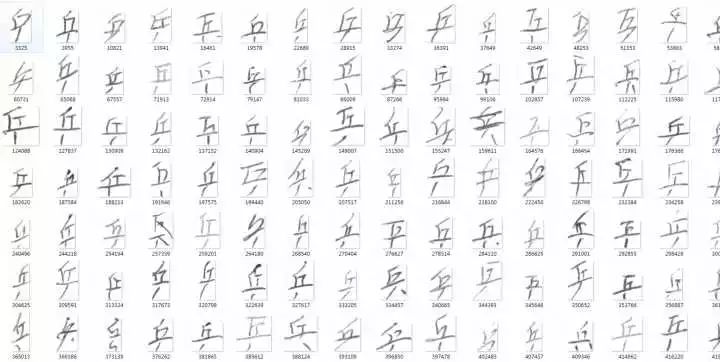
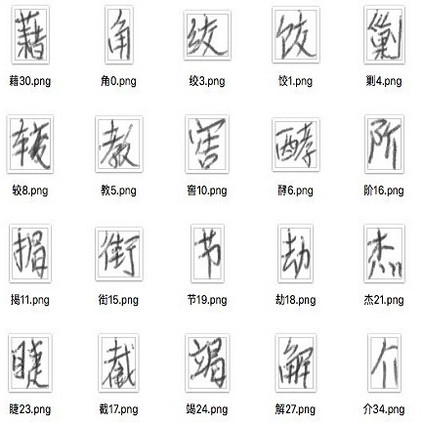
MNIST手写数字数据集通常做为深度学习的练习数据集,这个数据集恐怕早已经被大家玩坏了。识别手写汉字要把识别英文、数字难上很多。首先,英文字符的分类少,总共10+26*2;而中文总共50,000多汉字,常用的就有3000多。其次,汉字有书法,每个人书写风格多样。
本文目标是利用TensorFlow做一个简单的图像分类器,在比较大的数据集上,尽可能高效地做图像相关处理,从Train,Validation到Inference,是一个比较基本的Example, 从一个基本的任务学习如果在TensorFlow下做高效地图像读取,基本的图像处理,整个项目很简单,但其中有一些trick,在实际项目当中有很大的好处, 比如绝对不要一次读入所有的 的数据到内存(尽管在Mnist这类级别的例子上经常出现)…
最开始看到是这篇blog里面的TensorFlow练习22: 手写汉字识别,
http://link.zhihu.com/?target=http%3A//blog.topspeedsnail.com/archives/10897
但是这篇文章只用了140训练与测试,试了下代码 很快,但是当扩展到所有的时,发现32g的内存都不够用,这才注意到原文中都是用numpy,会先把所有的数据放入到内存,但这个不必须的,无论在MXNet还是TensorFlow中都是不必 须的,MXNet使用的是DataIter,会在程序运行的过程中异步读取数据,TensorFlow也是这样的,TensorFlow封装了高级的api,用来做数据的读取,比如TFRecord,还有就是从filenames中读取, 来异步读取文件,然后做shuffle batch,再feed到模型的Graph中来做模型参数的更新。具体在tf如何做数据的读取可以看看reading data in tensorflow
http://link.zhihu.com/?target=https%3A//www.tensorflow.org/how_tos/reading_data/
我会拿到所有的数据集来做训练与测试,算作是对斗大的熊猫上面那篇文章的一个扩展。
Batch Generate
数据集来自于中科院自动化研究所,感谢分享精神!!!具体下载:
wget http://www.nlpr.ia.ac.cn/databases/download/feature_data/HWDB1.1trn_gnt.zip

wget http://www.nlpr.ia.ac.cn/databases/download/feature_data/HWDB1.1tst_gnt.zip
解压后发现是一些gnt文件,然后用了斗大的熊猫里面的代码,将所有文件都转化为对应label目录下的所有png的图片。(注意在HWDB1.1trn_gnt.zip解压后是alz文件,需要再次解压 我在mac没有找到合适的工具,windows上有alz的解压工具)。
import os
import numpy as np
import struct
from PIL import Image
data_dir = '../data'
train_data_dir = os.path.join(data_dir, 'HWDB1.1trn_gnt')
test_data_dir = os.path.join(data_dir, 'HWDB1.1tst_gnt')
def read_from_gnt_dir(gnt_dir=train_data_dir):
def one_file(f):
header_size = 10
while True:
header = np.fromfile(f, dtype='uint8', count=header_size)
if not header.size: break
sample_size = header[0] + (header[1]<<8) + (header[2]<<16) + (header[3]<<24)
tagcode = header[5] + (header[4]<<8)
width = header[6] + (header[7]<<8)
height = header[8] + (header[9]<<8)
if header_size + width*height != sample_size:
break
image = np.fromfile(f, dtype='uint8', count=width*height).reshape((height, width))
yield image, tagcode
for file_name in os.listdir(gnt_dir):
if file_name.endswith('.gnt'):
file_path = os.path.join(gnt_dir, file_name)
with open(file_path, 'rb') as f:
for image, tagcode in one_file(f):
yield image, tagcode
char_set = set()
for _, tagcode in read_from_gnt_dir(gnt_dir=train_data_dir):
tagcode_unicode = struct.pack('>H', tagcode).decode('gb2312')
char_set.add(tagcode_unicode)
char_list = list(char_set)
char_dict = dict(zip(sorted(char_list), range(len(char_list))))
print len(char_dict)
import pickle
f = open('char_dict', 'wb')
pickle.dump(char_dict, f)
f.close()
train_counter = 0
test_counter = 0
for image, tagcode in read_from_gnt_dir(gnt_dir=train_data_dir):
tagcode_unicode = struct.pack('>H', tagcode).decode('gb2312')
im = Image.fromarray(image)
dir_name = '../data/train/' + '%0.5d'%char_dict[tagcode_unicode]
if not os.path.exists(dir_name):
os.mkdir(dir_name)
im.convert('RGB').save(dir_name+'/' + str(train_counter) + '.png')
train_counter += 1
for image, tagcode in read_from_gnt_dir(gnt_dir=test_data_dir):
tagcode_unicode = struct.pack('>H', tagcode).decode('gb2312')
im = Image.fromarray(image)
dir_name = '../data/test/' + '%0.5d'%char_dict[tagcode_unicode]
if not os.path.exists(dir_name):
os.mkdir(dir_name)
im.convert('RGB').save(dir_name+'/' + str(test_counter) + '.png')
test_counter += 1
处理好的数据,放到了云盘,大家可以直接在我的云盘来下载处理好的数据集HWDB1. 这里说明下,char_dict是汉字和对应的数字label的记录。
http://link.zhihu.com/?target=https%3A//pan.baidu.com/s/1o84jIrg
得到数据集后,就要考虑如何读取了,一次用numpy读入内存在很多小数据集上是可以行的,但是在稍微大点的数据集上内存就成了瓶颈,但是不要害怕,TensorFlow有自己的方法:
def batch_data(file_labels,sess, batch_size=128):
image_list = [file_label[0] for file_label in file_labels]
label_list = [int(file_label[1]) for file_label in file_labels]
print 'tag2 {0}'.format(len(image_list))
images_tensor = tf.convert_to_tensor(image_list, dtype=tf.string)
labels_tensor = tf.convert_to_tensor(label_list, dtype=tf.int64)
input_queue = tf.train.slice_input_producer([images_tensor, labels_tensor])
labels = input_queue[1]
images_content = tf.read_file(input_queue[0])
# images = tf.image.decode_png(images_content, channels=1)
images = tf.image.convert_image_dtype(tf.image.decode_png(images_content, channels=1), tf.float32)
# images = images / 256
images = pre_process(images)
# print images.get_shape()
# one hot
labels = tf.one_hot(labels, 3755)
image_batch, label_batch = tf.train.shuffle_batch([images, labels], batch_size=batch_size, capacity=50000,min_after_dequeue=10000)
# print 'image_batch', image_batch.get_shape()
coord = tf.train.Coordinator()
threads = tf.train.start_queue_runners(sess=sess, coord=coord)
return image_batch, label_batch, coord, threads
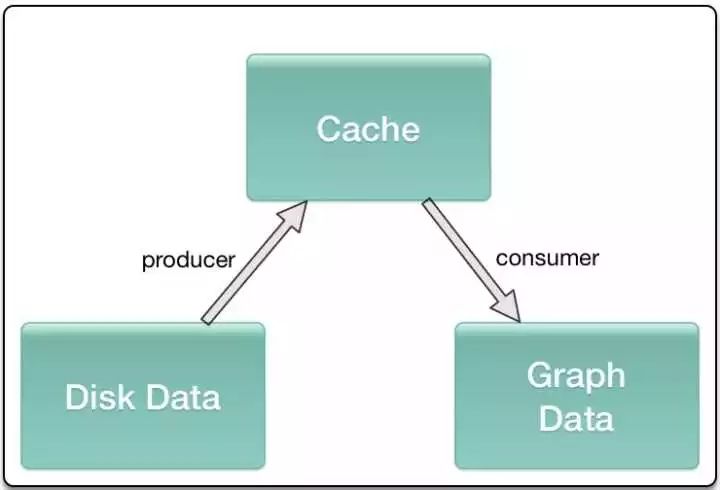
简单介绍下,首先你需要得到所有的图像的path和对应的label的列表,利用tf.convert_to_tensor转换为对应的tensor, 利用tf.train.slice_input_producer将image_list ,label_list做一个slice处理,然后做图像的读取、预处理,以及label的one_hot表示,然后就是传到tf.train.shuffle_batch产生一个个shuffle batch,这些就可以feed到你的 模型。 slice_input_producer和shuffle_batch这类操作内部都是基于queue,是一种异步的处理方式,会在设备中开辟一段空间用作cache,不同的进程会分别一直往cache中塞数据 和取数据,保证内存或显存的占用以及每一个mini-batch不需要等待,直接可以从cache中获取。
Data Augmentation
由于图像场景不复杂,只是做了一些基本的处理,包括图像翻转,改变下亮度等等,这些在TensorFlow里面有现成的api,所以尽量使用TensorFlow来做相关的处理:
def pre_process(images):
if FLAGS.random_flip_up_down:
images = tf.image.random_flip_up_down(images)
if FLAGS.random_flip_left_right:
images = tf.image.random_flip_left_right(images)
if FLAGS.random_brightness:
images = tf.image.random_brightness(images, max_delta=0.3)
if FLAGS.random_contrast:
images = tf.image.random_contrast(images, 0.8, 1.2)
new_size = tf.constant([FLAGS.image_size,FLAGS.image_size], dtype=tf.int32)
images = tf.image.resize_images(images, new_size)
return images
Build Graph
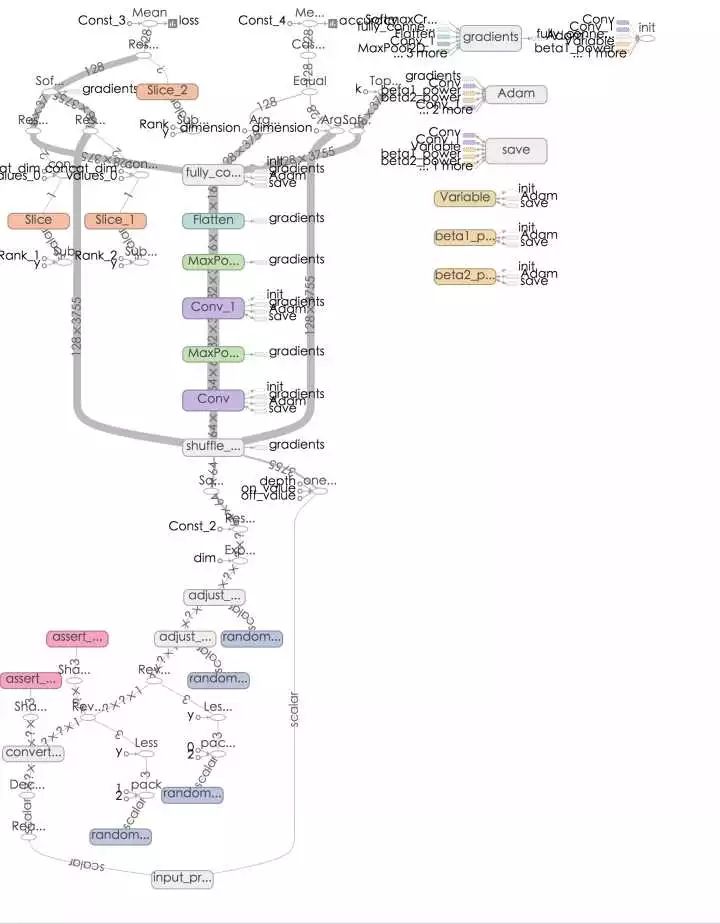
这里很简单的构造了一个两个卷积+一个全连接层的网络,没有做什么更深的设计,感觉意义不大,设计了一个dict,用来返回后面要用的所有op,还有就是为了方便再训练中查看loss和accuracy, 没有什么特别的,很容易理解, labels 为None时 方便做inference。
def network(images, labels=None):
endpoints = {}
conv_1 = slim.conv2d(images, 32, [3,3],1, padding='SAME')
max_pool_1 = slim.max_pool2d(conv_1, [2,2],[2,2], padding='SAME')
conv_2 = slim.conv2d(max_pool_1, 64, [3,3],padding='SAME')
max_pool_2 = slim.max_pool2d(conv_2, [2,2],[2,2], padding='SAME')
flatten = slim.flatten(max_pool_2)
out = slim.fully_connected(flatten,3755, activation_fn=None)
global_step = tf.Variable(initial_value=0)
if labels is not None:
loss = tf.reduce_mean(tf.nn.softmax_cross_entropy_with_logits(out, labels))
train_op = tf.train.AdamOptimizer(learning_rate=0.0001).minimize(loss, global_step=global_step)
accuracy = tf.reduce_mean(tf.cast(tf.equal(tf.argmax(out, 1), tf.argmax(labels, 1)), tf.float32))
tf.summary.scalar('loss', loss)
tf.summary.scalar('accuracy', accuracy)
merged_summary_op = tf.summary.merge_all()
output_score = tf.nn.softmax(out)
predict_val_top3, predict_index_top3 = tf.nn.top_k(output_score, k=3)
endpoints['global_step'] = global_step
if labels is not None:
endpoints['labels'] = labels
endpoints['train_op'] = train_op
endpoints['loss'] = loss
endpoints['accuracy'] = accuracy
endpoints['merged_summary_op'] = merged_summary_op
endpoints['output_score'] = output_score
endpoints['predict_val_top3'] = predict_val_top3
endpoints['predict_index_top3'] = predict_index_top3
return endpoints
Train
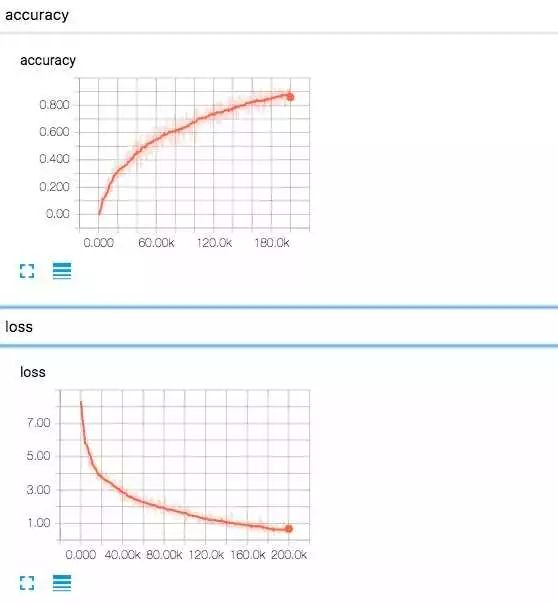
train函数包括从已有checkpoint中restore,得到step,快速恢复训练过程,训练主要是每一次得到mini-batch,更新参数,每隔eval_steps后做一次train batch的eval,每隔save_steps 后保存一次checkpoint。
def train():
sess = tf.Session()
file_labels = get_imagesfile(FLAGS.train_data_dir)
images, labels, coord, threads = batch_data(file_labels, sess)
endpoints = network(images, labels)
saver = tf.train.Saver()
sess.run(tf.global_variables_initializer())
train_writer = tf.train.SummaryWriter('./log' + '/train',sess.graph)
test_writer = tf.train.SummaryWriter('./log' + '/val')
start_step = 0
if FLAGS.restore:
ckpt = tf.train.latest_checkpoint(FLAGS.checkpoint_dir)
if ckpt:
saver.restore(sess, ckpt)
print "restore from the checkpoint {0}".format(ckpt)
start_step += int(ckpt.split('-')[-1])
logger.info(':::Training Start:::')
try:
while not coord.should_stop():
# logger.info('step {0} start'.format(i))
start_time = time.time()
_, loss_val, train_summary, step = sess.run([endpoints['train_op'], endpoints['loss'], endpoints['merged_summary_op'], endpoints['global_step']])
train_writer.add_summary(train_summary, step)
end_time = time.time()
logger.info("the step {0} takes {1} loss {2}".format(step, end_time-start_time, loss_val))
if step > FLAGS.max_steps:
break
# logger.info("the step {0} takes {1} loss {2}".format(i, end_time-start_time, loss_val))
if step % FLAGS.eval_steps == 1:
accuracy_val,test_summary, step = sess.run([endpoints['accuracy'], endpoints['merged_summary_op'], endpoints['global_step']])
test_writer.add_summary(test_summary, step)
logger.info('===============Eval a batch in Train data=======================')
logger.info( 'the step {0} accuracy {1}'.format(step, accuracy_val))
logger.info('===============Eval a batch in Train data=======================')
if step % FLAGS.save_steps == 1:
logger.info('Save the ckpt of {0}'.format(step))
saver.save(sess, os.path.join(FLAGS.checkpoint_dir, 'my-model'), global_step=endpoints['global_step'])
except tf.errors.OutOfRangeError:
# print "============train finished========="
logger.info('==================Train Finished================')
saver.save(sess, os.path.join(FLAGS.checkpoint_dir, 'my-model'), global_step=endpoints['global_step'])
finally:
coord.request_stop()
coord.join(threads)
sess.close()
Graph
Loss and Accuracy
Validation
训练完成之后,想对最终的模型在测试数据集上做一个评估,这里我也曾经尝试利用batch_data,将slice_input_producer中epoch设置为1,来做相关的工作,但是发现这里无法和train 共用,会出现epoch无初始化值的问题(train中传epoch为None),所以这里自己写了shuffle batch的逻辑,将测试集的images和labels通过feed_dict传进到网络,得到模型的输出, 然后做相关指标的计算:
def validation():
# it should be fixed by using placeholder with epoch num in train stage
sess = tf.Session()
file_labels = get_imagesfile(FLAGS.test_data_dir)
test_size = len(file_labels)
print test_size
val_batch_size = FLAGS.val_batch_size
test_steps = test_size / val_batch_size
print test_steps
# images, labels, coord, threads= batch_data(file_labels, sess)
images = tf.placeholder(dtype=tf.float32, shape=[None, 64, 64, 1])
labels = tf.placeholder(dtype=tf.int32, shape=[None,3755])
# read batch images from file_labels
# images_batch = np.zeros([128,64,64,1])
# labels_batch = np.zeros([128,3755])
# labels_batch[0][20] = 1
#
endpoints = network(images, labels)
saver = tf.train.Saver()
ckpt = tf.train.latest_checkpoint(FLAGS.checkpoint_dir)
if ckpt:
saver.restore(sess, ckpt)
# logger.info("restore from the checkpoint {0}".format(ckpt))
# logger.info('Start validation')
final_predict_val = []
final_predict_index = []
groundtruth = []
for i in range(test_steps):
start = i* val_batch_size
end = (i+1)*val_batch_size
images_batch = []
labels_batch = []
labels_max_batch = []
logger.info('=======start validation on {0}/{1} batch========='.format(i, test_steps))
for j in range(start,end):
image_path = file_labels[j][0]
temp_image = Image.open(image_path).convert('L')
temp_image = temp_image.resize((FLAGS.image_size, FLAGS.image_size),Image.ANTIALIAS)
temp_label = np.zeros([3755])
label = int(file_labels[j][1])
# print label
temp_label[label] = 1
# print "====",np.asarray(temp_image).shape
labels_batch.append(temp_label)
# print "====",np.asarray(temp_image).shape
images_batch.append(np.asarray(temp_image)/255.0)
labels_max_batch.append(label)
# print images_batch
images_batch = np.array(images_batch).reshape([-1, 64, 64, 1])
labels_batch = np.array(labels_batch)
batch_predict_val, batch_predict_index = sess.run([endpoints['predict_val_top3'],
endpoints['predict_index_top3']], feed_dict={images:images_batch, labels:labels_batch})
logger.info('=======validation on {0}/{1} batch end========='.format(i, test_steps))
final_predict_val += batch_predict_val.tolist()
final_predict_index += batch_predict_index.tolist()
groundtruth += labels_max_batch
sess.close()
return final_predict_val, final_predict_index, groundtruth
在训练20w个step之后,大概能达到在测试集上能够达到:
相信如果在网络设计上多花点时间能够在一定程度上提升accuracy和top 3 accuracy.有兴趣的小伙伴们可以玩玩这个数据集。
Inference
def inference(image):
temp_image = Image.open(image).convert('L')
temp_image = temp_image.resize((FLAGS.image_size, FLAGS.image_size),Image.ANTIALIAS)
sess = tf.Session()
logger.info('========start inference============')
images = tf.placeholder(dtype=tf.float32, shape=[None, 64, 64, 1])
endpoints = network(images)
saver = tf.train.Saver()
ckpt = tf.train.latest_checkpoint(FLAGS.checkpoint_dir)
if ckpt:
saver.restore(sess, ckpt)
predict_val, predict_index = sess.run([endpoints['predict_val_top3'],endpoints['predict_index_top3']], feed_dict={images:temp_image})
sess.close()
return final_predict_val, final_predict_index
运气挺好,随便找了张图片就能准确识别出来
Summary
综上,就是利用tensorflow做中文手写识别的全部,从如何使用tensorflow内部的queue来有效读入数据,到如何设计network, 到如何做train,validation,inference,珍格格流程比较清晰, 美中不足的是,原本打算是在训练过程中,来对测试集做评估,但是在使用queue读test_data_dir下的filenames,和train本身的好像有点问题,不过应该是可以解决的,我这里就pass了。另外可能 还有一些可以改善的地方,比如感觉可以把batch data one hot的部分写入到network,这样,减缓在validation时内存会因为onehot的sparse开销比较大。
感觉这个中文手写汉字数据集价值很大,后面感觉会有好多可以玩的。
https://zhuanlan.zhihu.com/p/24698483?refer=burness-DL
人工智能大数据与深度学习
搜索添加微信公众号:weic2c
长按图片,识别二维码,点关注
大数据挖掘DT数据分析
搜索添加微信公众号:datadw
教你机器学习,教你数据挖掘
长按图片,识别二维码,点关注

