想免费用谷歌资源训练神经网络?Colab 详细使用教程


本文作者 Jinkey(微信公众号 jinkey-love,官网 https://jinkey.ai)
1 简介
Colab 是谷歌内部类 Jupyter Notebook 的交互式 Python 环境,免安装快速切换 Python 2和 Python 3 的环境,支持Google全家桶(TensorFlow、BigQuery、GoogleDrive等),支持 pip 安装任意自定义库。
网址:https://colab.research.google.com
2 库的安装和使用
Colab 自带了 Tensorflow、Matplotlib、Numpy、Pandas 等深度学习基础库。如果还需要其他依赖,如 Keras,可以新建代码块,输入
# 安装最新版本Keras
# https://keras.io/
!pip install keras
# 指定版本安装
!pip install keras==2.0.9
# 安装 OpenCV
# https://opencv.org/
!apt-get -qq install -y libsm6 libxext6 && pip install -q -U opencv-python
# 安装 Pytorch
# http://pytorch.org/
!pip install -q http://download.pytorch.org/whl/cu75/torch-0.2.0.post3-cp27-cp27mu-manylinux1_x86_64.whl torchvision
# 安装 XGBoost
# https://github.com/dmlc/xgboost
!pip install -q xgboost
# 安装 7Zip
!apt-get -qq install -y libarchive-dev && pip install -q -U libarchive
# 安装 GraphViz 和 PyDot
!apt-get -qq install -y graphviz && pip install -q pydot
3 Google Drive 文件操作
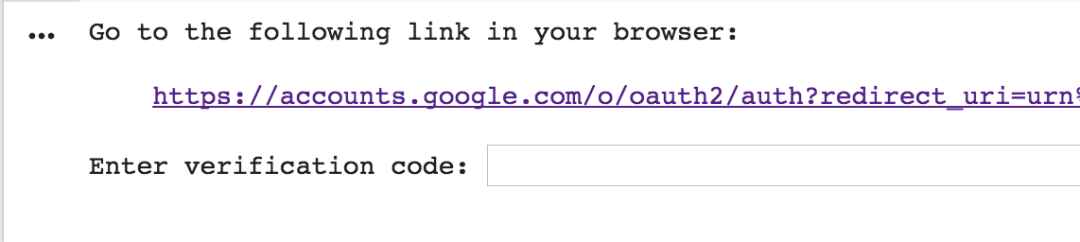
授权登录
对于同一个 notebook,登录操作只需要进行一次,然后才可以进度读写操作。
# 安装 PyDrive 操作库,该操作每个 notebook 只需要执行一次
!pip install -U -q PyDrive
from pydrive.auth import GoogleAuth
from pydrive.drive import GoogleDrive
from google.colab import auth
from oauth2client.client import GoogleCredentials

# 授权登录,仅第一次的时候会鉴权
auth.authenticate_user()
gauth = GoogleAuth()
gauth.credentials = GoogleCredentials.get_application_default()
drive = GoogleDrive(gauth)
遍历目录
# 列出根目录的所有文件
# "q" 查询条件教程详见:https://developers.google.com/drive/v2/web/search-parameters

file_list = drive.ListFile({'q': "'root' in parents and trashed=false"}).GetList()
for file1 in file_list:
  print('title: %s, id: %s, mimeType: %s' % (file1['title'], file1['id'], file1["mimeType"]))
其中 id 是接下来的教程获取文件的唯一标识。根据 mimeType 可以知道 Colab 测试 文件为 doc 文档,而 Colab Notebooks 为文件夹(也就是 Colab 的 Notebook 储存的根目录),如果想查询 Colab Notebooks 文件夹下的文件,查询条件可以这么写:
# '目录 id' in parents
file_list = drive.ListFile({'q': "'1cB5CHKSdL26AMXQ5xrqk2kaBv5LBkIsJ8HuEDyZpeqQ' in parents and trashed=false"}).GetList()
读取文件内容
目前测试过可以直接读取内容的格式为 .txt(mimeType: text/plain),读取代码:
file = drive.CreateFile({'id': "替换成你的 .txt 文件 id"})
file.GetContentString()
file = drive.CreateFile({'id': "替换成你的 .csv 文件 id"})
#这里的下载操作只是缓存,不会在你的Google Drive 目录下多下载一个文件
file.GetContentFile('iris.csv', "text/csv")
# 直接打印文件内容
with open('iris.csv') as f:
print f.readlines()
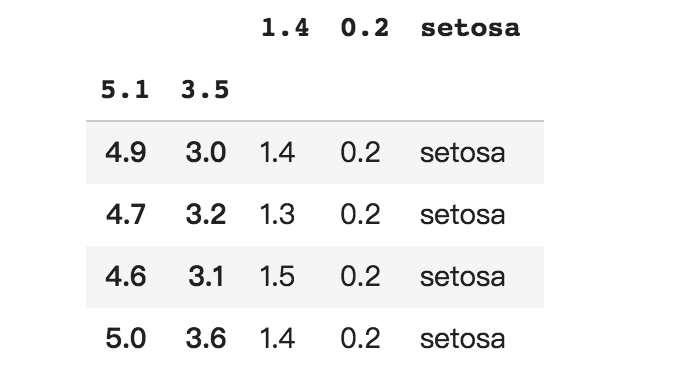
# 用 pandas 读取
import pandas
pd.read_csv('iris.csv', index_col=[0,1], skipinitialspace=True)
写文件操作
# 创建一个文本文件
uploaded = drive.CreateFile({'title': '示例.txt'})
uploaded.SetContentString('测试内容')
uploaded.Upload()
print('创建后文件 id 为 {}'.format(uploaded.get('id')))
4 Google Sheet 电子表格操作
授权登录
对于同一个 notebook,登录操作只需要进行一次,然后才可以进度读写操作。
!pip install --upgrade -q gspread
from google.colab import auth
auth.authenticate_user()

import gspread
from oauth2client.client import GoogleCredentials

gc = gspread.authorize(GoogleCredentials.get_application_default())
读取
把 iris.csv 的数据导入创建一个 Google Sheet 文件来做演示,可以放在 Google Drive 的任意目录
worksheet = gc.open('iris').sheet1
# 获取一个列表[
# [第1行第1列, 第1行第2列, ... , 第1行第n列], ... ,[第n行第1列, 第n行第2列, ... , 第n行第n列]]
rows = worksheet.get_all_values()
print(rows)
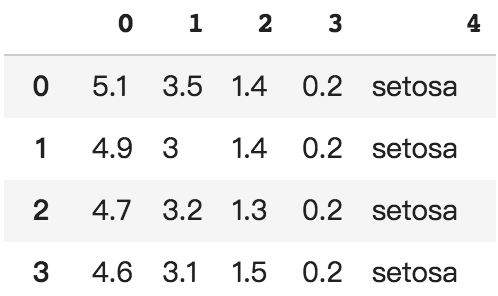
# 用 pandas 读取
import pandas as pd
pd.DataFrame.from_records(rows)
写入
sh = gc.create('谷歌表')

# 打开工作簿和工作表
worksheet = gc.open('谷歌表').sheet1
cell_list = worksheet.range('A1:C2')

import random
for cell in cell_list:
  cell.value = random.randint(1, 10)
worksheet.update_cells(cell_list)
5 下载文件到本地
from google.colab import files
with open('example.txt', 'w') as f:
  f.write('测试内容')
files.download('example.txt')
6 实战
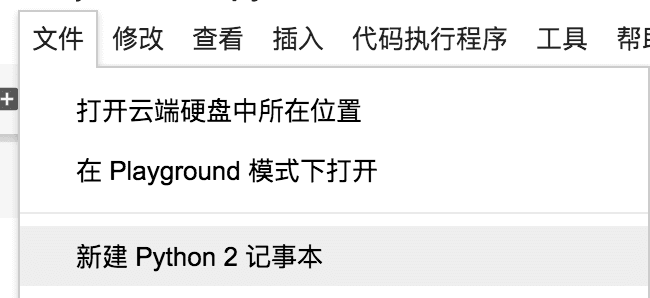
新建
在 Colab 上新建 Python2 的笔记本
安装依赖
!pip install keras
!pip install jieba
!pip install h5py

import h5py
import jieba as jb
import numpy as np
import keras as krs
import tensorflow as tf
from sklearn.preprocessing import LabelEncoder
加载数据
授权登录
# 安装 PyDrive 操作库,该操作每个 notebook 只需要执行一次
!pip install -U -q PyDrive
from pydrive.auth import GoogleAuth
from pydrive.drive import GoogleDrive
from google.colab import auth
from oauth2client.client import GoogleCredentials

def login_google_drive():
  # 授权登录,仅第一次的时候会鉴权
  auth.authenticate_user()
  gauth = GoogleAuth()
  gauth.credentials = GoogleCredentials.get_application_default()
  drive = GoogleDrive(gauth)
  return drive
def list_file(drive):
  file_list = drive.ListFile({'q': "'root' in parents and trashed=false"}).GetList()
  for file1 in file_list:
    print('title: %s, id: %s, mimeType: %s' % (file1['title'], file1['id'], file1["mimeType"]))


drive = login_google_drive()
list_file(drive)
def cache_data():
  # id 替换成上一步读取到的对应文件 id
  health_txt = drive.CreateFile({'id': "117GkBtuuBP3wVjES0X0L4wVF5rp5Cewi"})
  tech_txt = drive.CreateFile({'id': "14sDl4520Tpo1MLPydjNBoq-QjqOKk9t6"})
  design_txt = drive.CreateFile({'id': "1J4lndcsjUb8_VfqPcfsDeOoB21bOLea3"})
  #这里的下载操作只是缓存,不会在你的Google Drive 目录下多下载一个文件

  health_txt.GetContentFile('health.txt', "text/plain")
  tech_txt.GetContentFile('tech.txt', "text/plain")
  design_txt.GetContentFile('design.txt', "text/plain")

  print("缓存成功")

cache_data()
def load_data():
    titles = []
    print("正在加载健康类别的数据...")
    with open("health.txt", "r") as f:
        for line in f.readlines():
            titles.append(line.strip())

    print("正在加载科技类别的数据...")
    with open("tech.txt", "r") as f:
        for line in f.readlines():
            titles.append(line.strip())


    print("正在加载设计类别的数据...")
    with open("design.txt", "r") as f:
        for line in f.readlines():
            titles.append(line.strip())

    print("一共加载了 %s 个标题" % len(titles))

    return titles

titles = load_data()
def load_label():
    arr0 = np.zeros(shape=[12000, ])
    arr1 = np.ones(shape=[12000, ])
    arr2 = np.array([2]).repeat(7318)
    target = np.hstack([arr0, arr1, arr2])
    print("一共加载了 %s 个标签" % target.shape)

    encoder = LabelEncoder()
    encoder.fit(target)
    encoded_target = encoder.transform(target)
    dummy_target = krs.utils.np_utils.to_categorical(encoded_target)

    return dummy_target

target = load_label()
文本预处理
max_sequence_length = 30
embedding_size = 50

# 标题分词
titles = [".".join(jb.cut(t, cut_all=True)) for t in titles]

# word2vec 词袋化
vocab_processor = tf.contrib.learn.preprocessing.VocabularyProcessor(max_sequence_length, min_frequency=1)
text_processed = np.array(list(vocab_processor.fit_transform(titles)))

# 读取词标签
dict = vocab_processor.vocabulary_._mapping
sorted_vocab = sorted(dict.items(), key = lambda x : x[1])
构建神经网络
这里使用 Embedding 和 lstm 作为前两层,通过 softmax 激活输出结果
# 配置网络结构
def build_netword(num_vocabs):
    # 配置网络结构
    model = krs.Sequential()
    model.add(krs.layers.Embedding(num_vocabs, embedding_size, input_length=max_sequence_length))
    model.add(krs.layers.LSTM(32, dropout=0.2, recurrent_dropout=0.2))
    model.add(krs.layers.Dense(3))
    model.add(krs.layers.Activation("softmax"))
    model.compile(loss="categorical_crossentropy", optimizer="adam", metrics=["accuracy"])

    return model

num_vocabs = len(dict.items())
model = build_netword(num_vocabs=num_vocabs)

import time
start = time.time()
# 训练模型
model.fit(text_processed, target, batch_size=512, epochs=10, )
finish = time.time()
print("训练耗时:%f 秒" %(finish-start))
预测样本
sen 可以换成你自己的句子,预测结果为[健康类文章概率, 科技类文章概率, 设计类文章概率], 概率最高的为那一类的文章,但最大概率低于 0.8 时判定为无法分类的文章。
sen = "做好商业设计需要学习的小技巧"
sen_prosessed = " ".join(jb.cut(sen, cut_all=True))
sen_prosessed = vocab_processor.transform([sen_prosessed])
sen_prosessed = np.array(list(sen_prosessed))
result = model.predict(sen_prosessed)

catalogue = list(result[0]).index(max(result[0]))
threshold=0.8
if max(result[0]) > threshold:
    if catalogue == 0:
        print("这是一篇关于健康的文章")
    elif catalogue == 1:
        print("这是一篇关于科技的文章")
    elif catalogue == 2:
        print("这是一篇关于设计的文章")
    else:
        print("这篇文章没有可信分类")
- 加入人工智能学院系统学习 -

点击“ 阅读原文 ”进入学习
登录查看更多
相关内容

Google Colaboratory是谷歌开放的一款研究工具,主要用于机器学习的开发和研究。这款工具现在可以免费使用,但是不是永久免费暂时还不确定。Google Colab最大的好处是给广大的AI开发者提供了免费的GPU使用。
Arxiv
4+阅读 · 2018年11月21日


相关VIP内容
相关资讯
相关论文
Arxiv
4+阅读 · 2018年11月21日