用Google Colab,怎样让机器学习图表动起来?
作者 Navjot
王小新 编译自 TowardsDataScience
量子位 出品 | 公众号 QbitAI

Google Colab发布短短半年时间,受到了众多机器学习小伙伴的追捧。
毕竟它无需安装、功能强大、支持实时协作,还能免费蹭Google云上的GPU,比Jupyter Notebooks不知高到哪里去了。

可是,Colab也有不友好的地方:机器学习第一步,也就是用可视化图表分析数据的时候,你就可能遇到困难。想在Colab里绘制动图,比在Jupyter Notebooks里难多了。
Jupyter Notebooks中,可以很容易地运行matplotlib库中的动图接口,但Colab中,就需要开动脑筋。
为了在Google Colab中绘制动图,名叫Navjot的小哥在Medium上提出了一种方法。

量子位搬运过来,以下为他博客的译文:
让图表动起来,我见过的最佳方法是这样的 :
from matplotlib import rc
rc('animation', html='jshtml')
下面,我们会分步详细介绍。
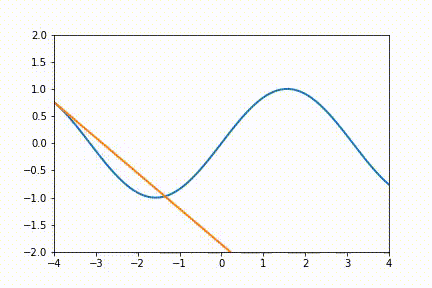
任务:绘制y= sin(x)曲线,并得到每个点切线的动画。
首先,导入函数库:
import numpy as np
import matplotlib.pyplot as plt
from matplotlib import animation
定义自变量x的范围,并绘制sin(x)函数:
x = np.linspace(-4, 4, 100)
y = np.sin(x)
创建所需的绘图对象:
fig, ax = plt.subplots()
ax.set_xlim(( -4, 4))
ax.set_ylim((-2, 2))
再画出2条线,对应目标函数和它的切线:
line1, = ax.plot([], [], lw=2)
line2, = ax.plot([], [], lw=2)
接着,定义init函数,以设置动画中每一帧的背景:
def init():
    line1.set_data(x, y)
    return (line1,)
然后,定义animate函数,并按顺序进行调用,得到每一帧中看出的变化:
def animate(i):
  at_x = x[i]

  # gradient_line will have the form m*x + b
  m = np.cos(at_x)
  b = np.sin(at_x) - np.cos(at_x)*at_x
  gradient_line = m*x + b

  line2.set_data(x, gradient_line)
  return (line2,)
最后,调用matplotlib.animation中FuncAnimation函数来设置动画参数:
anim = animation.FuncAnimation(fig, animate, init_func=init, frames=100, interval=100, blit=True)在该阶段,我们得到了动画对象anim,而且为了把动画内嵌到网页中,我们把图表中默认的表示设置为交互式的JavaScript小部件,把animate.html中的rc参数改为jshtml来实现。
rc('animation', html='jshtml')设置好上面内容后,我们就可以引用动画对象anim来显示内嵌动画图。
下面是完整的实现代码:
import numpy as np
import matplotlib.pyplot as plt
from matplotlib import animation, rc
from IPython.display import HTML

# animate over some set of x, y
x = np.linspace(-4, 4, 100)
y = np.sin(x)

# First set up the figure, the axes, and the plot element
fig, ax = plt.subplots()
plt.close()
ax.set_xlim(( -4, 4))
ax.set_ylim((-2, 2))

line1, = ax.plot([], [], lw=2)
line2, = ax.plot([], [], lw=2)

# initialization function: plot the background of each frame
def init():
    line1.set_data(x, y)
    return (line1,)

# animation function: this is called sequentially
def animate(i):
  at_x = x[i]

  # gradient_line will have the form m*x + b
  m = np.cos(at_x)
  b = np.sin(at_x) - np.cos(at_x)*at_x
  gradient_line = m*x + b

  line2.set_data(x, gradient_line)
  return (line2,)

anim = animation.FuncAnimation(fig, animate, init_func=init, frames=100, interval=100, blit=True)
rc('animation', html='jshtml')
anim
在Google Colab中运行这个代码,可生成下面的内嵌动画图。
相关链接:
1. 本文的配套Colab文档:
https://colab.research.google.com/drive/131wXGA8h8d7llSZxZJ6R4e8nz0ih1WPG
2. 动图内嵌为交互式JavaScript小部件的方法:
http://tiao.io/posts/notebooks/embedding-matplotlib-animations-in-jupyter-as-interactive-javascript-widgets/
3. 原文:
https://towardsdatascience.com/making-animations-work-in-google-colaboratory-new-home-for-ml-prototyping-c6147186ae75
作者系网易新闻·网易号“各有态度”签约作者
— 完 —
活动报名

加入社群
量子位AI社群16群开始招募啦,欢迎对AI感兴趣的同学,加小助手微信qbitbot6入群;
此外,量子位专业细分群(自动驾驶、CV、NLP、机器学习等)正在招募,面向正在从事相关领域的工程师及研究人员。
进群请加小助手微信号qbitbot6,并务必备注相应群的关键词~通过审核后我们将邀请进群。(专业群审核较严,敬请谅解)
诚挚招聘
量子位正在招募编辑/记者,工作地点在北京中关村。期待有才气、有热情的同学加入我们!相关细节,请在量子位公众号(QbitAI)对话界面,回复“招聘”两个字。

量子位 QbitAI · 头条号签约作者
վ'ᴗ' ի 追踪AI技术和产品新动态