React 源码分析(2):组件的初始渲染
(点击上方公众号,可快速关注)
作者:莫凡
realtcg.com/2018/03/17/窥探React-源码分析(二)-组件的初始渲染/
上一篇文章讲到了React 调用ReactDOM.render首次渲染组件的前几个过程的源码, 包括创建元素、根据元素实例化对应组件, 利用事务来进行批量更新. 我们还穿插介绍了React 事务的实现以及如何利用事务进行批量更新的实现. 这篇文章我们接着分析后面的过程, 包括调用了哪些事务, 组件插入的过程, 组件生命周期方法什么时候被调用等.
正文
在React 源码中, 首次渲染组件有一个重要的过程, mount, 插入, 即插入到DOM中, 发生在实例化组件之后. 这是一个不断生成(render)不断插入、类似递归的过程. 让我们一步一步来分析.
使用事务执行插入过程
我们来看首先在插入之前的准备, ReactMount.js中, batchedMountComponentIntoNode被放到了批量策略batchedUpdates中执行, batchedMountComponentIntoNode 函数正是执行插入过程的第一步
// 放在批量策略batchedUpdates中执行插入
ReactUpdates.batchedUpdates(
batchedMountComponentIntoNode,
componentInstance,
...
);
这个batchingStrategy就是ReactDefaultBatchingStrategy, 因此调用了ReactDefaultBatchingStrategy的batchedUpdates, 并将batchedMountComponentIntoNode当作callback.
在ReactDefaultBatchingStrategy.js中启动了ReactDefaultBatchingStrategyTransaction事务去执行batchedMountComponentIntoNode, 以便利用策略控制更新, 而在这个函数中又启动了一个调和(Reconcile)事务, 执行mountComponentIntoNode进行插入.
// ReactDefaultBatchingStrategy.js
var transaction = new ReactDefaultBatchingStrategyTransaction();
...
var ReactDefaultBatchingStrategy = {
...
batchedUpdates: function(callback, a, b, c, d, e) {
...
// 启动ReactDefaultBatchingStrategy事务
return transaction.perform(callback, null, a, b, c, d, e);
},
};
// ReactMount.js
function batchedMountComponentIntoNode(
...
) {
var transaction = ReactUpdates.ReactReconcileTransaction.getPooled(
!shouldReuseMarkup && ReactDOMFeatureFlags.useCreateElement,
);
// 启动Reconcile事务
transaction.perform(
mountComponentIntoNode,
...
);
...
}
相信你注意到了 ReactUpdates.ReactReconcileTransaction.getPooled, 这个函数的作用就是从对象池里拿到ReactReconcileTransaction 对象重用.
React优化策略——对象池
在ReactMount.js :
function batchedMountComponentIntoNode(
componentInstance,
container,
shouldReuseMarkup,
context,
) {
// 从对象池中拿到ReactReconcileTransaction事务
var transaction = ReactUpdates.ReactReconcileTransaction.getPooled(
!shouldReuseMarkup && ReactDOMFeatureFlags.useCreateElement,
);
// 启动事务执行mountComponentIntoNode
transaction.perform(
mountComponentIntoNode,
null,
componentInstance,
container,
transaction,
shouldReuseMarkup,
context,
);
// 释放事务
ReactUpdates.ReactReconcileTransaction.release(transaction);
}
React 在启动另一个事务之前拿到了这个事务, 从哪里拿到的呢? 这里就涉及到了React 优化策略之一——对象池
GC很慢
首先你用JavaScript声明的变量不再使用时, js引擎会在某些时间回收它们, 这个回收时间是耗时的. 资料显示:
Marking latency depends on the number of live objects that have to be marked, with marking of the whole heap potentially taking more than 100 ms for large webpages.
整个堆的标记对于大型网页很可能需要超过100毫秒
尽管V8引擎对垃圾回收有优化, 但为了避免重复创建临时对象造成GC不断启动以及复用对象, React使用了对象池来复用对象, 对GC表明, 我一直在使用它们, 请不要启动回收.
React 实现的对象池其实就是对类进行了包装, 给类添加一个实例队列, 用时取, 不用时再放回, 防止重复实例化:
PooledClass.js :
// 添加对象池, 实质就是对类包装
var addPoolingTo = function (CopyConstructor, pooler) {
// 拿到类
var NewKlass = CopyConstructor;
// 添加实例队列属性
NewKlass.instancePool = [];
// 添加拿到实例方法
NewKlass.getPooled = pooler || DEFAULT_POOLER;
// 实例队列默认为10个
if (!NewKlass.poolSize) {
NewKlass.poolSize = DEFAULT_POOL_SIZE;
}
// 将实例放回队列
NewKlass.release = standardReleaser;
return NewKlass;
};
// 从对象池申请一个实例.对于不同参数数量的类,React分别处理, 这里是一个参数的类的申请实例的方法, 其他一样
var oneArgumentPooler = function(copyFieldsFrom) {
// this 指的就是传进来的类
var Klass = this;
// 如果类的实例队列有实例, 则拿出来一个
if (Klass.instancePool.length) {
var instance = Klass.instancePool.pop();
Klass.call(instance, copyFieldsFrom);
return instance;
} else { // 否则说明是第一次实例化, new 一个
return new Klass(copyFieldsFrom);
}
};
// 释放实例到类的队列中
var standardReleaser = function(instance) {
var Klass = this;
...
// 调用类的解构函数
instance.destructor();
// 放到队列
if (Klass.instancePool.length < Klass.poolSize) {
Klass.instancePool.push(instance);
}
};
// 使用时将类传进去即可
PooledClass.addPoolingTo(ReactReconcileTransaction);
可以看到, React对象池就是给类维护一个实例队列, 用到就pop一个, 不用就push回去. 在React源码中, 用完实例后要立即释放, 也就是申请和释放成对出现, 达到优化性能的目的.
插入过程
在ReactMount.js中, mountComponentIntoNode函数执行了组件实例的mountComponent, 不同的组件实例有自己的mountComponent方法, 做的也是不同的事情. (源码我就不上了, 太TM…)
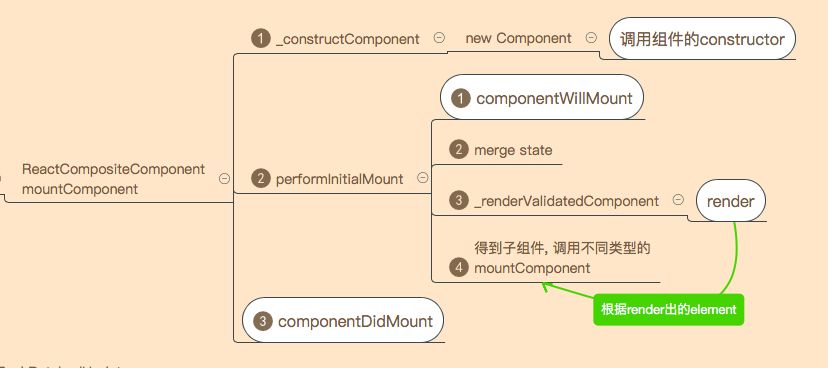
ReactCompositeComponent类型的mountComponent方法:
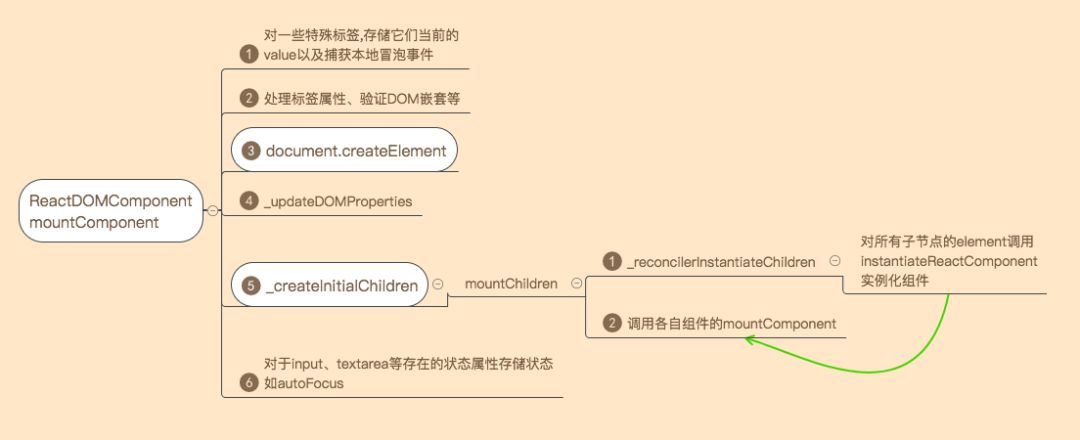
ReactDOMComponent类型:
ReactDOMTextComponent类型:

整个mount过程是递归渲染的(矢量图):
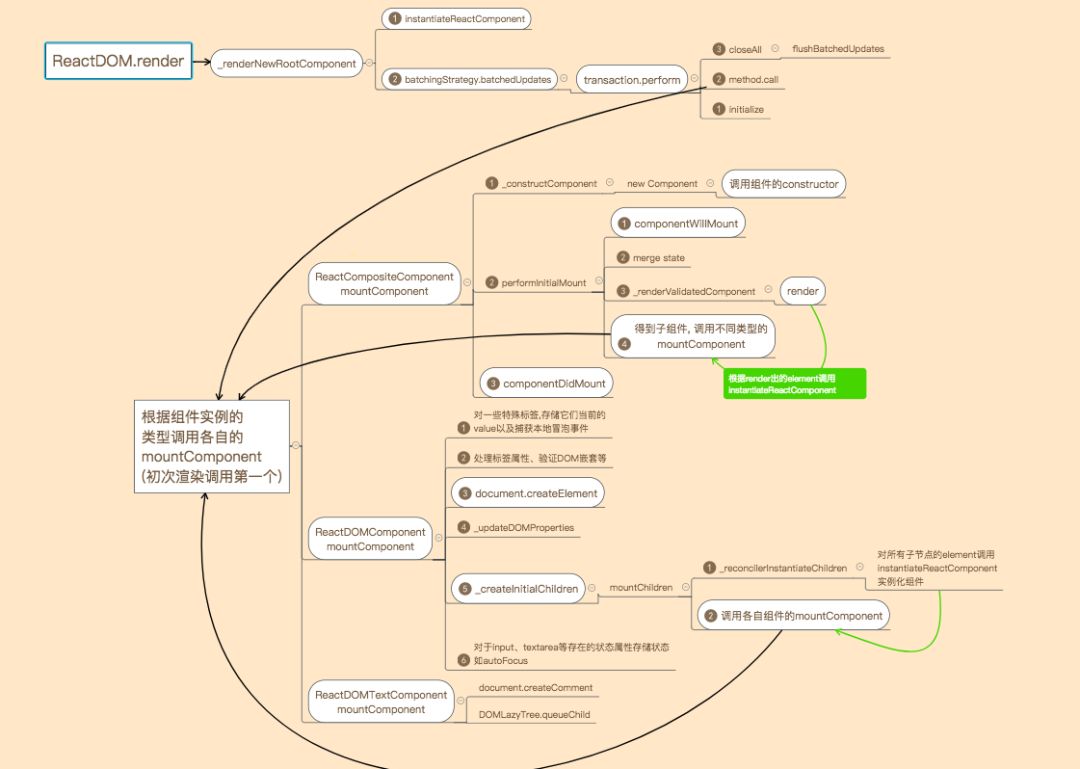
刚开始, React给要渲染的组件从最顶层加了一个ReactCompositeComponent类型的 topLevelWrapper来方便的存储所有更新, 因此初次递归是从 ReactCompositeComponent 的mountComponent 开始的, 这个过程会调用组件的render函数(如果有的话), 根据render出来的elements再调用instantiateReactComponent实例化不同类型的组件, 再调用组件的 mountComponent, 因此这是一个不断渲染不断插入、递归的过程.
总结
React 初始渲染主要分为以下几个步骤:
构建一个组件的elements tree(subtree)—— 从组件嵌套的最里层(转换JSX后最里层的createElements函数)开始层层调用createElements创建这个组件elements tree. 在这个subtree中, 里层创建出来的元素作为包裹层的props.children;
实例化组件——根据当前元素的类型创建对应类型的组件实例;
利用多种事务执行组件实例的mountComponent.
首先执行topLevelWrapper(ReactCompositeComponent)的mountComponent;
ReactCompositeComponent的mountComponent过程中会先调用render(Composite类型 )生成组件的elements tree, 然后顺着props.children, 不断实例化, 不断调用各自组件的mountComponent 形成循环
在以上过程中, 依靠事务进行存储更新、回调队列, 在事务结束时批量更新.
觉得本文对你有帮助?请分享给更多人
关注「Web前端开发学习圈」,提升前端技能
相关内容

React.js(React)是 Facebook 推出的一个用来构建用户界面的 JavaScript 库。
Facebook开源了React,这是该公司用于构建反应式图形界面的JavaScript库,已经应用于构建Instagram网站及 Facebook部分网站。最近出现了AngularJS、MeteorJS 和Polymer中实现的Model-Driven Views等框架,React也顺应了这种趋势。React基于在数据模型之上声明式指定用户界面的理念,用户界面会自动与底层数据保持同步。与前面提及 的框架不同,出于灵活性考虑,React使用JavaScript来构建用户界面,没有选择HTML。Not Rest