![]()
写JAVA代码的同学都知道,JAVA里的锁有两大类,一类是synchronized锁,一类是concurrent包里的锁(JUC锁)。其中synchronized锁是JAVA语言层面提供的能力,在此不展开,本文主要讨论JUC里的ReentrantLock锁。
一 JDK层
1 AbstractQueuedSynchronizer
ReentrantLock的lock(),unlock()等API其实依赖于内部的Synchronizer(注意,不是synchronized)来实现。Synchronizer又分为FairSync和NonfairSync,顾名思义是指公平和非公平。
当调用ReentrantLock的lock方法时,其实就只是简单地转交给Synchronizer的lock()方法:
代码节选自:java.util.concurrent.locks.ReentrantLock.java /** Synchronizer providing all implementation mechanics */    private final Sync sync;    /**     * Base of synchronization control for this lock. Subclassed     * into fair and nonfair versions below. Uses AQS state to     * represent the number of holds on the lock.     */    abstract static class Sync extends AbstractQueuedSynchronizer {......}
    public void lock() {        sync.lock();    }
那么这个sync又是什么?我们看到Sync 继承自AbstractQueueSynchronizer(AQS),AQS是concurrent包的基石,AQS本身并不实现任何同步接口(比如lock,unlock,countDown等等),但是它定义了一个并发资源控制逻辑的框架(运用了template method 设计模式),它定义了acquire和release方法用于独占地(exclusive)获取和释放资源,以及acquireShared和releaseShared方法用于共享地获取和释放资源。比如acquire/release用于实现ReentrantLock,而acquireShared/releaseShared用于实现CountDownLacth,Semaphore。比如acquire的框架如下:
/** * Acquires in exclusive mode, ignoring interrupts. Implemented * by invoking at least once {@link #tryAcquire}, * returning on success. Otherwise the thread is queued, possibly * repeatedly blocking and unblocking, invoking {@link * #tryAcquire} until success. This method can be used * to implement method {@link Lock#lock}. * * @param arg the acquire argument. This value is conveyed to * {@link #tryAcquire} but is otherwise uninterpreted and * can represent anything you like. */ public final void acquire(int arg) { if (!tryAcquire(arg) && acquireQueued(addWaiter(Node.EXCLUSIVE), arg)) selfInterrupt(); }
整体逻辑是,先进行一次tryAcquire,如果成功了,就没啥事了,调用者继续执行自己后面的代码,如果失败,则执行addWaiter和acquireQueued。其中tryAcquire()需要子类根据自己的同步需求进行实现,而acquireQueued() 和addWaiter() 已经由AQS实现。addWaiter的作用是把当前线程加入到AQS内部同步队列的尾部,而acquireQueued的作用是当tryAcquire()失败的时候阻塞当前线程。
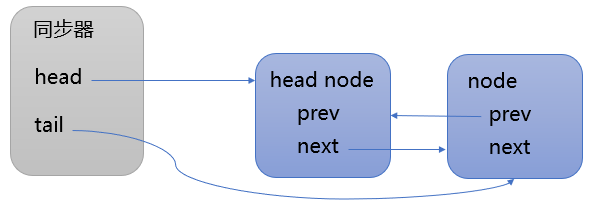
/** * Creates and enqueues node for current thread and given mode. * * @param mode Node.EXCLUSIVE for exclusive, Node.SHARED for shared * @return the new node */ private Node addWaiter(Node mode) { //创建节点,设置关联线程和模式(独占或共享) Node node = new Node(Thread.currentThread(), mode); // Try the fast path of enq; backup to full enq on failure Node pred = tail; // 如果尾节点不为空,说明同步队列已经初始化过 if (pred != null) { //新节点的前驱节点设置为尾节点 node.prev = pred; // 设置新节点为尾节点 if (compareAndSetTail(pred, node)) { //老的尾节点的后继节点设置为新的尾节点。 所以同步队列是一个双向列表。 pred.next = node; return node; } } //如果尾节点为空,说明队列还未初始化,需要初始化head节点并加入新节点 enq(node); return node; }
/** * Inserts node into queue, initializing if necessary. See picture above. * @param node the node to insert * @return node's predecessor */ private Node enq(final Node node) { for (;;) { Node t = tail; if (t == null) { // Must initialize // 如果tail为空,则新建一个head节点,并且tail和head都指向这个head节点 //队列头节点称作“哨兵节点”或者“哑节点”,它不与任何线程关联 if (compareAndSetHead(new Node())) tail = head; } else { //第二次循环进入这个分支, node.prev = t; if (compareAndSetTail(t, node)) { t.next = node; return t; } } } }
addWaiter执行结束后,同步队列的结构如下所示:
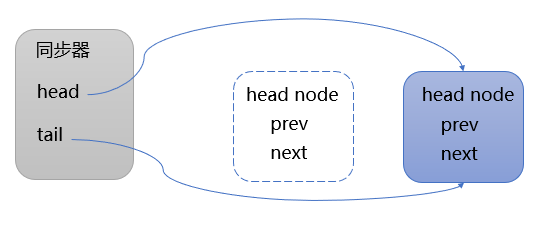
/** * Acquires in exclusive uninterruptible mode for thread already in * queue. Used by condition wait methods as well as acquire. * * @param node the node * @param arg the acquire argument * @return {@code true} if interrupted while waiting */ final boolean acquireQueued(final Node node, int arg) { boolean failed = true; try { boolean interrupted = false; for (;;) { //获取当前node的前驱node final Node p = node.predecessor(); //如果前驱node是head node,说明自己是第一个排队的线程,则尝试获锁 if (p == head && tryAcquire(arg)) { //把获锁成功的当前节点变成head node(哑节点)。 setHead(node); p.next = null; // help GC failed = false; return interrupted; } if (shouldParkAfterFailedAcquire(p, node) && parkAndCheckInterrupt()) interrupted = true; } } finally { if (failed) cancelAcquire(node); } }
判断自己是不是同步队列中的第一个排队的节点,则尝试进行加锁,如果成功,则把自己变成head node,过程如下所示:
如果自己不是第一个排队的节点或者tryAcquire失败,则调用shouldParkAfterFailedAcquire,其主要逻辑是使用CAS将节点状态由 INITIAL 设置成 SIGNAL,表示当前线程阻塞等待SIGNAL唤醒。如果设置失败,会在 acquireQueued 方法中的死循环中继续重试,直至设置成功,然后调用parkAndCheckInterrupt 方法。parkAndCheckInterrupt的作用是把当前线程阻塞挂起,等待唤醒。parkAndCheckInterrupt的实现需要借助下层的能力,这是本文的重点,在下文中逐层阐述。
2 ReentrantLock
下面就让我们一起看看ReentrantLock是如何基于AbstractQueueSynchronizer实现其语义的。
ReentrantLock内部使用的FairSync和NonfairSync,它们都是AQS的子类,比如FairSync的主要代码如下:
      /**     * Sync object for fair locks     */    static final class FairSync extends Sync {        private static final long serialVersionUID = -3000897897090466540L;
        final void lock() {            acquire(1);        }
        /**         * Fair version of tryAcquire.  Don't grant access unless         * recursive call or no waiters or is first.         */        protected final boolean tryAcquire(int acquires) {            final Thread current = Thread.currentThread();            int c = getState();            if (c == 0) {                if (!hasQueuedPredecessors() &&                    compareAndSetState(0, acquires)) {                    setExclusiveOwnerThread(current);                    return true;                }            }            else if (current == getExclusiveOwnerThread()) {                int nextc = c + acquires;                if (nextc < 0)                    throw new Error("Maximum lock count exceeded");                setState(nextc);                return true;            }            return false;        }    }
AQS中最重要的一个字段就是state,锁和同步器的实现都是围绕着这个字段的修改展开的。AQS可以实现各种不同的锁和同步器的原因之一就是,不同的锁或同步器按照自己的需要可以对同步状态的含义有不同的定义,并重写对应的tryAcquire, tryRelease或tryAcquireshared, tryReleaseShared等方法来操作同步状态。
我们来看看ReentrantLock的FairSync的tryAcquire的逻辑:
-
如果此时state(private volatile int state)是0,那么就表示这个时候没有人占有锁。但因为是公平锁,所以还要判断自己是不是首节点,然后才尝试把状态设置为1,假如成功的话,就成功的占有了锁。compareAndSetState 也是通过CAS来实现。CAS 是原子操作,而且state的类型是volatile,所以state 的值是线程安全的。
-
如果此时状态不是0,那么再判断当前线程是不是锁的owner,如果是的话,则state 递增,当state溢出时,会抛错。如果没溢出,则返回true,表示成功获取锁。
-
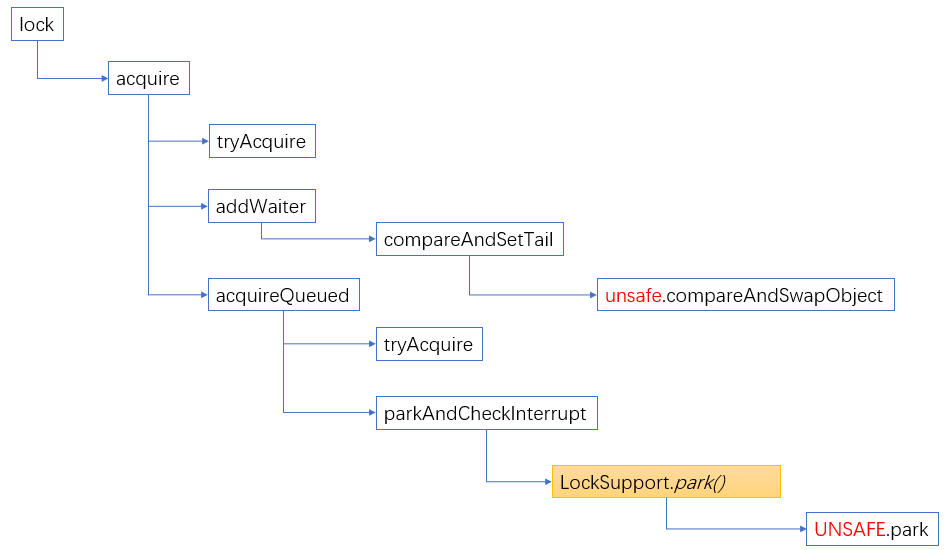
至此,JAVA层面的实现基本说清楚了,小结一下,整个框架如下所示:
关于unlock的实现,限于篇幅,就不讨论了,下文重点分析lock过程中是如何把当前线程阻塞挂起的,就是上图中的unsafe.park()是如何实现的。
二 JVM层
Unsafe.park和Unsafe.unpark 是sun.misc.Unsafe类的native 方法,
      public native void unpark(Object var1);
public native void park(boolean var1, long var2);
这两个方法的实现是在JVM的hotspot/src/share/vm/prims/unsafe.cpp 文件中,
UNSAFE_ENTRY(void, Unsafe_Park(JNIEnv *env, jobject unsafe, jboolean isAbsolute, jlong time)) UnsafeWrapper("Unsafe_Park"); EventThreadPark event;#ifndef USDT2 HS_DTRACE_PROBE3(hotspot, thread__park__begin, thread->parker(), (int) isAbsolute, time);#else /* USDT2 */ HOTSPOT_THREAD_PARK_BEGIN( (uintptr_t) thread->parker(), (int) isAbsolute, time);#endif /* USDT2 */ JavaThreadParkedState jtps(thread, time != 0); thread->parker()->park(isAbsolute != 0, time);#ifndef USDT2 HS_DTRACE_PROBE1(hotspot, thread__park__end, thread->parker());#else /* USDT2 */ HOTSPOT_THREAD_PARK_END( (uintptr_t) thread->parker());#endif /* USDT2 */ if (event.should_commit()) { const oop obj = thread->current_park_blocker(); if (time == 0) { post_thread_park_event(&event, obj, min_jlong, min_jlong); } else { if (isAbsolute != 0) { post_thread_park_event(&event, obj, min_jlong, time); } else { post_thread_park_event(&event, obj, time, min_jlong); } } }UNSAFE_END
核心是逻辑是thread->parker()->park(isAbsolute != 0, time); 就是获取java线程的parker对象,然后执行它的park方法。每个java线程都有一个Parker实例,Parker类是这样定义的:
class Parker : public os::PlatformParker {private: volatile int _counter ; ...public: void park(bool isAbsolute, jlong time); void unpark(); ...}class PlatformParker : public CHeapObj<mtInternal> { protected: enum { REL_INDEX = 0, ABS_INDEX = 1 }; int _cur_index; // which cond is in use: -1, 0, 1 pthread_mutex_t _mutex [1] ; pthread_cond_t _cond [2] ; // one for relative times and one for abs.
public: // TODO-FIXME: make dtor private ~PlatformParker() { guarantee (0, "invariant") ; }
public: PlatformParker() { int status; status = pthread_cond_init (&_cond[REL_INDEX], os::Linux::condAttr()); assert_status(status == 0, status, "cond_init rel"); status = pthread_cond_init (&_cond[ABS_INDEX], NULL); assert_status(status == 0, status, "cond_init abs"); status = pthread_mutex_init (_mutex, NULL); assert_status(status == 0, status, "mutex_init"); _cur_index = -1; // mark as unused }};
      void Parker::park(bool isAbsolute, jlong time) {  // Return immediately if a permit is available.  // We depend on Atomic::xchg() having full barrier semantics  // since we are doing a lock-free update to _counter.  if (Atomic::xchg(0, &_counter) > 0) return;
  Thread* thread = Thread::current();  assert(thread->is_Java_thread(), "Must be JavaThread");  JavaThread *jt = (JavaThread *)thread;
  if (Thread::is_interrupted(thread, false)) {    return;  }
  // Next, demultiplex/decode time arguments  timespec absTime;  if (time < 0 || (isAbsolute && time == 0) ) { // don't wait at all    return;  }  if (time > 0) {    unpackTime(&absTime, isAbsolute, time);  }
  ////进入safepoint region,更改线程为阻塞状态  ThreadBlockInVM tbivm(jt);  // Don't wait if cannot get lock since interference arises from  // unblocking.  Also. check interrupt before trying wait  if (Thread::is_interrupted(thread, false) || pthread_mutex_trylock(_mutex) != 0) {  //如果线程被中断,或者尝试给互斥变量加锁时失败,比如被其它线程锁住了,直接返回    return;  }  //到这里,意味着pthread_mutex_trylock(_mutex)成功  int status ;  if (_counter > 0)  { // no wait needed    _counter = 0;    status = pthread_mutex_unlock(_mutex);    assert (status == 0, "invariant") ;    OrderAccess::fence();    return;  }
#ifdef ASSERT  // Don't catch signals while blocked; let the running threads have the signals.  // (This allows a debugger to break into the running thread.)  sigset_t oldsigs;  sigset_t* allowdebug_blocked = os::Linux::allowdebug_blocked_signals();  pthread_sigmask(SIG_BLOCK, allowdebug_blocked, &oldsigs);#endif  OSThreadWaitState osts(thread->osthread(), false /* not Object.wait() */);  jt->set_suspend_equivalent();  // cleared by handle_special_suspend_equivalent_condition() or java_suspend_self()
  assert(_cur_index == -1, "invariant");  if (time == 0) {    _cur_index = REL_INDEX; // arbitrary choice when not timed    status = pthread_cond_wait (&_cond[_cur_index], _mutex) ;  } else {    _cur_index = isAbsolute ? ABS_INDEX : REL_INDEX;    status = os::Linux::safe_cond_timedwait (&_cond[_cur_index], _mutex, &absTime) ;    if (status != 0 && WorkAroundNPTLTimedWaitHang) {      pthread_cond_destroy (&_cond[_cur_index]) ;      pthread_cond_init    (&_cond[_cur_index], isAbsolute ? NULL : os::Linux::condAttr());    }  }  _cur_index = -1;  assert_status(status == 0 || status == EINTR ||                status == ETIME || status == ETIMEDOUT,                status, "cond_timedwait");
#ifdef ASSERT  pthread_sigmask(SIG_SETMASK, &oldsigs, NULL);#endif
  _counter = 0 ;  status = pthread_mutex_unlock(_mutex) ;  assert_status(status == 0, status, "invariant") ;  // Paranoia to ensure our locked and lock-free paths interact  // correctly with each other and Java-level accesses.  OrderAccess::fence();
  // If externally suspended while waiting, re-suspend  if (jt->handle_special_suspend_equivalent_condition()) {    jt->java_suspend_self();  }}
park的思路:parker内部有个关键字段_counter, 这个counter用来记录所谓的“permit”,当_counter大于0时,意味着有permit,然后就可以把_counter设置为0,就算是获得了permit,可以继续运行后面的代码。如果此时_counter不大于0,则等待这个条件满足。
-
当调用park时,先尝试能否直接拿到“许可”,即_counter>0时,如果成功,则把_counter设置为0,并返回。
-
如果不成功,则把线程的状态设置成_thread_in_vm并且_thread_blocked。_thread_in_vm 表示线程当前在JVM中执行,_thread_blocked表示线程当前阻塞了。
-
拿到mutex之后,再次检查_counter是不是>0,如果是,则把_counter设置为0,unlock mutex并返回
-
如果_counter还是不大于0,则判断等待的时间是否等于0,然后调用相应的pthread_cond_wait系列函数进行等待,如果等待返回(即有人进行unpark,则pthread_cond_signal来通知),则把_counter设置为0,unlock mutex并返回。
所以本质上来讲,LockSupport.park 是通过pthread库的条件变量pthread_cond_t来实现的。下面我们就来看看pthread_cond_t 是怎么实现的。
三 GLIBC 层
      #include <pthread.h>#include <stdio.h>#include <stdlib.h>
pthread_mutex_t mutex = PTHREAD_MUTEX_INITIALIZER; /*初始化互斥锁*/pthread_cond_t cond = PTHREAD_COND_INITIALIZER;  //初始化条件变量
void *thread1(void *);void *thread2(void *);
int i=1;int main(void){        pthread_t t_a;        pthread_t t_b;        pthread_create(&t_a,NULL,thread1,(void *)NULL);/*创建进程t_a*/        pthread_create(&t_b,NULL,thread2,(void *)NULL); /*创建进程t_b*/        pthread_join(t_b, NULL);/*等待进程t_b结束*/        pthread_mutex_destroy(&mutex);        pthread_cond_destroy(&cond);        exit(0);}void *thread1(void *junk){        for(i=1;i<=9;i++)        {             pthread_mutex_lock(&mutex);//             if(i%3==0)                 pthread_cond_signal(&cond);/*条件改变,发送信号,通知t_b进程*/              else                         printf("thead1:%d/n",i);              pthread_mutex_unlock(&mutex);//*解锁互斥量*/              printf("Up Unlock Mutex/n");                    sleep(1);        }}void *thread2(void *junk){        while(i<9)        {            pthread_mutex_lock(&mutex);            if(i%3!=0)                   pthread_cond_wait(&cond,&mutex);/*等待*/            printf("thread2:%d/n",i);            pthread_mutex_unlock(&mutex);            printf("Down Ulock Mutex/n");            sleep(1);         }
}
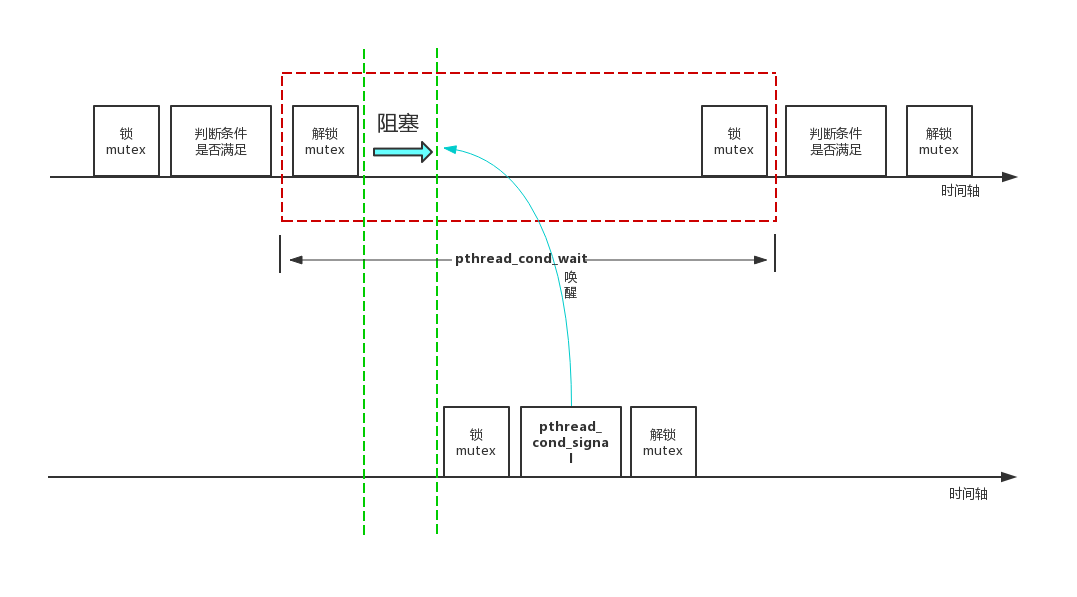
重点就是:无论是pthread_cond_wait还是pthread_cond_signal 都必须得先pthread_mutex_lock。如果没有这个保护,可能会产生race condition,漏掉信号。pthread_cond_wait()函数一进入wait状态就会自动release mutex。当其他线程通过pthread_cond_signal或pthread_cond_broadcast把该线程唤醒,使pthread_cond_wait()返回时,该线程又自动获得该mutex。
1 pthread_mutex_lock
例如,在Linux中,使用了称为Futex(快速用户空间互斥锁的简称)的系统。
在此系统中,对用户空间中的互斥变量执行原子增量和测试操作。
如果操作结果表明锁上没有争用,则对pthread_mutex_lock的调用将返回,而无需将上下文切换到内核中,因此获取互斥量的操作可以非常快。
仅当检测到争用时,系统调用(称为futex)才会发生,并且上下文切换到内核中,这会使调用进程进入睡眠状态,直到释放互斥锁为止。
还有很多更多的细节,尤其是对于可靠和/或优先级继承互斥,但这就是它的本质。
nptl/pthread_mutex_lock.c
      intPTHREAD_MUTEX_LOCK (pthread_mutex_t *mutex){  /* See concurrency notes regarding mutex type which is loaded from __kind     in struct __pthread_mutex_s in sysdeps/nptl/bits/thread-shared-types.h.  */  unsigned int type = PTHREAD_MUTEX_TYPE_ELISION (mutex);
  LIBC_PROBE (mutex_entry, 1, mutex);
  if (__builtin_expect (type & ~(PTHREAD_MUTEX_KIND_MASK_NP                                 | PTHREAD_MUTEX_ELISION_FLAGS_NP), 0))    return __pthread_mutex_lock_full (mutex);
  if (__glibc_likely (type == PTHREAD_MUTEX_TIMED_NP))    {      FORCE_ELISION (mutex, goto elision);    simple:      /* Normal mutex.  */      LLL_MUTEX_LOCK_OPTIMIZED (mutex);      assert (mutex->__data.__owner == 0);    }#if ENABLE_ELISION_SUPPORT  else if (__glibc_likely (type == PTHREAD_MUTEX_TIMED_ELISION_NP))    {  elision: __attribute__((unused))      /* This case can never happen on a system without elision,         as the mutex type initialization functions will not         allow to set the elision flags.  */      /* Don't record owner or users for elision case.  This is a         tail call.  */      return LLL_MUTEX_LOCK_ELISION (mutex);    }#endif  else if (__builtin_expect (PTHREAD_MUTEX_TYPE (mutex)                             == PTHREAD_MUTEX_RECURSIVE_NP, 1))    {      /* Recursive mutex.  */      pid_t id = THREAD_GETMEM (THREAD_SELF, tid);
      /* Check whether we already hold the mutex.  */      if (mutex->__data.__owner == id)        {          /* Just bump the counter.  */          if (__glibc_unlikely (mutex->__data.__count + 1 == 0))            /* Overflow of the counter.  */            return EAGAIN;
          ++mutex->__data.__count;
          return 0;        }
      /* We have to get the mutex.  */      LLL_MUTEX_LOCK_OPTIMIZED (mutex);
      assert (mutex->__data.__owner == 0);      mutex->__data.__count = 1;    }  else if (__builtin_expect (PTHREAD_MUTEX_TYPE (mutex)                          == PTHREAD_MUTEX_ADAPTIVE_NP, 1))    {      if (LLL_MUTEX_TRYLOCK (mutex) != 0)        {          int cnt = 0;          int max_cnt = MIN (max_adaptive_count (),                             mutex->__data.__spins * 2 + 10);          do            {              if (cnt++ >= max_cnt)                {                  LLL_MUTEX_LOCK (mutex);                  break;                }              atomic_spin_nop ();            }          while (LLL_MUTEX_TRYLOCK (mutex) != 0);
          mutex->__data.__spins += (cnt - mutex->__data.__spins) / 8;        }      assert (mutex->__data.__owner == 0);    }  else    {      pid_t id = THREAD_GETMEM (THREAD_SELF, tid);      assert (PTHREAD_MUTEX_TYPE (mutex) == PTHREAD_MUTEX_ERRORCHECK_NP);      /* Check whether we already hold the mutex.  */      if (__glibc_unlikely (mutex->__data.__owner == id))        return EDEADLK;      goto simple;    }
  pid_t id = THREAD_GETMEM (THREAD_SELF, tid);
  /* Record the ownership.  */  mutex->__data.__owner = id;#ifndef NO_INCR  ++mutex->__data.__nusers;#endif
  LIBC_PROBE (mutex_acquired, 1, mutex);
  return 0;}
typedef union{ struct __pthread_mutex_s { int __lock; unsigned int __count; int __owner; unsigned int __nusers; int __kind; int __spins; __pthread_list_t __list; } __data; ......} pthread_mutex_t;
/* Mutex types. */enum{ PTHREAD_MUTEX_TIMED_NP, PTHREAD_MUTEX_RECURSIVE_NP, PTHREAD_MUTEX_ERRORCHECK_NP, PTHREAD_MUTEX_ADAPTIVE_NP#if defined __USE_UNIX98 || defined __USE_XOPEN2K8 , PTHREAD_MUTEX_NORMAL = PTHREAD_MUTEX_TIMED_NP, PTHREAD_MUTEX_RECURSIVE = PTHREAD_MUTEX_RECURSIVE_NP, PTHREAD_MUTEX_ERRORCHECK = PTHREAD_MUTEX_ERRORCHECK_NP, PTHREAD_MUTEX_DEFAULT = PTHREAD_MUTEX_NORMAL#endif#ifdef __USE_GNU /* For compatibility. */ , PTHREAD_MUTEX_FAST_NP = PTHREAD_MUTEX_TIMED_NP#endif};
-
PTHREAD_MUTEX_TIMED_NP,这是缺省值,也就是普通锁。
-
PTHREAD_MUTEX_RECURSIVE_NP,可重入锁,允许同一个线程对同一个锁成功获得多次,并通过多次unlock解锁。
-
PTHREAD_MUTEX_ERRORCHECK_NP,检错锁,如果同一个线程重复请求同一个锁,则返回EDEADLK,否则与PTHREAD_MUTEX_TIMED_NP类型相同。
-
PTHREAD_MUTEX_ADAPTIVE_NP,自适应锁,自旋锁与普通锁的混合。
mutex默认用的是PTHREAD_MUTEX_TIMED_NP,所以会走到LLL_MUTEX_LOCK_OPTIMIZED,这是个宏:
# define LLL_MUTEX_LOCK_OPTIMIZED(mutex) lll_mutex_lock_optimized (mutex)
lll_mutex_lock_optimized (pthread_mutex_t *mutex){ /* The single-threaded optimization is only valid for private mutexes. For process-shared mutexes, the mutex could be in a shared mapping, so synchronization with another process is needed even without any threads. If the lock is already marked as acquired, POSIX requires that pthread_mutex_lock deadlocks for normal mutexes, so skip the optimization in that case as well. */ int private = PTHREAD_MUTEX_PSHARED (mutex); if (private == LLL_PRIVATE && SINGLE_THREAD_P && mutex->__data.__lock == 0) mutex->__data.__lock = 1; else lll_lock (mutex->__data.__lock, private);}
由于不是LLL_PRIVATE,所以走lll_lock, lll_lock也是个宏:
#define lll_lock(futex, private) \ __lll_lock (&(futex), private)
注意这里出现了futex,本文的后续主要就是围绕它展开的。
#define __lll_lock(futex, private) \ ((void) \ ({ \ int *__futex = (futex); \ if (__glibc_unlikely \ (atomic_compare_and_exchange_bool_acq (__futex, 1, 0))) \ { \ if (__builtin_constant_p (private) && (private) == LLL_PRIVATE) \ __lll_lock_wait_private (__futex); \ else \ __lll_lock_wait (__futex, private); \ } \ }))
其中,atomic_compare_and_exchange_bool_acq是尝试通过原子操作尝试将__futex(就是mutex->__data.__lock)从0变为1,如果成功就直接返回了,如果失败,则调用__lll_lock_wait,代码如下:
      void__lll_lock_wait (int *futex, int private){  if (atomic_load_relaxed (futex) == 2)    goto futex;
  while (atomic_exchange_acquire (futex, 2) != 0)    {    futex:      LIBC_PROBE (lll_lock_wait, 1, futex);      futex_wait ((unsigned int *) futex, 2, private); /* Wait if *futex == 2.  */    }}
在这里先要说明一下,pthread将futex的锁状态定义为3种:
-
0,代表当前锁空闲无锁,可以进行快速上锁,不需要进内核。
-
1,代表有线程持有当前锁,如果这时有其它线程需要上锁,就必须标记futex为“锁竞争”,然后通过futex系统调用进内核把当前线程挂起。
-
2,代表锁竞争,有其它线程将要或正在内核的futex系统中排队等待锁。
所以上锁失败进入到__lll_lock_wait这里后,先判断futex 是不是等于2,如果是则说明大家都在排队,你也排着吧(直跳转到futex_wait)。如果不等于2,那说明你是第一个来竞争的人,把futex设置成2,告诉后面来的人要排队,然后自己以身作则先排队。
futex_wait 实质上就是调用futex系统调用。在第四节,我们就来仔细分析这个系统调用。
2 pthread_cond_wait
本质也是走到futex系统调用,限于篇幅就不展开了。
四 内核层
为什么要有futex,它解决什么问题?何时加入内核的?
简单来讲,futex的解决思路是:在无竞争的情况下操作完全在user space进行,不需要系统调用,仅在发生竞争的时候进入内核去完成相应的处理(wait 或者 wake up)。所以说,futex是一种user mode和kernel mode混合的同步机制,需要两种模式合作才能完成,futex变量位于user space,而不是内核对象,futex的代码也分为user mode和kernel mode两部分,无竞争的情况下在user mode,发生竞争时则通过sys_futex系统调用进入kernel mode进行处理。
用户态的部分已经在前面讲解了,本节重点讲解futex在内核部分的实现。
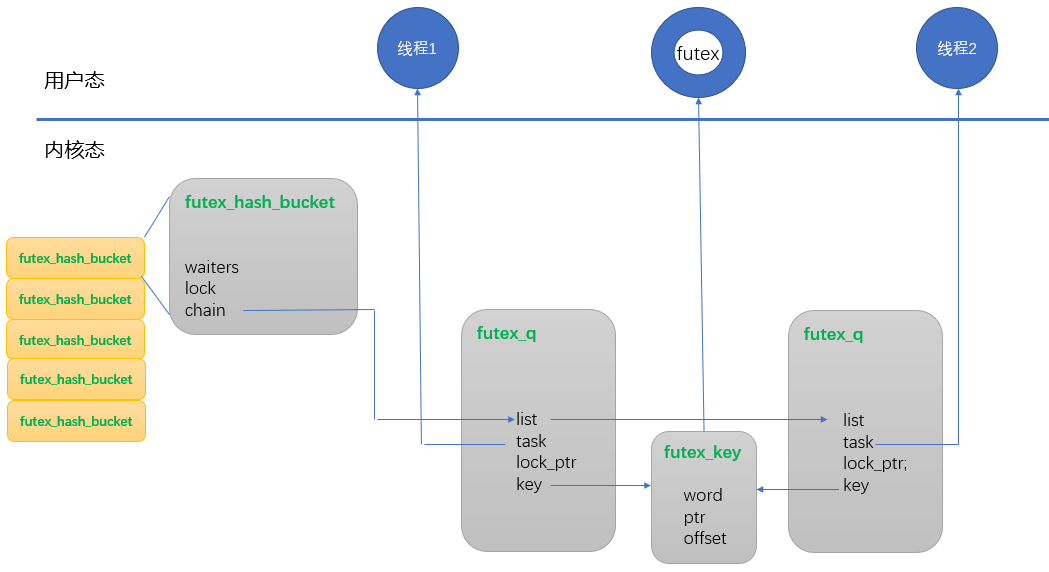
futex 设计了三个基本数据结构:futex_hash_bucket,futex_key,futex_q。
struct futex_hash_bucket { atomic_t waiters; spinlock_t lock; struct plist_head chain;} ____cacheline_aligned_in_smp;
struct futex_q { struct plist_node list; struct task_struct *task; spinlock_t *lock_ptr; union futex_key key; //唯一标识uaddr的key值 struct futex_pi_state *pi_state; struct rt_mutex_waiter *rt_waiter; union futex_key *requeue_pi_key; u32 bitset;};
union futex_key { struct { unsigned long pgoff; struct inode *inode; int offset; } shared; struct { unsigned long address; struct mm_struct *mm; int offset; } private; struct { unsigned long word; void *ptr; int offset; } both;};
其实还有个struct __futex_data, 如下所示,这个
      static struct {        struct futex_hash_bucket *queues;        unsigned long            hashsize;} __futex_data __read_mostly __aligned(2*sizeof(long));
#define futex_queues   (__futex_data.queues)#define futex_hashsize (__futex_data.hashsize)
在futex初始化的时候(futex_init),会确定hashsize,比如24核cpu时,hashsize = 8192。然后根据这个hashsize调用alloc_large_system_hash分配数组空间,并初始化数组元素里的相关字段,比如plist_head, lock。
      static int __init futex_init(void){        unsigned int futex_shift;        unsigned long i;
#if CONFIG_BASE_SMALL        futex_hashsize = 16;#else        futex_hashsize = roundup_pow_of_two(256 * num_possible_cpus());#endif
        futex_queues = alloc_large_system_hash("futex", sizeof(*futex_queues),                                               futex_hashsize, 0,                                               futex_hashsize < 256 ? HASH_SMALL : 0,                                               &futex_shift, NULL,                                               futex_hashsize, futex_hashsize);        futex_hashsize = 1UL << futex_shift;
        futex_detect_cmpxchg();
        for (i = 0; i < futex_hashsize; i++) {                atomic_set(&futex_queues[i].waiters, 0);                plist_head_init(&futex_queues[i].chain);                spin_lock_init(&futex_queues[i].lock);        }
        return 0;}
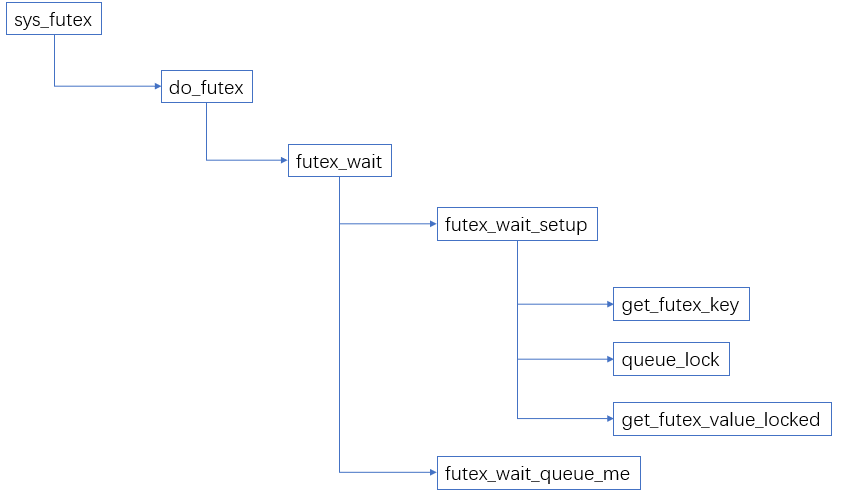
脑子里有了数据结构,流程就容易理解了。futex_wait的总体流程如下:
![]()
static int futex_wait(u32 __user *uaddr, unsigned int flags, u32 val, ktime_t *abs_time, u32 bitset){ struct hrtimer_sleeper timeout, *to = NULL; struct restart_block *restart; struct futex_hash_bucket *hb; struct futex_q q = futex_q_init; int ret;
if (!bitset) return -EINVAL; q.bitset = bitset;
if (abs_time) { to = &timeout; hrtimer_init_on_stack(&to->timer, (flags & FLAGS_CLOCKRT) ? CLOCK_REALTIME : CLOCK_MONOTONIC, HRTIMER_MODE_ABS); hrtimer_init_sleeper(to, current); hrtimer_set_expires_range_ns(&to->timer, *abs_time, current->timer_slack_ns); }
retry: /* * Prepare to wait on uaddr. On success, holds hb lock and increments * q.key refs. */ ret = futex_wait_setup(uaddr, val, flags, &q, &hb); if (ret) goto out;
/* queue_me and wait for wakeup, timeout, or a signal. */ futex_wait_queue_me(hb, &q, to);
/* If we were woken (and unqueued), we succeeded, whatever. */ ret = 0; /* unqueue_me() drops q.key ref */ if (!unqueue_me(&q)) goto out; ret = -ETIMEDOUT; if (to && !to->task) goto out;
/* * We expect signal_pending(current), but we might be the * victim of a spurious wakeup as well. */ if (!signal_pending(current)) goto retry;
ret = -ERESTARTSYS; if (!abs_time) goto out;
restart = ¤t->restart_block; restart->fn = futex_wait_restart; restart->futex.uaddr = uaddr; restart->futex.val = val; restart->futex.time = *abs_time; restart->futex.bitset = bitset; restart->futex.flags = flags | FLAGS_HAS_TIMEOUT;
ret = -ERESTART_RESTARTBLOCK;
out: if (to) { hrtimer_cancel(&to->timer); destroy_hrtimer_on_stack(&to->timer); } return ret;}
函数 futex_wait_setup主要做两件事,一是对uaddr进行hash,找到futex_hash_bucket并获取它上面的自旋锁,二是判断*uaddr是否为预期值。如果不相等则会立即返回,由用户态继续trylock。
      * * futex_wait_setup() - Prepare to wait on a futex * @uaddr:      the futex userspace address * @val:        the expected value * @flags:      futex flags (FLAGS_SHARED, etc.) * @q:          the associated futex_q * @hb:         storage for hash_bucket pointer to be returned to caller * * Setup the futex_q and locate the hash_bucket.  Get the futex value and * compare it with the expected value.  Handle atomic faults internally. * Return with the hb lock held and a q.key reference on success, and unlocked * with no q.key reference on failure. * * Return: *  -  0 - uaddr contains val and hb has been locked; *  - <1 - -EFAULT or -EWOULDBLOCK (uaddr does not contain val) and hb is unlocked */static int futex_wait_setup(u32 __user *uaddr, u32 val, unsigned int flags,                           struct futex_q *q, struct futex_hash_bucket **hb){        u32 uval;        int ret;        retry:        //初始化futex_q, 把uaddr设置到futex_key的字段中,将来futex_wake时也是通过这个key来查找futex。        ret = get_futex_key(uaddr, flags & FLAGS_SHARED, &q->key, VERIFY_READ);        if (unlikely(ret != 0))                return ret;
retry_private:        //根据key计算hash,然后在数组里找到对应的futex_hash_bucket        *hb = queue_lock(q);        //原子地将uaddr的值读到uval中        ret = get_futex_value_locked(&uval, uaddr);
        if (ret) {                queue_unlock(*hb);
                ret = get_user(uval, uaddr);                if (ret)                        goto out;
                if (!(flags & FLAGS_SHARED))                        goto retry_private;
                put_futex_key(&q->key);                goto retry;        }        //如果当前uaddr指向的值不等于val,即说明其他进程修改了  //uaddr指向的值,等待条件不再成立,不用阻塞直接返回。       if (uval != val) {                queue_unlock(*hb);                ret = -EWOULDBLOCK;        }
out:        if (ret)                put_futex_key(&q->key);        return ret;}
然后调用futex_wait_queue_me 把当前进程挂起:
      /** * futex_wait_queue_me() - queue_me() and wait for wakeup, timeout, or signal * @hb:         the futex hash bucket, must be locked by the caller * @q:          the futex_q to queue up on * @timeout:    the prepared hrtimer_sleeper, or null for no timeout */static void futex_wait_queue_me(struct futex_hash_bucket *hb, struct futex_q *q,                                struct hrtimer_sleeper *timeout){        /*         * The task state is guaranteed to be set before another task can         * wake it. set_current_state() is implemented using smp_store_mb() and         * queue_me() calls spin_unlock() upon completion, both serializing         * access to the hash list and forcing another memory barrier.         */        set_current_state(TASK_INTERRUPTIBLE);        queue_me(q, hb);
        /* Arm the timer */        if (timeout)                hrtimer_start_expires(&timeout->timer, HRTIMER_MODE_ABS);
        /*         * If we have been removed from the hash list, then another task         * has tried to wake us, and we can skip the call to schedule().         */        if (likely(!plist_node_empty(&q->list))) {                /*                 * If the timer has already expired, current will already be                 * flagged for rescheduling. Only call schedule if there                 * is no timeout, or if it has yet to expire.                 */                if (!timeout || timeout->task)                        freezable_schedule();        }        __set_current_state(TASK_RUNNING);}
futex_wait_queue_me主要做几件事:
-
将当前进程插入到等待队列,就是把futex_q 挂到futex_hash_bucket上
-
-
五 总结
本文主要是对JAVA中的ReentrantLock.lock流程进行了自上而下的梳理。
