使用 Mobilenet 和 Keras 来做迁移学习

本文为 AI 研习社编译的技术博客,原标题 :
Transfer Learning using Mobilenet and Keras
作者 | Ferhat Culfaz
翻译 | 胡瑛皓 校对 | 酱番梨
整理 | 菠萝妹
原文链接:
https://towardsdatascience.com/transfer-learning-using-mobilenet-and-keras-c75daf7ff299
注:本文的相关链接请点击文末【阅读原文】进行访问
使用Mobilenet和Keras来做迁移学习
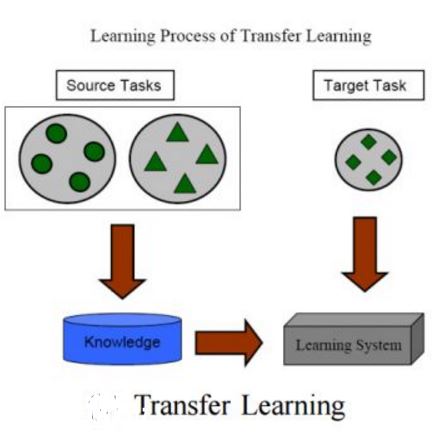
本文以notebook的实例的形式讲解。首先用Mobilenet分类狗的图片,然后演示一张不能正确分类的蓝雀图片,然后用迁移学习和Mobilenet重新训练,使这张图片得到正确分类。例子中举的是二分类,当然也可以按需要进行增加更多类型,看具体硬件和计算时间的限制。
Mobilenet论文地址:https://arxiv.org/pdf/1704.04861.pdf
MobileNets: Efficient Convolutional Neural Networks for Mobile Vision Applications, Howard et al, 2017.
Mobilenet采用轻量级架构,会用它进行训练。它使用深度可分离卷积操作,意思是说其采用的是单通道卷积操作,而不是混合三种颜色然后进行扁平化操作。其具有过滤输入通道的效果。或就像论文作者解释的: “ MobileNets运用深度卷积操作,对每个输入通道应用单个过滤操作。然后逐点用1×1卷积合并深度卷积的结果。用标准卷积将输入进行过滤合并到一组新的输出。深度可分离卷积再将其分开成2层,一层用于过滤,另一层用于合并。上述分解显著减少了计算量和模型大小。”
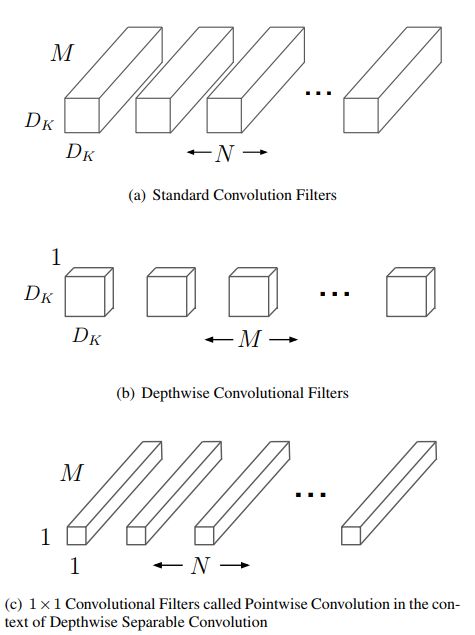
逐点卷积和深度卷积的区别
Mobilenet的整体架构是这样的,其中包含30层:
步长2的卷积层
深度卷积
逐点卷积层使通道数翻倍
步长为2的深度卷积层
逐点卷积层使通道数翻倍等
等等
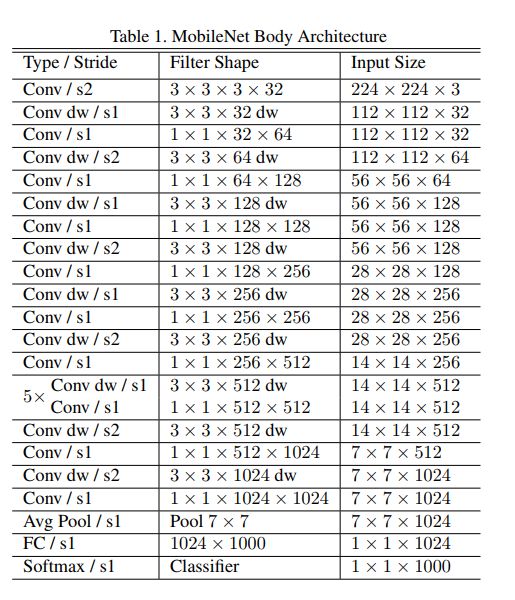
Mobilenet 完整架构
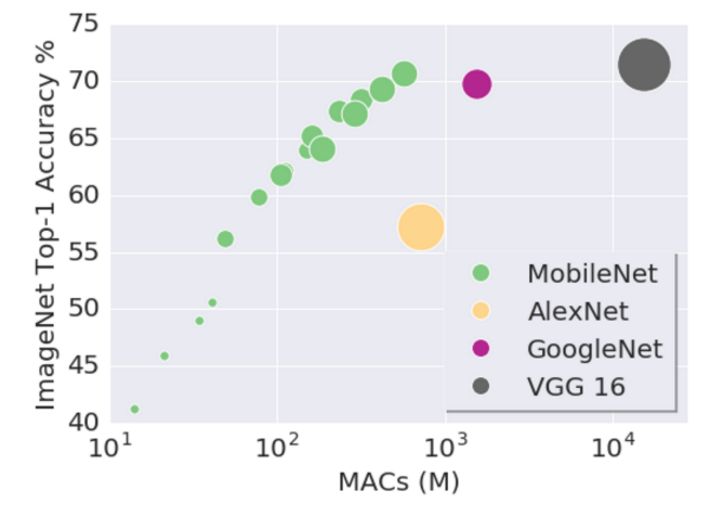
其维护成本很低,因而性能速度都很好。目前也有一些受青睐的预训练模型,模型的大小可在适应内存或磁盘上,与所用到的参数成正比。模型的速度和能耗与MACs(Multiply-Accumulates)数量成正比,该指标用以衡量乘法操作与累加操作的数量。
好,现在我们开始编码!
本文代码地址如下: https://github.com/ferhat00/Deep-Learning/tree/master/Transfer%20Learning%20CNN
首先,加载一些必要的包和库。
import keras
from keras import backend as K
from keras.layers.core import Dense, Activation
from keras.optimizers import Adam
from keras.metrics import categorical_crossentropy
from keras.preprocessing.image import ImageDataGenerator
from keras.preprocessing import image
from keras.models import Model
from keras.applications import imagenet_utils
from keras.layers import Dense,GlobalAveragePooling2D
from keras.applications import MobileNet
from keras.applications.mobilenet import preprocess_input
import numpy as np
from IPython.display import Image
from keras.optimizers import Adam
我们从Keras导入预训练模型。
mobile = keras.applications.mobilenet.MobileNet()
def prepare_image(file):
    img_path = ''
    img = image.load_img(img_path + file, target_size=(224, 224))
    img_array = image.img_to_array(img)
    img_array_expanded_dims = np.expand_dims(img_array, axis=0)
    return keras.applications.mobilenet.preprocess_input(img_array_expanded_dims)
我们试试看分类不同品种的狗狗。
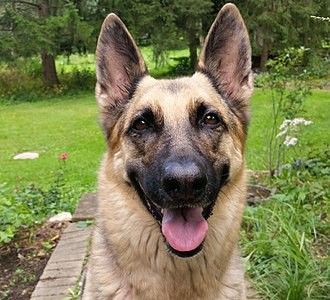
Image(filename='German_Shepherd.jpg')
preprocessed_image = prepare_image('German_Shepherd.jpg')
predictions = mobile.predict(preprocessed_image)
results = imagenet_utils.decode_predictions(predictions)
results
输出:
[[('n02106662', 'German_shepherd', 0.9796372),
('n02105162', 'malinois', 0.020184083),
('n02091467', 'Norwegian_elkhound', 0.00015799515),
('n02116738', 'African_hunting_dog', 5.2901587e-06),
('n02105251', 'briard', 3.9127376e-06)]]
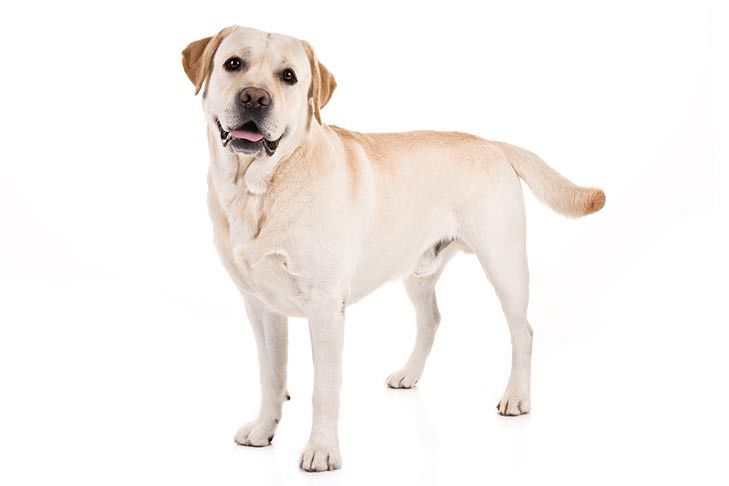
Image(filename='labrador1.jpg')
preprocessed_image = prepare_image('labrador1.jpg')
predictions = mobile.predict(preprocessed_image)
results = imagenet_utils.decode_predictions(predictions)
results
输出:
[[(‘n02099712’, ‘Labrador_retriever’, 0.73073703),
(‘n02087394’, ‘Rhodesian_ridgeback’, 0.03984367),
(‘n02092339’, ‘Weimaraner’, 0.03359009),
(‘n02109047’, ‘Great_Dane’, 0.028944707),
(‘n02110341’, ‘dalmatian’, 0.022403581)]]
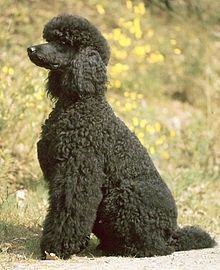
Image(filename='poodle1.jpg')
preprocessed_image = prepare_image('poodle1.jpg')
predictions = mobile.predict(preprocessed_image)
results = imagenet_utils.decode_predictions(predictions)
results
输出:
[[('n02113799', 'standard_poodle', 0.5650911),
  ('n02113712', 'miniature_poodle', 0.37279922),
  ('n02102973', 'Irish_water_spaniel', 0.053150617),
  ('n02113624', 'toy_poodle', 0.0072146286),
  ('n02093859', 'Kerry_blue_terrier', 0.0013652634)]]
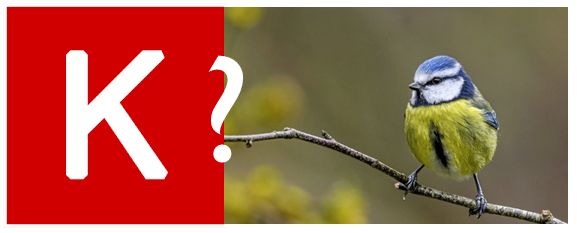
目前为止一切都很好。分类器区分出不同品种的狗。那么让我们拿一种鸟类图片来试试,这里用蓝雀图片。
Image(filename='blue_tit.jpg')
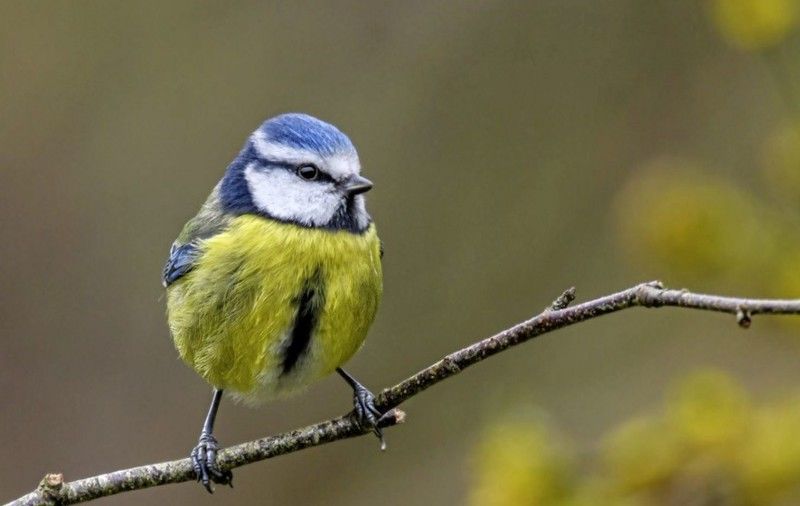
蓝雀
preprocessed_image = prepare_image('blue_tit.jpg')
predictions = mobile.predict(preprocessed_image)
results = imagenet_utils.decode_predictions(predictions)
results
输出:
[[('n01592084', 'chickadee', 0.95554715),
  ('n01530575', 'brambling', 0.012973112),
  ('n01828970', 'bee_eater', 0.012916375),
  ('n01532829', 'house_finch', 0.010978725),
  ('n01580077', 'jay', 0.0020677084)]]
可以看到,分类器不能识别蓝雀。图片被错分为山雀(chickadee)。这是一种北美本土的鸟类,有一些微妙的不同:
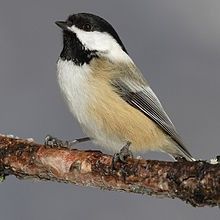
山雀
我们调一下 Mobilenet 的架构,然后重新训练顶部几层,进行迁移学习。 要达成这个,拿一些图片来训练这个模型。这里会让模型学习蓝雀和乌鸦。这里就不用手工下载训练用到的图片了,用谷歌图像搜索,然后下载这些图片,google_images_download包很好用,加一下引用就行了。
地址: https://github.com/hardikvasa/google-images-download
!pip install google_images_download
from google_images_download import google_images_download
response = google_images_download.googleimagesdownload()
arguments = {"keywords":"blue tit","limit":100,"print_urls":False,"format":"jpg", "size":">400*300"}
paths = response.download(arguments)
arguments = {"keywords":"crow","limit":100,"print_urls":False, "format":"jpg", "size":">400*300"}
paths = response.download(arguments)
现在我们重用MobileNet,会下载一个轻量级存档文件(17Mb), 冻结其基础层,在模型顶部增加几层,然后进行训练。注意本文只训练一个二分类器,区分蓝雀和乌鸦。
base_model=MobileNet(weights='imagenet',include_top=False) #imports the mobilenet model and discards the last 1000 neuron layer.

x=base_model.output
x=GlobalAveragePooling2D()(x)
x=Dense(1024,activation='relu')(x) #we add dense layers so that the model can learn more complex functions and classify for better results.
x=Dense(1024,activation='relu')(x) #dense layer 2
x=Dense(512,activation='relu')(x) #dense layer 3
preds=Dense(2,activation='softmax')(x) #final layer with softmax activation
我们来看一下模型的架构
for i,layer in enumerate(model.layers):
  print(i,layer.name)
这里采用Imagenet数据集预训练的权重。保证所有权重是不可被训练(冻结)的。只训练最后几个dense层。
for layer in model.layers:
    layer.trainable=False
# or if we want to set the first 20 layers of the network to be non-trainable
for layer in model.layers[:20]:
    layer.trainable=False
for layer in model.layers[20:]:
    layer.trainable=True
把训练数据载入ImageDataGenerator。指定一下路径,它会自动将数据以批次形式供给训练,简化了编码过程。
train_datagen=ImageDataGenerator(preprocessing_function=preprocess_input) #included in our dependencies

train_generator=train_datagen.flow_from_directory('C:/Users/Ferhat/Python Code/Workshop/Tensoorflow transfer learning/downloads',
                                                 target_size=(224,224),
                                                 color_mode='rgb',
                                                 batch_size=32,
                                                 class_mode='categorical',
                                                 shuffle=True)
编译模型。现在开始训练。在GTX1070 GPU环境下,训练不到2分钟。
model.compile(optimizer='Adam',loss='categorical_crossentropy',metrics=['accuracy'])
# Adam optimizer
# loss function will be categorical cross entropy
# evaluation metric will be accuracy

step_size_train=train_generator.n//train_generator.batch_size
model.fit_generator(generator=train_generator,
                   steps_per_epoch=step_size_train,
                   epochs=10)
Epoch 1/10
5/5 [==============================] - 5s 952ms/step - loss: 0.9098 - acc: 0.6562
Epoch 2/10
5/5 [==============================] - 3s 563ms/step - loss: 0.0503 - acc: 0.9686
Epoch 3/10
5/5 [==============================] - 3s 687ms/step - loss: 0.0236 - acc: 0.9930
Epoch 4/10
5/5 [==============================] - 4s 716ms/step - loss: 7.5358e-04 - acc: 1.0000
Epoch 5/10
5/5 [==============================] - 3s 522ms/step - loss: 0.0021 - acc: 1.0000
Epoch 6/10
5/5 [==============================] - 4s 780ms/step - loss: 0.0353 - acc: 0.9937
Epoch 7/10
5/5 [==============================] - 3s 654ms/step - loss: 0.0905 - acc: 0.9938
Epoch 8/10
5/5 [==============================] - 4s 890ms/step - loss: 0.0047 - acc: 1.0000
Epoch 9/10
5/5 [==============================] - 3s 649ms/step - loss: 0.0377 - acc: 0.9867
Epoch 10/10
5/5 [==============================] - 5s 929ms/step - loss: 0.0125 - acc: 1.0000
模型训练好了。我们来测试一些独立输入的图片,检查一下预测情况。
def load_image(img_path, show=False):

    img = image.load_img(img_path, target_size=(150, 150))
    img_tensor = image.img_to_array(img)                    # (height, width, channels)
    img_tensor = np.expand_dims(img_tensor, axis=0)         # (1, height, width, channels), add a dimension because the model expects this shape: (batch_size, height, width, channels)
    img_tensor /= 255.                                      # imshow expects values in the range [0, 1]

    if show:
        plt.imshow(img_tensor[0])
        plt.axis('off')
        plt.show()

    return img_tensor

#img_path = 'C:/Users/Ferhat/Python Code/Workshop/Tensoorflow transfer learning/blue_tit.jpg'
img_path = 'C:/Users/Ferhat/Python Code/Workshop/Tensoorflow transfer learning/crow.jpg'
new_image = load_image(img_path)

pred = model.predict(new_image)

pred
输出:
array([[4.5191143e-15, 1.0000000e+00]], dtype=float32)
结果显示,分类器准确的预测了乌鸦,此处蓝雀图像被注释掉了。
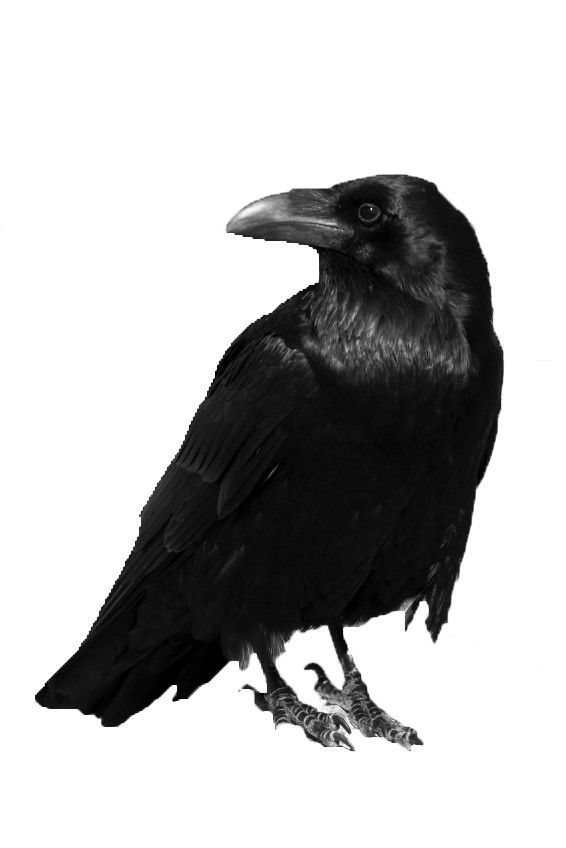
乌鸦
本文中的方法可被进一步扩展到更多图像类型的分类上,分类数增加抽象效果会更好。这种方法是轻量级、可快速实现的CNN迁移学习方法。当然这也取决于速度、准确度、采用的硬件以及你投入的时间。
想要继续查看该篇文章相关链接和参考文献?
长按链接点击打开或点击底部【阅读原文】:
http://ai.yanxishe.com/page/TextTranslation/1214
AI研习社每日更新精彩内容,观看更多精彩内容:
进入 kaggle 竞赛前 2% 的秘诀
如何极大效率地提高你训练模型的速度?
用 4 种卷积神经网络,轻松分类时尚图像
这 25 个开源机器学习项目,一般人我不告诉 Ta
等你来译: