推荐|Andrew Ng计算机视觉教程总结
Computer Vision by Andrew Ng—11 Lessons Learned
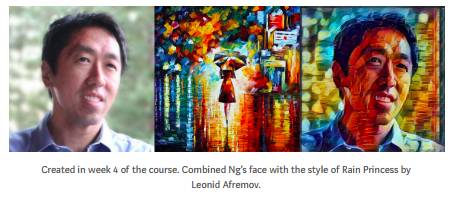
I recently completed Andrew Ng’s computer vision course on Coursera. Ng does an excellent job at explaining many of the complex ideas required to optimize any computer vision task. My favourite component of the course was the neural style transfer section (see lesson 11), which allows you to create artwork which combines the style of Claud Monet with the content of whichever image you would like. This is an example of what you can do:
In this article, I will discuss 11 key lessons that I learned in the course. Note that this is the fourth course in the Deep Learning specialization released by deeplearning.ai. If you would like to learn about the previous 3 courses, I recommend you check out this blog.
Lesson 1: Why computer vision is taking o?
Big data and algorithmic developments will cause the testing error of intelligent systems to converge to Bayes optimal error. This will lead to Created in week 4 of the course. Combined Ng’s face with the style of Rain Princess by Leonid Afremov. AI surpassing human level performance in all areas, including natural perception tasks. Open source software from TensorFlow allows you to use transfer learning to implement an object detection system for any object very rapidly. With transfer learning, you only need about 100– 500 examples for the system to work relatively well. Manually labeling 100 examples isn’t too much work, so you’ll have a minimum viable product very quickly.
Lesson 2: How convolution works?
Ng explains how to implement the convolution operator and shows how it can detect edges in an image. He also explains other lters, such as the Sobel lter, which put more weight on central pixels of the edge. Ng then explains that the weights of the lter should not be handdesigned but rather should be learned using a hill climbing algorithm such as gradient descent. Lesson 3: Why convolutions? Ng gives several philosophical reasons for why convolutions work so well in image recognition tasks. He outlines 2 concrete reasons. The rst is known as parameter sharing. It is the idea that a feature detector that’s useful in one part of an image is probably useful in another part of the image. For example, an edge detector is probably useful is many parts of the image. The sharing of parameters allows the number of parameters to be small and also allows for robust translation invariance. Translation invariance is the notion that a cat shifted and rotated is still a picture of a cat.
The second idea he outlines is known as sparsity of connections. This is the idea that each output layer is only a function of a small number of inputs (particularly, the lter size squared). This greatly reduces the number of parameters in the network and allows for faster training.
Lesson 3: Why Padding?
Padding is usually used to preserve the input size (i.e. the dimension of the input and output are the same). It is also used so that frames near the edges of image contribute as much to the output as frames near near the centre.
Lesson 4: Why Max Pooling?
Through empirical research, max pooling has proven to be extremely eective in CNN’s. By downsampling the image, we reduce the number of parameters which makes the features invariant to scale or orientation changes.
Lesson 5: Classical network architectures
Ng shows 3 classical network architectures including LeNet-5, AlexNet and VGG-16. The main idea he presents is that eective networks often have layers with an increasing channel size and decreasing width and height.
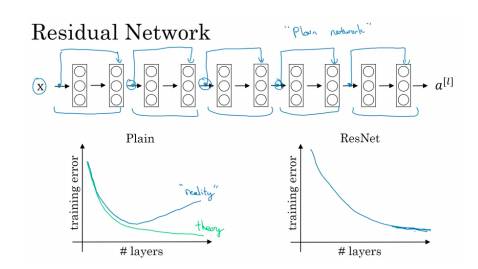
Lesson 6: Why ResNets works?
For a plain network, the training error does not monotonically decrease as the number of layers increases due to vanishing and exploding gradients. These networks have feed forward skipped connections which allow you train extremely large networks without a drop in performance.
Lesson 7: Use Transfer Learning!
Training large networks, such as inception, from scratch can take weeks on a GPU. You should download the weights from a pretrained network and just retrain the last softmax layer (or the last few layers). This will greatly reduce training time. The reason this works is that earlier layers tend to be associated with concepts in all images such as edges and curvy lines.
Lesson 8: How to win computer vision competitions
Ng explains that you should train several networks independently and average their outputs to get better performance. Data augmentation techniques such as randomly cropping images, ipping images about the horizontal and vertical axes may also help with performance. Finally, you should use an open source implementation and pretrained model to start and then ne-tune the parameters for your particular application.
Lesson 9: How to implement object detection
Ng starts by explaining the idea of landmark detection in an image. Basically, these landmarks become apart of your training output examples. With some clever convolution manipulations, you get an output volume that tells you the probability that the object is in a certain region and the location of the object. He also explains how to evaluate the eectiveness of your object detection algorithm using the intersection over union formula. Finally, Ng puts all these components together to explain the famous YOLO algorithm.
Lesson 10: How to implement Face Recognition
Facial recognition is a one-shot learning problem since you may only have one example image to identify the person. The solution is to learn a similarity function which gives the degree of dierence between two images. So if the images are of the same person, you want the function to output a small number, and vice versa for dierent people.
The rst solution Ng gives is known as a siamese network. The idea is to input two persons into the same network separately and then compare their outputs. If the outputs are similar, then the persons are probably the same. The network is trained so that if two input images are of the same person, then the distance between their encodings is relatively small.
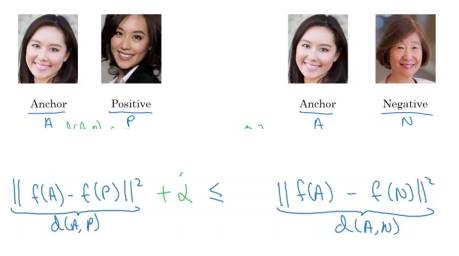
The second solution he gives uses a triplet loss method. The idea is that you have a triplet of images (Anchor (A), Positive (P) and Negative (N)) and you train the network so that the output distance between A and P is much smaller than the distance between A and N.
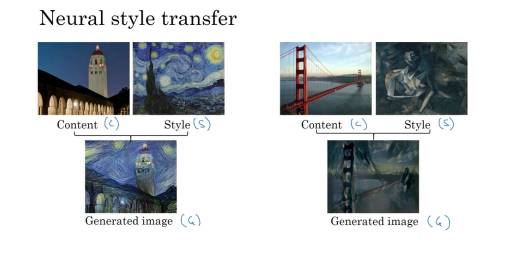
Lesson 11: How to create artwork using Neural Style Transfer
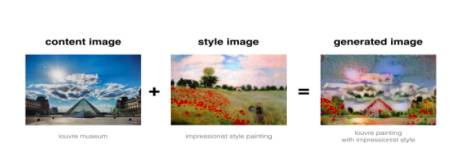
Ng explains how to generate an image with a combining content and style. See the examples below.
The key to Neural Style Transfer is to understand the visual representations for what each layer in a convolutional network is learning. It turns out that earlier layers learn simple features like edges and later features learn complex objects like faces, feet and cars.
To build a neural style transfer image, you simply dene a cost function which is a convex combination of the similarity in content and style. In particular, the cost function would be:
J(G) = alpha * J_content(C,G) + beta * J_style(S,G)
where G is the generated image, C is the content image and S is the style image. The learning algorithm simply uses gradient descent to minimize the cost function with respect to the generated image, G.
The steps are as follows:
Generate G randomly.
Use gradient descent to minimize J(G), i.e. write G := GdG(J(G)).
Repeat step 2.
Conclusion
By completing this course, you will gain an intuitive understanding of a large chunk of the computer vision literature. The homework 1. 2. 3. assignments also give you practice implementing these ideas yourself. You will not become an expert in computer vision after completing this course, but this course may kickstart a potential idea/career you may have in computer vision.
If you have any interesting applications of computer vision you would like to share, let me know in the comments below. I would be happy to discuss potential collaboration on new projects.
That’s all folks—if you’ve made it this far, please comment below and add me on LinkedIn. https://www.linkedin.com/in/ryanshrott/
Github :https://github.com/ryanshrott
招聘|AI学院长期招聘AI课程讲师(兼职):日薪5k-10k

