随手记在iPhone X上的真机适配实践总结
随手记在iPhone X上的真机适配实践总结
欢迎关注微信公众号「随手记技术团队」,查看更多随手记团队的技术文章。
本文作者:丁同舟、王博文
随手记是首批苹果官方邀请,前往北京真机适配iPhone X的团队,该篇文章的经验总结也是由此而来,完全针对真机适配的方案。
Intro
前几天,随手记团队对 iPhone X 紧张的适配工作暂时告一段落。从最初在 iPhone X 模拟器上面运行,到最后真机测试时完全适配。在这一路过来适配的历程中,我们整理出下面这份通用的 iPhone X 适配文档供大家参考。
Always Remember
摘自 Designing for iPhone X : 为了让你的应用在 iPhone X上 面完美运行,你需要将可视元素扩展至填充整个展示窗口(屏幕)上,同时,你也需要保证如按钮、tab bar 等可交互控件,以及一些至关重要的信息不会因为屏幕的圆角而被裁掉,或者被手机的「刘海」和虚拟「Home键」遮住。
Updating your App to work on the new display(iPhone X) involves extending visual elements to fill the display's view port, while also keeping controls and critical information from getting clipped in the corners or covered by the sensor housing or home indicator.
UIKit and Auto Layout
对于原生的 UIKit 控件来说,适配 iPhone X 是一件非常轻松的事。假如你的应用使用了许多原生控件并且没有对它们做过多的自定义的话,例如像导航条 (Navigation Bars),列表 (Tables),集合视图 (Collection Views),这些控件会在 iPhone X 屏幕上自动调整其布局。
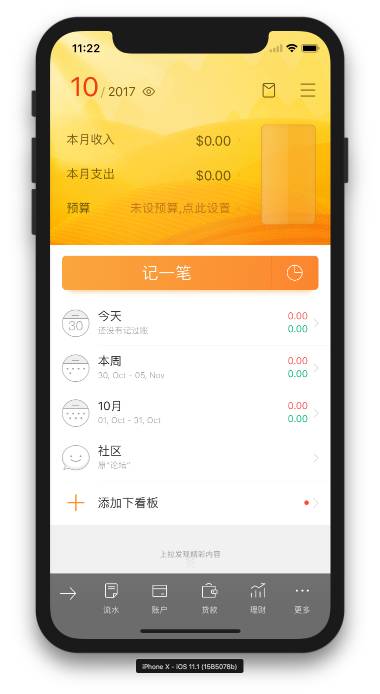
如上图,在 iPhone X 屏幕上面,navigation bar 和底部 tab bar 分别在其控件的顶部和底部作了延伸,为「刘海」和 home indicator 留出位置。
对于使用了 Auto Layout 的控件而言,适配 iPhone X 的特殊屏幕也不会成为难题。在 iOS 11 中,苹果引入了一个新的 UILayoutGuide 属性解决了适配问题。
var safeAreaLayoutGuide: UILayoutGuide { get }
Safe area 的特性,为我们适配 iPhone X 打下了基础。
Safe Area
在苹果的官方 Human Interface Guidelines 中,对 safe area 的描述为
All apps should adhere to the safe area and layout margins defined by UIKit, which ensure appropriate insetting based on the device and context
The safe area also prevents content from underlapping the status bar, navigation bar, toolbar, and tab bar.
所有的应用应该附着于安全区域和 UIKit 定义的边距中,这可以让应用在各种设备或者横竖屏情况下都有正确的布局。同时,安全区域可以保证页面的内容不会和状态条、导航条、工具条或者底部导航重叠。
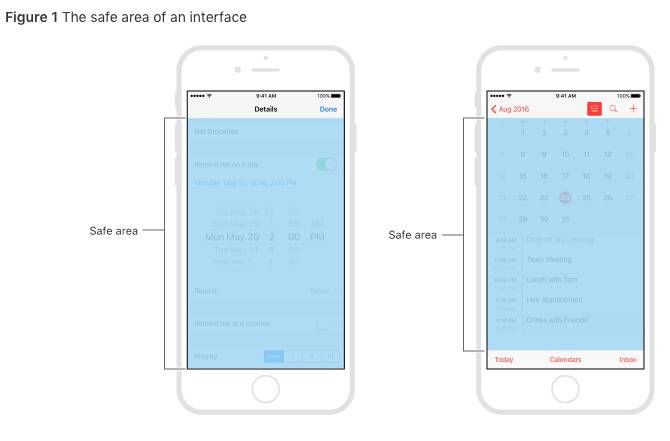
另一官方文档 Positioning Content Relative to the Safe Area 中的一张图清晰地展示了 safe area 在应用中代表的意义。
Auto Layout with Safe Area
Standard system-provided views automatically adopt a safe area layout guide.
New in iOS 11, Apple is deprecating the top and bottom layout guides and replacing them with a single safe area layout guide:
iOS 11中,苹果推出了 SafeAreaLayoutGuide 取代了 bottomLayoutGuide 和 topLayoutGuide,对于已经使用了 bottomLayoutGuide 和 topLayoutGuide 的布局来说,单纯使用 safeAreaLayoutGuide 可以完成一样的工作,同时也可以完美适配 iPhone X 的布局。
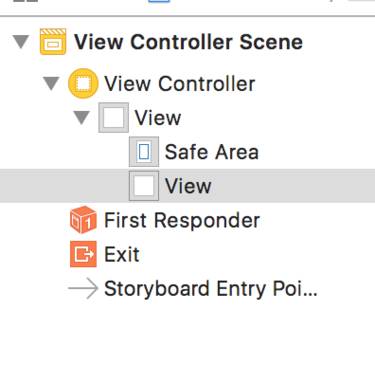
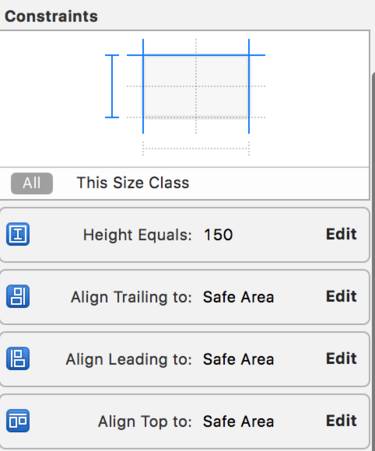
使用 Auto Layout 布局,适配 safe area 会是一个非常简单的事情。打开一个 storyboard,会发现视图层次中多了一个 Safe Area
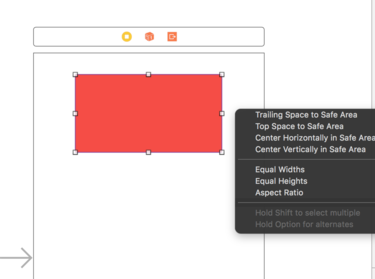
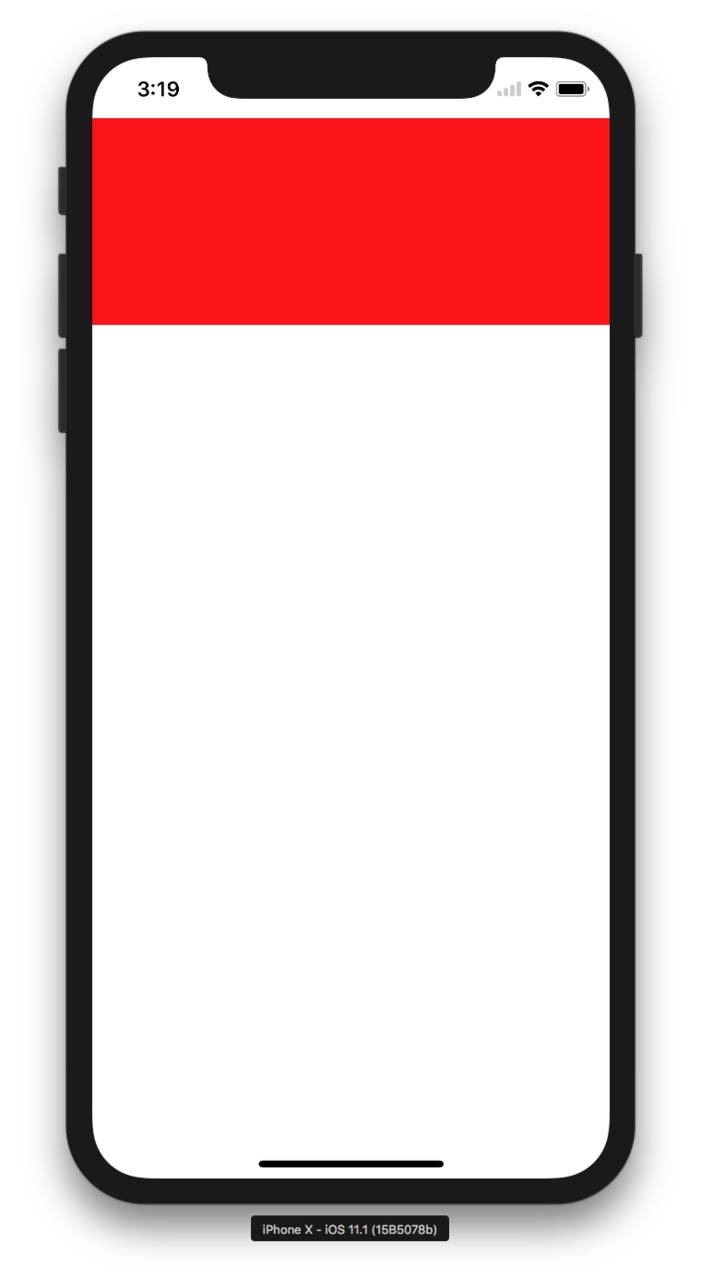
所以,使用 Auto Layout 布局的话,safe area 就相对于一个处于每个 view controller 的视图层级底层的容器,我们的子控件只需要和它建立约束关系,就可以完美适配 iPhone X 安全区域
Programming with Safe Area
如果使用代码进行布局,对于 safe area 适配也不会复杂。iOS 11 中 UIView 的新 API SafeAreaInsets 和 UIViewController 的新 API additionalSafeAreaInsets 能够很方便地解决代码布局的适配问题。
var safeAreaInsets: UIEdgeInsets { get }
You might use this property at runtime to adjust the position of your view's content programmatically.
Example:
override func viewDidLayoutSubviews() {
super.viewDidLayoutSubviews()
let insets = self.view.safeAreaInsets
self.bottomButton.frame = CGRect(x: 0, y: self.view.frame.size.height - 80 - insets.bottom, width: self.view.frame.size.width, height: 80)
}
另一个新的 API additionalSafeAreaInsets 则提供给开发人员能够自主扩展 safe area 区域的能力。顾名思义,如果对这个属性主动赋值,那么整个视图的 safe area 区域便会发生变化。
var additionalSafeAreaInsets: UIEdgeInsets { get set }
Use this property to adjust the safe area insets of this view controller's views by the specified amount. The safe area defines the portion of your view controller's visible area that is guaranteed to be unobscured by the system status bar or by an ancestor-provided view such as the navigation bar.
You might use this property to extend the safe area to include custom content in your interface. For example, a drawing app might use this property to avoid displaying content underneath tool palettes.
Example:
override func viewDidAppear(_ animated: Bool) {
super.viewDidAppear(animated)
print("Origin SafeAreaInsets :" + "\(self.view.safeAreaInsets)")
self.additionalSafeAreaInsets = UIEdgeInsetsMake(5, 5, 5, 5)
print("view controller's additionalSafeAreaInsets set to " + "\(self.additionalSafeAreaInsets)")
print("Adjusted SafeAreaInsets :" + "\(self.view.safeAreaInsets)")
}
控制台输出如下
Origin SafeAreaInsets :UIEdgeInsets(top: 88.0, left: 0.0, bottom: 34.0, right: 0.0)
view controller's additionalSafeAreaInsets set to UIEdgeInsets(top: 5.0, left: 5.0, bottom: 5.0, right: 5.0)
Adjusted SafeAreaInsets :UIEdgeInsets(top: 93.0, left: 5.0, bottom: 39.0, right: 5.0)
需要注意,在不同状态,例如竖屏和横屏下,获取到的 SafeAreaInsets 是不同的,对于 ViewController 来说,大概符合以下的规则:
//竖屏
SafeAreaInsets = (top: heightForTopBars + additionalSafeAreaInsets.top,
left: 0 + additionalSafeAreaInsets.left,
bottom: heightForBottomBars + additionalSafeAreaInsets.bottom,
right: 0 + additionalSafeAreaInsets.right)
//横屏
SafeAreaInsets = (top: heightForTopBars + additionalSafeAreaInsets.top,
left: StatusBarHeight + additionalSafeAreaInsets.left,
bottom: HomeIndicatorAreaHeight + additionalSafeAreaInsets.bottom,
right: StatusBarHeight + additionalSafeAreaInsets.right)
SafeAreaInsets 调用时机问题
If the view is not currently installed in a view hierarchy, or is not yet visible onscreen, the edge insets in this property are 0.
时刻记住,SafeAreaInsets 并不是随时都能获取到的。 苹果的解释是在视图显示在屏幕上或者装载到一个视图层级中的时候,才能正确获取到 SafeAreaInsets,否则返回0。
例如在一个 view controller 的生命周期中追踪 self.view.safeAreaInsets 得到的结果:
ViewController loadView() SafeAreaInsets :UIEdgeInsets(top: 0.0, left: 0.0, bottom: 0.0, right: 0.0)
ViewController viewDidLoad() SafeAreaInsets :UIEdgeInsets(top: 0.0, left: 0.0, bottom: 0.0, right: 0.0)
ViewController viewWillAppear() SafeAreaInsets :UIEdgeInsets(top: 0.0, left: 0.0, bottom: 0.0, right: 0.0)
ViewController viewDidLayoutSubviews() SafeAreaInsets :UIEdgeInsets(top: 44.0, left: 0.0, bottom: 34.0, right: 0.0)
ViewController viewDidAppear() SafeAreaInsets :UIEdgeInsets(top: 44.0, left: 0.0, bottom: 34.0, right: 0.0)
控制器根视图
For the view controller's root view, the insets account for the status bar, other visible bars, and any additional insets that you specified using the additionalSafeAreaInsets property of your view controller.
对于 view controller 的根视图,SafeAreaInsets 会根据各种 bar 的高度,以及开发者自己设置的 additionalSafeAreaInsets 属性来计算。
其他
For other views in the view hierarchy, the insets reflect only the portion of the view that is covered. For example, if a view is entirely within the safe area of its superview, the edge insets in this property are 0.
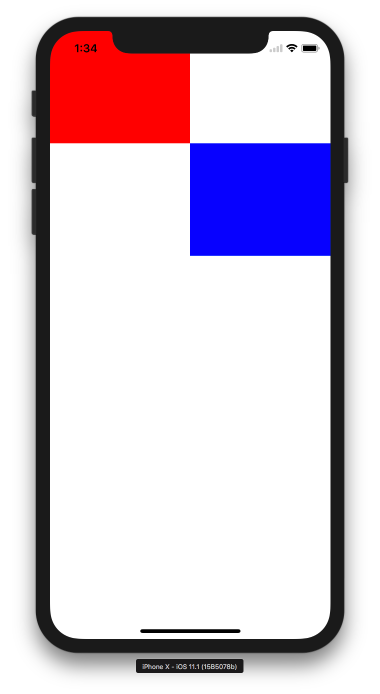
对于其他的视图,苹果的说法是只有当视图存在一部分被非安全区域遮挡的情况下,SafeAreaInsets 才会返回相应的值。如果整个视图已经处于安全区域中,那么 SafeAreaInsets 返回 zero。
// Blue View SafeAreaInsets
UIEdgeInsets(top: 0.0, left: 0.0, bottom: 0.0, right: 0.0)
// Red View SafeAreaInsets
UIEdgeInsets(top: 88.0, left: 0.0, bottom: 0.0, right: 0.0)
Home Indicator
Home indicator 的设置类似于 prefersStatusBarStyle,iOS 11 增加了 UIViewController 的一个 UIHomeIndicatorAutoHidden 分类来控制 home 键的自动隐藏。通常在全屏播放视频,全屏游戏等场景下会需要用到此特性。
@interface UIViewController (UIHomeIndicatorAutoHidden)
// Override to return a child view controller or nil. If non-nil, that view controller's home indicator auto-hiding will be used. If nil, self is used. Whenever the return value changes, -setNeedsHomeIndicatorAutoHiddenUpdate should be called.
- (nullable UIViewController *)childViewControllerForHomeIndicatorAutoHidden API_AVAILABLE(ios(11.0)) API_UNAVAILABLE(watchos, tvos);
// Controls the application's preferred home indicator auto-hiding when this view controller is shown.
- (BOOL)prefersHomeIndicatorAutoHidden API_AVAILABLE(ios(11.0)) API_UNAVAILABLE(watchos, tvos);
// This should be called whenever the return values for the view controller's home indicator auto-hiding have changed.
- (void)setNeedsUpdateOfHomeIndicatorAutoHidden API_AVAILABLE(ios(11.0)) API_UNAVAILABLE(watchos, tvos);
@end
iPhone X: Dealing with Home Indicator
需要注意 prefersHomeIndicatorAutoHidden,苹果官方并不确保这个重写这个方法一定可以让 home indicator 自动隐藏。
Discussion
Override this method to signal your preference for displaying the visual indicator. The system takes your preference into account, but returning true is no guarantee that the indicator will be hidden.
值得一提的是,苹果并没有提供可以手动改变 home indicator 颜色的接口给开发者。因为苹果并不希望我们手动更改 home indicator 的颜色,而应该遵循其自动切换颜色的特性(Home indicator 会根据底色的不同自动切换黑色或白色)。
其他
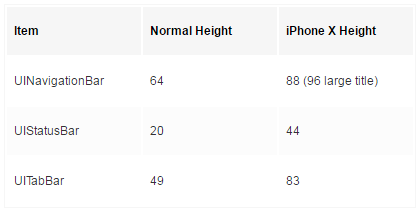
Some Height
Reference

