怎么画高大上的神经网络结构?试试这个!
【导读】现在这年头,做深度学习的,如果不在自己的文章里画一个神经网络结构图,都不好意思出门跟人说话。今天小编给大家介绍一个工具,让你简单又快速的搞定神经网络结构图:PlotNeuralNet。
Github 地址:
https://github.com/HarisIqbal88/PlotNeuralNet
编辑报道:
专知-huaiwen
「工具简介」
PlotNeuralNet工具,具如其名,plot neural net用的,首先我们看看效果:
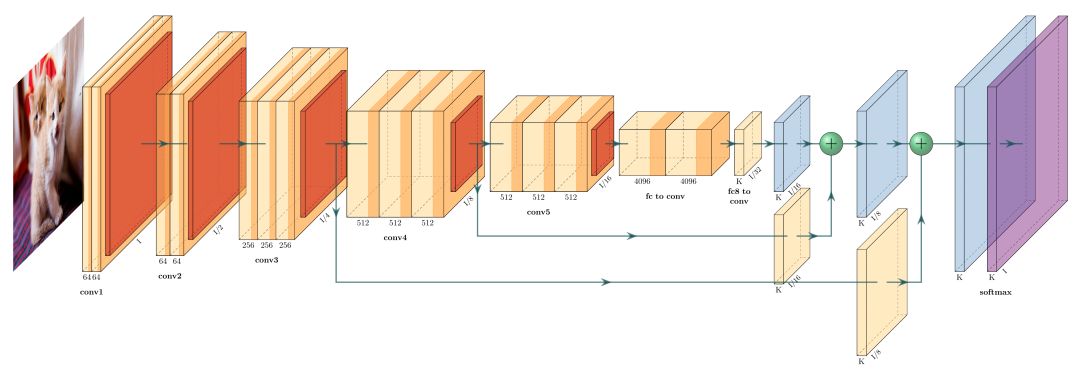
FCN-8
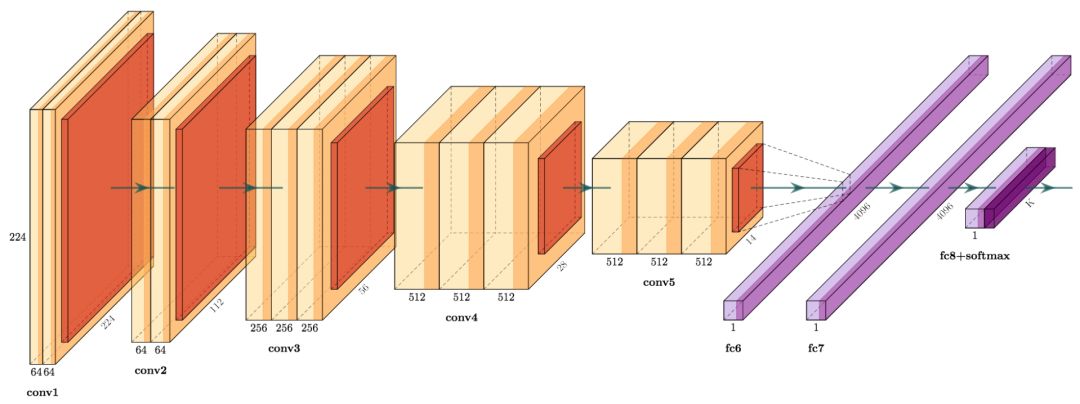
VGG-16
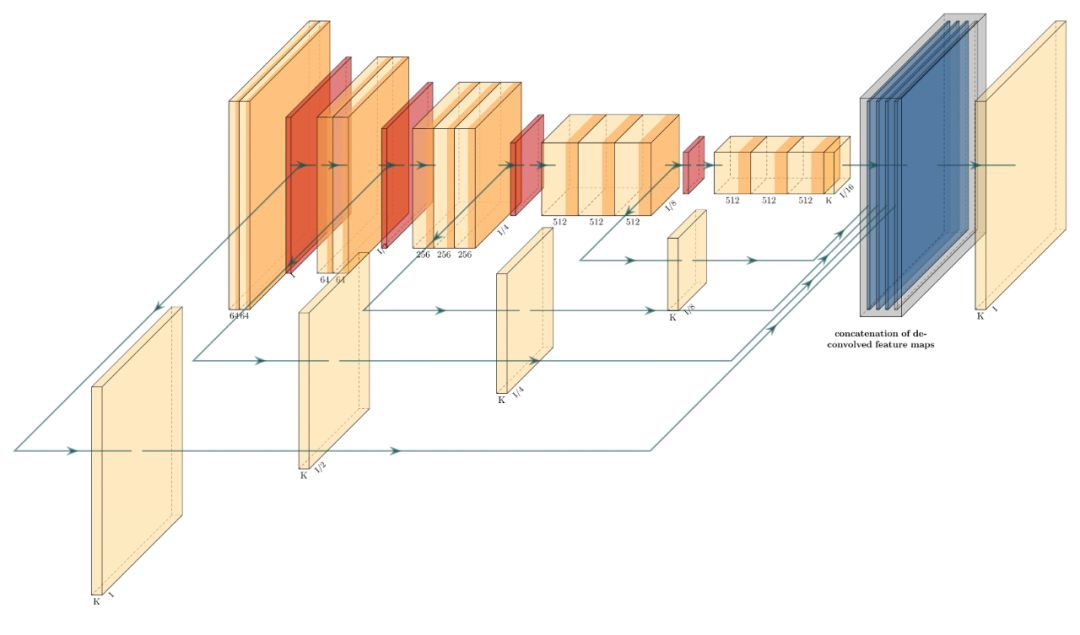
Holistically-Nested Edge Detection
「安装使用」
PlotNeuralNet的使用方法非常简单,首先将这个项目克隆下来:
git clone https://github.com/HarisIqbal88/PlotNeuralNet
然后,你可以自己写一个python脚本,想要用什么结构,就从PlotNerualNet里找对应的模块,然后,把它们拼起来就行, 好比UNet:
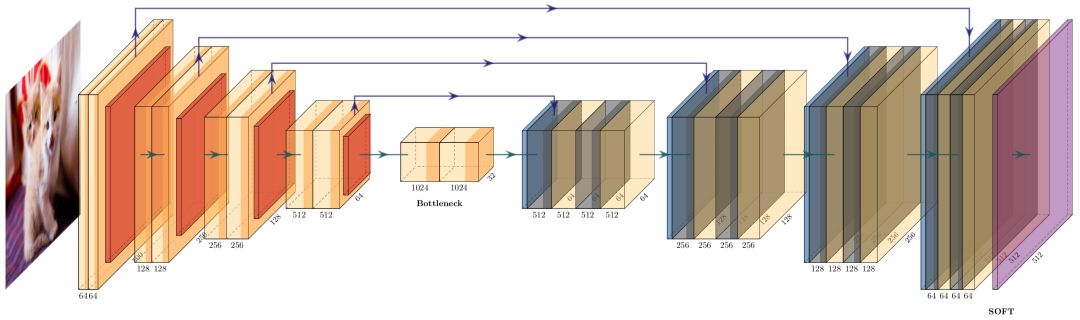
你只需要按部就班的堆:
import sys
sys.path.append('../')
from core.tikzeng
import *from core.blocks  import *

arch = [
    to_head('..'),
    to_cor(),
    to_begin(),
    #input
    to_input( '../examples/fcn8s/cats.jpg' ),

    #block-001
    to_ConvConvRelu( name='ccr_b1', s_filer=500, n_filer=(64,64), offset="(0,0,0)", to="(0,0,0)", width=(2,2), height=40, depth=40  ),
    to_Pool(name="pool_b1", offset="(0,0,0)", to="(ccr_b1-east)", width=1, height=32, depth=32, opacity=0.5),

    *block_2ConvPool( name='b2', botton='pool_b1', top='pool_b2', s_filer=256, n_filer=128, offset="(1,0,0)", size=(32,32,3.5), opacity=0.5 ),
    *block_2ConvPool( name='b3', botton='pool_b2', top='pool_b3', s_filer=128, n_filer=256, offset="(1,0,0)", size=(25,25,4.5), opacity=0.5 ),
    *block_2ConvPool( name='b4', botton='pool_b3', top='pool_b4', s_filer=64,  n_filer=512, offset="(1,0,0)", size=(16,16,5.5), opacity=0.5 ),

    #Bottleneck
    #block-005
    to_ConvConvRelu( name='ccr_b5', s_filer=32, n_filer=(1024,1024), offset="(2,0,0)", to="(pool_b4-east)", width=(8,8), height=8, depth=8, caption="Bottleneck"  ),
    to_connection( "pool_b4", "ccr_b5"),

    #Decoder
    *block_Unconv( name="b6", botton="ccr_b5", top='end_b6', s_filer=64,  n_filer=512, offset="(2.1,0,0)", size=(16,16,5.0), opacity=0.5 ),
    to_skip( of='ccr_b4', to='ccr_res_b6', pos=1.25),
    *block_Unconv( name="b7", botton="end_b6", top='end_b7', s_filer=128, n_filer=256, offset="(2.1,0,0)", size=(25,25,4.5), opacity=0.5 ),
    to_skip( of='ccr_b3', to='ccr_res_b7', pos=1.25),
    *block_Unconv( name="b8", botton="end_b7", top='end_b8', s_filer=256, n_filer=128, offset="(2.1,0,0)", size=(32,32,3.5), opacity=0.5 ),
    to_skip( of='ccr_b2', to='ccr_res_b8', pos=1.25),

    *block_Unconv( name="b9", botton="end_b8", top='end_b9', s_filer=512, n_filer=64,  offset="(2.1,0,0)", size=(40,40,2.5), opacity=0.5 ),
    to_skip( of='ccr_b1', to='ccr_res_b9', pos=1.25),

    to_ConvSoftMax( name="soft1", s_filer=512, offset="(0.75,0,0)", to="(end_b9-east)", width=1, height=40, depth=40, caption="SOFT" ),
    to_connection( "end_b9", "soft1"),

    to_end()
    ]

def main():
    namefile = str(sys.argv[0]).split('.')[0]
    to_generate(arch, namefile + '.tex' )
if __name__ == '__main__':
    main()
赶紧试试吧!
-END-
专 · 知
专知《深度学习:算法到实战》课程全部完成!480+位同学在学习,现在报名,限时优惠!网易云课堂人工智能畅销榜首位!

欢迎微信扫一扫加入专知人工智能知识星球群,获取最新AI专业干货知识教程视频资料和与专家交流咨询!

请加专知小助手微信(扫一扫如下二维码添加),加入专知人工智能主题群,咨询《深度学习:算法到实战》课程,咨询技术商务合作~

请PC登录www.zhuanzhi.ai或者点击阅读原文,注册登录专知,获取更多AI知识资料!
点击“阅读原文”,了解报名专知《深度学习:算法到实战》课程
展开全文