使用plt.contour 绘制配准后图像的形变场(Deformation Field)

- 2019-3-17 更新
第一次写博客,写得不够好,还存在一些问题,而且仅提供了一个函数,没有测试代码,在此做一下纠正与补充。我之前写的绘制变形场是在PyTorch框架下的一个函数,对于其他框架的不够友好,这次我修改成使用numpy的函数,方便大家使用。
下面直接奉上修改后的代码:
import matplotlib.pyplot as plt
import numpy as np

def grid2contour(grid):
    '''
    grid--image_grid used to show deform field
    type: numpy ndarray, shape: (h, w, 2), value range:(-1, 1)
    '''
    assert grid.ndim == 3
    x = np.arange(-1, 1, 2/grid.shape[1])
    y = np.arange(-1, 1, 2/grid.shape[0])
    X, Y = np.meshgrid(x, y)
    Z1 = grid[:,:,0] + 2#remove the dashed line
    Z1 = Z1[::-1]#vertical flip
    Z2 = grid[:,:,1] + 2

    plt.figure()
    plt.contour(X, Y, Z1, 15, colors='k')
    plt.contour(X, Y, Z2, 15, colors='k')
    plt.xticks(()), plt.yticks(())#remove x, y ticks
    plt.title('deform field')
测试
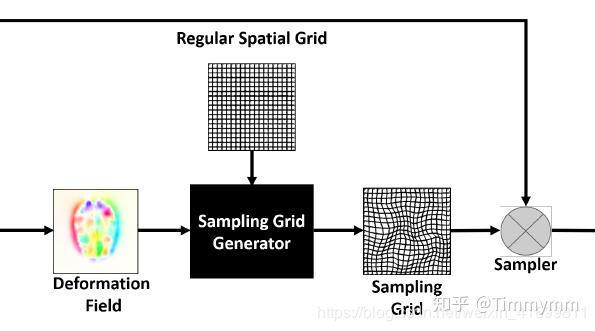
在图像配准中,将规则的空间网格,加上预测出的变形场,得到采样网格,对浮动图像(moving image)进行采样,即得预测的配准图像。这一过程牵涉到了变形场的可视化,具体流程示意图如下:

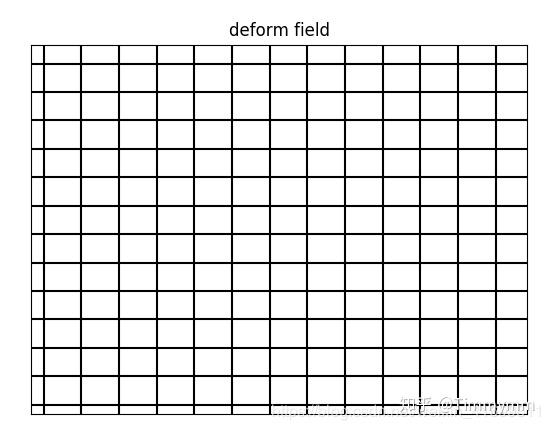
1,规则网格可视化测试代码:
img_shape = [40, 80]
x = np.arange(-1, 1, 2/img_shape[1])
y = np.arange(-1, 1, 2/img_shape[0])
X, Y = np.meshgrid(x, y)
regular_grid = np.stack((X,Y), axis=2)
grid2contour(regular_grid)
输出图像:

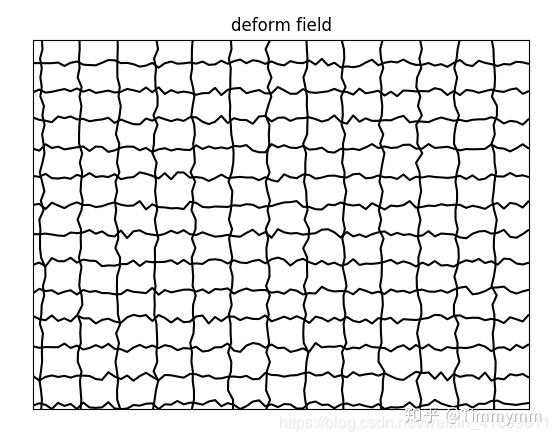
2,采样网格可视化测试代码:
rand_field = np.random.rand(*img_shape,2)
rand_field_norm = rand_field.copy()
rand_field_norm[:,:,0] = rand_field_norm[:,:,0]*2/img_shape[1]
rand_field_norm[:,:,1] = rand_field_norm[:,:,1]*2/img_shape[0]

sampling_grid = regular_grid + rand_field_norm
grid2contour(sampling_grid)
输出图像:

值得注意的三点:
1,使用规则网格(regular grid),对浮动图像进行采样得到的图像与浮动图像相同,而使用包含形变信息的采样网格(sampling grid),得到的是变形后的图像。如上两图示意。
2,grid2contour函数的输入grid,实际上是归一化的变形场(deformation field或者称为dense displacement vector field),归一化之前,其中的值,指的是对应坐标像素的位移。
3,之所以网格要进行归一化,将采样网格的值缩放到[-1, 1]之间,这是因为我沿用的PyTorch中grid_sample函数的规则,调用该函数时,输入的是deformation field,对应于上述代码中的rand_field_norm,它要求grid的值大部分的值在[-1, 1]之间,当x=-1,y=-1时,对应于图像的左上像素,而x=1,y=1,对应于图像的右下像素。原文如下:
grid should have most values in the range of [-1, 1]. This is because the pixel locations are normalized by the inputspatial dimensions. For example, values x = -1, y = -1 is the left-top pixel of input, and values x = 1, y =1 is the right-bottom pixel of input.
参考文献
1. 图片来自 Siyuan Shan, Wen Yan, Xiaoqing Guo, et al. Unsupervised End-to-end Learning for Deformable Medical Image Registration. arXiv:1711.08608v2 [cs.CV], 2018. arXiv: 1711.08608v2.
2,pytorch grid_sample(): https://pytorch.org/docs/stable/nn.html#grid-sample
版权说明
原文作者为本人,首发于我的CSDN博客,如有兴趣了解更多配准相关的内容,请移步本人的博客。
以下内容,你可能感兴趣:
- 我的GitHub仓库(Timmy-Fang/Deformable-Image-Registration-Projects)
- 我的bilibili视频(配准讲解视频已上传,关注我的B站账号:
方便及时获取更新内容,谢谢~)